
Are you tired of the never-ending group chat discussions that go in circles without reaching a clear consensus? With the iMessage app on your iPhone or iPad, you can avoid this frustration by creating polls to gather opinions and make decisions more efficiently. Whether it’s choosing a restaurant for a group dinner or deciding on a meeting time, iMessage polls can simplify the process and ensure everyone’s voice is heard.
To create a poll in iMessage, follow these simple steps:
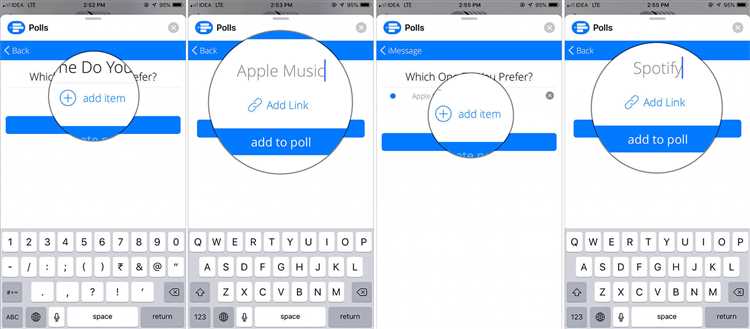
- Open the iMessage app and select the group chat or individual you want to create a poll for.
- Type your question or topic for the poll in the message field.
- Tap on the App Store icon next to the message field.
- Scroll through the available apps and select “Polls” from the list.
- Choose the type of poll you want to create: Multiple Choice, Yes/No, or Emoji.
- Add the options for the poll you want to create.
- Customize the appearance of the poll by adding a title and changing the colors.
- Tap the “Create” button to generate the poll.
- Your poll will now appear in the iMessage thread, and participants can vote on their preferred option.
- Once everyone has voted, you can view the results by tapping on the poll.
Creating polls in iMessage is a convenient and easy way to gather opinions and make decisions as a group. By following these step-by-step instructions, you’ll be able to create and manage polls effortlessly. So next time you find yourself stuck in an indecisive conversation, remember that iMessage polls can help you reach a consensus quickly and efficiently.
Disclaimer: iMessage polls are only available for devices running iOS 14 or later. Make sure your device is updated to the latest version to access this feature.
How to Create Polls in iMessage: Step-by-Step Guide
iMessage is a popular messaging app for Apple devices that allows users to send text messages, photos, videos, and even play games with their friends. One of the great features of iMessage is the ability to create polls to gather opinions or make decisions with a group of people. Here is a step-by-step guide on how to create polls in iMessage.
Step 1: Open the iMessage App
Open the iMessage app on your device by tapping on the green speech bubble icon with a white messaging icon inside.
Step 2: Select a Conversation
Select a conversation with the person or group of people you want to create a poll with by tapping on the contact or group name.
Step 3: Tap on the App Store Icon
In the conversation, tap on the App Store icon located next to the text input field. It resembles an “A” inside a white circle.
Step 4: Search for a Poll App
In the App Store, search for a poll app that allows you to create and share polls in iMessage. Some popular poll apps include “Polly” and “Simple Poll”.
Step 5: Install the Poll App
Once you have found a suitable poll app, tap on it to view more details. Then, tap on the “Get” or “Install” button to download and install the app on your device.
Step 6: Enable the Poll App in iMessage
After installing the poll app, go back to your conversation in iMessage. Tap on the “App Store” icon again and swipe left or right to find the poll app that you just installed. Tap on the app to open it.
Step 7: Create a Poll
Inside the poll app, you will find options to create a new poll. Tap on the “Create Poll” or similar button to start creating your poll. Give your poll a title and add the options for people to choose from.
Step 8: Share the Poll
Once you have created your poll, tap on the “Share” or “Send” button to share it with your selected contacts or groups. The poll will be sent as a message in the conversation.
Step 9: View and Monitor the Poll
The recipients of the poll can now view and vote on the options you provided. As the poll creator, you can monitor the results by opening the poll app and checking the votes.
Step 10: Close the Poll
When you are satisfied with the responses, you can close the poll by going back to the conversation in iMessage and tapping on the poll message. You may have an option to close the poll or stop receiving further votes.
Creating polls in iMessage can be a fun and useful way to gather opinions and make group decisions. Follow these step-by-step instructions to create your own polls and engage with your friends or colleagues in a new and interactive way.
Setting Up iMessage Polls
Creating polls within iMessage is a convenient way to gather opinions and make decisions with friends and family. With the latest updates, iMessage now offers built-in poll functionalities. Follow the steps below to set up iMessage polls on your device.
- Open iMessage: Launch the iMessage app on your iPhone or iPad.
- Create a new message: Tap on the new message icon, usually found at the top right corner of the screen.
- Add recipients: Select the person or group you want to send the poll to by typing their name or selecting them from your contacts list.
- Type your question: In the text field, enter your poll question to gather opinions from your recipients. For example, “Where should we go for dinner tonight?”
- Add poll options: Tap on the “+” icon next to the text field to add poll options. You can add as many options as you need by tapping on the “+” icon repeatedly.
- Customize poll options: If you want to assign specific names or details to each option, tap on the option and edit the text accordingly.
- Choose a style: iMessage offers different visual styles for your poll options. Swipe left or right to browse through the available styles and select the one that suits your preference.
- Send the poll: Once you have entered your question and added poll options, tap on the send button to share the poll with your recipients.
- View poll results: After your recipients have voted, you can view the results by tapping on the poll in the conversation window. iMessage will display a visual representation of the votes received for each option.
With iMessage polls, you can easily gather feedback, make group decisions, and keep everyone involved in the conversation. It’s a seamless way to ensure everyone’s voice is heard and help choose the best option for your plans.
Note: iMessage polls require both parties to have an Apple device with compatible software versions. Make sure your device is updated to the latest iOS or iPadOS version to access this feature.
Choosing Poll Options
When creating a poll in iMessage, you’ll need to decide on the options that participants can choose from. These options should be thoughtfully crafted to ensure that they clearly represent the different choices or possibilities that you want to gather opinions on.
Consider the following tips when choosing poll options:
- Be clear and concise: Each option should be easily understandable and avoid any ambiguity. Use straightforward language that clearly states the different choices.
- Include all relevant choices: Make sure to include all the options that are relevant to the poll question. Ensure that each choice encompasses the full range of possibilities or opinions related to the topic.
- Avoid bias: Be mindful of any wording that might introduce bias or influence the participant’s decision. Aim for neutral and objective wording to ensure unbiased results.
- Limit the number of options: While it’s essential to include all relevant choices, too many options can overwhelm participants. Try to keep the number of options reasonable and manageable.
- Use consistent formatting: Maintain a consistent format for all options, such as using matching capitalization or punctuation. This helps to keep the poll visually organized and easy to read.
By following these guidelines, you can create poll options that are clear, comprehensive, and unbiased, leading to more accurate and insightful results from your iMessage poll.
Customizing Poll Appearance
Once you have created a poll in iMessage, you can further customize its appearance by following these steps:
- Change the Poll Title: To change the title of your poll, tap on the “Edit” button next to the title. Type in the new title and tap “Done” to save the changes.
- Add Descriptions: If you want to provide additional information about the poll, tap on the “Add a description” option. This will open a text field where you can type in your description. Tap “Done” to save it.
- Include Images: To add images to your poll, tap on the image icon located at the bottom right corner of the poll. This will open your photo library, where you can select the desired image. Once chosen, tap “Done” to include it in the poll.
- Change Poll Options: You can modify the poll options by tapping on the “Edit” button next to the options. From here, you can rearrange the order of the options or add/remove options as needed.
- Set a Poll Expiry: To set an expiry date for your poll, tap on the clock icon located at the bottom right corner of the poll. Choose the desired date and time and tap “Done” to save the expiry.
- Change Theme: iMessage allows you to change the theme of your poll. Tap on the color palette icon located at the top right corner of the poll. A menu with different theme options will appear. Choose the desired theme to apply it to your poll.
By customizing the appearance of your poll, you can make it more visually appealing and engaging for participants. Experiment with different options to create a poll that suits your preferences and requirements.
Sharing Polls with Friends
After creating a poll in iMessage, you can easily share it with your friends to get their opinions or have some fun. Here’s how:
- Open the iMessage app on your iPhone or iPad.
- Select the conversation with the friend or group you want to share the poll with.
- Tap on the text input field to bring up the keyboard.
- Tap on the App Store icon next to the text input field to open the iMessage apps drawer.
- Swipe left or right to find the “Polls” icon and tap on it.
- You will see a list of polls you’ve created. Find the poll you want to share and tap on it.
- A preview of the poll will appear. You can add a message or description if you want.
- Tap on the “Send” button to share the poll with your friends.
Your friends will receive the poll in the conversation and will be able to vote by tapping on their chosen option. The results will be updated in real-time, so everyone can see how the votes are going.
Alternatively, you can also share the poll outside of iMessage by tapping on the “Share” button below the poll preview. This allows you to send the poll via other apps like email or social media.
Sharing polls with friends is a great way to gather opinions and make decisions together. Whether it’s choosing a restaurant for dinner or deciding on a movie to watch, iMessage polls make it easy and fun to get everyone involved!
Tracking Poll Results
Once you have created a poll in iMessage, you can easily track the results and see how people are voting. Here are the steps to track poll results:
- Open the iMessage app on your iPhone or iPad.
- Go to the conversation where you created the poll.
- Scroll up to find the poll you want to track.
- Tap on the poll to open it.
- You will see the poll question and the options listed below it.
- Under each option, you will see the number of votes that option has received.
- If you want to see who has voted for each option, tap on the option and a list of names will appear.
- To close the poll and see the final results, tap on the “Close” button at the top right corner of the screen.
- You will now see the final results of the poll, with the percentage of votes for each option.
- If you want to share the poll results with the participants, tap on the share button next to the poll results.
- You can choose to send the results as a message, email, or any other compatible sharing option.
Tracking poll results in iMessage is a simple and convenient way to gather feedback and insights from your friends and contacts. With the ability to see the number of votes and the percentage of votes for each option, you can easily analyze the data and make informed decisions.
Analyzing Poll Data
Once you have collected poll data from your iMessage polls, it’s important to analyze the results to gain insights and make informed decisions. Here are some steps to help you analyze poll data:
- Compile and organize the data: Gather all the poll responses and compile them in a central location. Organize the data in a way that is easy to analyze, such as a table or spreadsheet.
- Identify key metrics: Determine the key metrics or variables that you want to analyze. This could include things like the percentage of respondents who chose each option, average ratings, or trends over time.
- Visualize the data: Create charts, graphs, or visual representations of the data to make it easier to understand and identify patterns. Visualizations can be helpful in identifying trends and making comparisons.
- Calculate percentages: Calculate the percentage of respondents who chose each option in the poll. This can give you a clear understanding of the distribution of responses.
- Look for patterns and trends: Analyze the data for any patterns or trends that may emerge. This could include identifying popular options, preferences based on demographic information, or changes in responses over time.
- Compare with previous data: If you have previous poll data, compare the new results with the old to identify any changes or trends over time. This can provide valuable insights into shifts in opinions or preferences.
- Draw conclusions: Based on the analysis, draw conclusions about the poll results. Identify any insights or key findings that can inform decision-making or guide further research.
- Make data-driven decisions: Use the analyzed poll data to make data-driven decisions. Consider the insights gained from the analysis and integrate them into your decision-making processes.
By following these steps, you can make the most out of your poll data and harness its power to inform your decision-making processes. Remember to consider the limitations of your data and approach the analysis with a critical mindset.
Deleting or Updating Polls
In iMessage, you have the option to delete or update a poll that you have created. Follow the steps below to learn how to perform these actions:
- To delete a poll, open the conversation where the poll was created.
- Locate the poll message and long-press on it.
- A menu will appear with various options. Tap on “Delete” to remove the poll from the conversation.
If you want to update a poll, you will need to delete the existing poll and create a new one with the updated options. Follow the steps below:
- Open the conversation where the poll was created.
- Locate the poll message and long-press on it.
- Tap on “Delete” to remove the poll from the conversation.
- Create a new poll using the steps mentioned in the previous section.
By following these steps, you can easily delete or update polls in iMessage to keep your conversations organized and up-to-date.
Tips for Effective Polling
1. Clearly define the purpose of the poll: Before creating a poll, it is important to have a clear understanding of what you want to achieve. Define the purpose and objectives of the poll so that you can create relevant and focused questions.
2. Keep it short and simple: People have limited attention spans, so try to keep your poll as short and simple as possible. Avoid using complex or lengthy questions that might confuse respondents. Stick to the main points and keep the options concise.
3. Use clear and neutral language: Make sure your questions and answer options are easy to understand and do not contain any biased language. Using neutral language will help to ensure that all respondents interpret the questions in the same way and provide more accurate responses.
4. Offer a variety of answer options: When creating the poll, try to provide a range of answer options that cater to different perspectives and opinions. This will allow respondents to choose options that best reflect their views, leading to more accurate and representative results.
5. Add an “other” option: Including an “other” option in your poll can be useful when respondents’ answers do not fit within the given options. This allows them to provide their own response and ensures that their opinion is included in the analysis.
6. Randomize answer options: If you are creating a multiple-choice poll, consider randomizing the order of the answer options. This helps to prevent any potential bias caused by the order of the options and ensures that respondents are not influenced by the position of the options.
7. Test your poll: Before sending out your poll, test it with a small group of people to ensure that it is working correctly and that the questions are clear. This will give you an opportunity to make any necessary adjustments before distributing the poll to a larger audience.
8. Promote participation: Increase the likelihood of participation by promoting your poll through various channels, such as social media, email, or your website. Clearly communicate the benefits of participating and explain how the results will be used to motivate people to take part in the poll.
9. Analyze and use the results: After collecting the responses, take the time to analyze the results and extract meaningful insights. Use the results to inform decision-making, identify trends, and improve your understanding of the topic at hand.
10. Provide feedback: Share the results of the poll with the participants to show appreciation for their contribution and to keep them engaged. Providing feedback can also help to maintain transparency and build trust with your audience.
FAQ:
Can I create polls in iMessage?
Yes, you can create polls in iMessage using the poll feature.
Can I customize the answer options in iMessage polls?
Yes, you can customize the answer options in iMessage polls. When creating a poll, you can add or remove answer options according to your preference.