
Recording live conversations on your iPhone can be a useful tool in a variety of situations, whether you want to capture an important business meeting, keep a record of an interview, or simply save a memorable conversation with friends or family. In this step-by-step guide, we will walk you through the process of recording live conversations on your iPhone, making it easy for you to capture and revisit those important moments.
Step 1: Ensure that you have a compatible iPhone model. Most iPhones have a built-in voice memo app that allows you to record audio. To check if your iPhone has this app, simply search for it on your home screen. If you can’t find it, you may need to download it from the App Store.
Step 2: Open the voice memo app. Once you have located the app on your iPhone, open it up by tapping on the icon. This will take you to the main screen of the app, where you will see a large microphone button and a list of your previous recordings.
Step 3: Position your iPhone near the conversation. To ensure clear audio recording, place your iPhone close to the conversation you want to record. If possible, try to position it in such a way that the microphone is facing the direction of the speakers. This will help minimize background noise and ensure that the conversation is captured clearly.
Note: It is important to obtain the consent of all parties involved before recording a live conversation. Depending on your location, there may be legal implications for recording conversations without the consent of all parties. Always ensure that you are following the laws and regulations of your jurisdiction.
Step 4: Start recording. Once you have positioned your iPhone appropriately, tap on the large microphone button on the voice memo app to begin recording. The button will turn red, indicating that the app is actively recording audio. Make sure to keep an eye on the timer at the top of the screen to monitor the length of your recording.
Step 5: Finish and save your recording. When you are ready to finish recording, simply tap the microphone button again, and it will stop recording. The recording will then be saved in your voice memo app, where you can access and play it back at any time. You can also rename the recording for easier identification.
By following these simple steps, you can easily record live conversations on your iPhone and have a convenient way to capture and revisit important moments. Just remember to always obtain consent and ensure that you are following any legal requirements in your jurisdiction regarding recording conversations.
Choose a Reliable Recording App
When it comes to recording live conversations on your iPhone, there are several apps available to choose from. It’s important to select a reliable recording app that suits your specific needs and preferences. Here are some factors to consider when making your decision:
- Compatibility: Ensure that the recording app is compatible with your iPhone model and operating system. Check the app’s description in the App Store to see if it supports your device.
- User Interface: Look for an app with a user-friendly interface that is easy to navigate. A cluttered or confusing interface can make it difficult to use the app effectively.
- Recording Quality: Consider the quality of the recordings produced by the app. Look for an app that provides clear and high-quality sound recordings.
- Features: Evaluate the features offered by the recording app. Some apps may offer advanced features such as noise reduction, voice activation, or transcription services. Determine which features are important to you.
- Privacy and Security: Look for an app that prioritizes privacy and security. Check if the app encrypts your recordings and if it offers any password protection or other security measures.
- Reviews and Ratings: Read user reviews in the App Store or on trusted review websites to get an idea of other users’ experiences with the app. Look for apps with high ratings and positive reviews.
Take your time to research and compare different recording apps to find the one that best fits your needs. Once you’ve chosen a reliable recording app, you’ll be ready to start capturing and saving those important conversations on your iPhone.
Grant Microphone Access to the App
Before you can start recording live conversations on your iPhone, you will need to grant microphone access to the app you plan to use. Without this access, the app will not be able to capture the audio during your conversations.
Here is a step-by-step guide to granting microphone access:
- Open the Settings app on your iPhone.
- Scroll down and tap on the Privacy option.
- In the Privacy menu, select the Microphone option.
- You will see a list of apps that have requested microphone access. Look for the app you plan to use for recording live conversations.
- Toggle the switch next to the app to enable microphone access. The switch should turn green when it is enabled.
Once you have granted microphone access to the app, you will be able to start recording live conversations on your iPhone. Make sure to follow any additional instructions provided by the app to ensure a successful recording.
It is important to note that recording live conversations without the consent of all parties involved may be illegal in some jurisdictions. Always make sure to understand and comply with the laws and regulations regarding audio recording in your area.
Check the Recording Settings
Before you start recording a live conversation on your iPhone, it’s important to check the recording settings to ensure that everything is properly set up. Follow these steps:
- Open the Settings app on your iPhone.
- Scroll down and tap on the “Control Center” option.
- Tap on “Customize Controls”.
- Scroll down until you find the “Voice Memos” option.
- If the “Voice Memos” option is not included in the “Include” list, tap on the green plus button next to it to add it.
- Once the “Voice Memos” option is added, you can rearrange the order by dragging the handle next to it.
- Exit the Settings app.
Now that you have added the “Voice Memos” option to your Control Center, you can easily access the Voice Memos app and start recording your live conversations.
Test the Recording Function
After enabling the Live Conversation recording feature on your iPhone, it’s important to ensure that it’s working properly before you need to use it. Here’s how you can test the recording function:
- Open the Voice Memos app on your iPhone.
- Tap on the red record button to start a new recording.
- Speak into the microphone clearly and audibly.
- After a few seconds, tap the stop button to end the recording.
- Saved recordings will appear in the list of available Voice Memos.
- Tap on the recording you just made to listen to it.
If you are able to hear your recorded voice clearly, it means that the recording function is successfully working on your iPhone. Make sure to check the volume of your device and the placement of the microphone to ensure optimal recording quality.
Position Your iPhone Properly
When recording live conversations on your iPhone, it is important to position your device properly to ensure optimal audio quality. Here are some tips on how to position your iPhone:
- Place your iPhone on a stable surface: To avoid any unnecessary movement or vibrations, it is recommended to place your iPhone on a stable surface such as a table or a desk. Make sure the surface is level and secure to prevent any accidental falls.
- Keep the microphone close: The microphone on your iPhone is usually located at the bottom of the device, near the charging port. Ensure that the microphone is not obstructed and is facing in the direction of the conversation. Keeping the microphone close to the source of sound will result in clearer audio recordings.
- Minimize background noise: Try to find a quiet environment to record your conversations. Background noise can interfere with the clarity of the recording. If possible, use a separate room or a quiet corner to minimize distractions and ensure better audio quality.
- Use a tripod or a stand: If you plan on recording for an extended period or need to use both hands during the conversation, consider using a tripod or stand to hold your iPhone. This will help maintain a consistent position and prevent any unintentional movements that may affect the recording.
- Consider using an external microphone: If you frequently record live conversations, investing in an external microphone can greatly improve the audio quality of your recordings. There are various options available, including wired and wireless microphones that can be easily connected to your iPhone.
Remember, properly positioning your iPhone plays a crucial role in capturing clear and accurate recordings of live conversations. Take the time to set up your device correctly and make necessary adjustments before you start recording.
Start Recording the Conversation
Once you have chosen the appropriate recording app and prepared your phone for recording, you are ready to start capturing your live conversation. Here are the steps to follow:
- Ensure that everyone involved in the conversation is aware that it is being recorded and has given their consent.
- Open the recording app on your iPhone.
- Familiarize yourself with the app’s interface and settings before starting the recording.
- Position your iPhone in a stable place where it can capture the audio clearly. You can use a holder or stand to keep it steady.
- Adjust the microphone sensitivity or any other recording settings according to your preference and the environment.
- When ready, tap the “Record” button to start the recording. Some apps may have a countdown before starting.
- Position yourself and the other participants in such a way that the iPhone’s microphone can capture all voices clearly.
- Make sure to speak clearly and at an audible volume for better recording quality.
- During the conversation, monitor the recording app to ensure that it continues to capture the audio properly and that there are no technical issues.
- Once the conversation is over, tap the “Stop” or “End” button in the recording app to halt the recording.
Remember to save the recorded conversation in a safe location on your iPhone or transfer it to a more secure storage location to prevent accidental deletion or loss.
Monitor the Recording
Once you have started the recording on your iPhone, you can monitor the audio in real-time to ensure that everything is being captured correctly. Here are a few ways to monitor the recording:
- Use headphones: Plug in a pair of headphones into your iPhone to listen to the audio as it is being recorded. This will allow you to hear any background noise or other issues that may affect the quality of the recording.
- Check the recording levels: While the recording is in progress, you can check the recording levels on the screen. The levels should remain within a certain range to ensure optimal audio quality. Adjust the input volume on your iPhone if necessary.
- Keep an eye on the timer: The timer on the screen will show you how long the recording has been in progress. This can be helpful for keeping track of the duration of the conversation and ensuring that you do not run out of storage space on your iPhone.
It is important to continuously monitor the recording to ensure that you are capturing the conversation accurately. This will help you avoid any potential issues or problems that may arise during the recording process.
Save and Share the Recording
Once you have finished recording your live conversation on your iPhone, you will want to save and share the recording. Follow the steps below to do so:
- Tap on the “Done” button located in the top-right corner of the screen.
- A new screen will appear with options to save and share the recording. Tap on the “Save” button to save the recording to your iPhone’s local storage.
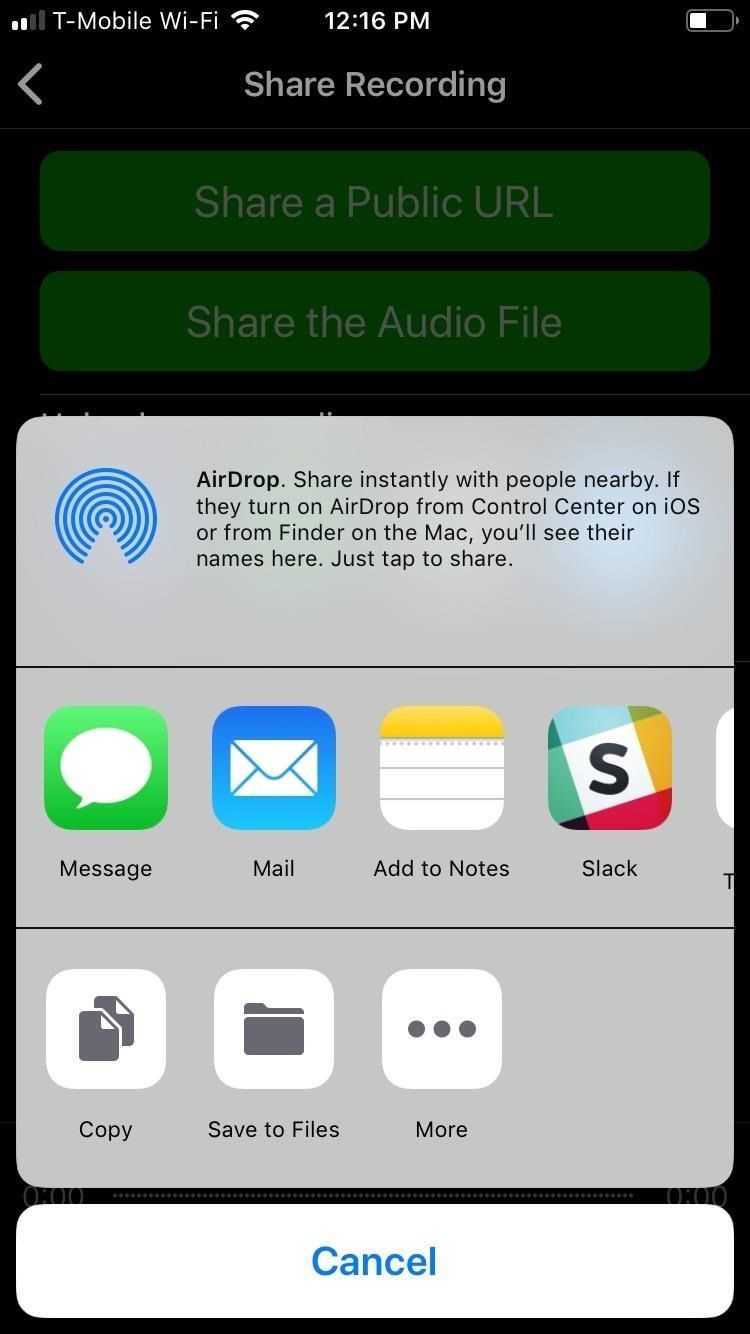
- If you want to share the recording with others, tap on the “Share” button. This will bring up a menu with various sharing options, such as sending the recording via email, message, or social media platforms.
- Choose the desired sharing option and follow the prompts to complete the sharing process. If you select the email option, for example, you will need to enter the recipient’s email address and add any additional message before sending.
Remember to respect the privacy of others and obtain their consent before sharing any recorded conversations. It is important to follow legal regulations and ethical guidelines when recording and sharing conversations. Always use the recording feature responsibly and in accordance with the law.
FAQ:
Can I record live conversations on my iPhone?
Yes, you can record live conversations on your iPhone using the built-in Voice Memos app or by using third-party apps.
Are there any third-party apps that can help me record live conversations on my iPhone?
Yes, there are several third-party apps available on the App Store that can help you record live conversations on your iPhone. Some popular options include Rev Call Recorder, TapeACall, and Call Recorder – IntCall.
Will the other person know if I am recording the conversation?
It depends on the laws of your country or state. In some places, it is illegal to record a conversation without the consent of all parties involved. It is important to familiarize yourself with the laws in your area before recording any conversations.
Can I share the recorded conversations with others?
Yes, you can share the recorded conversations from your iPhone with others. You can send them as audio files through email, messaging apps, or transfer them to your computer.
Is there a time limit for recording conversations on iPhone?
No, there is no time limit for recording conversations on iPhone using the Voice Memos app. However, some third-party apps may have limitations on the recording duration.