
Windows Essentials was a suite of free software applications released by Microsoft that included programs like Windows Live Mail, Movie Maker, and Photo Gallery. While these applications were popular among Windows users, Microsoft officially ended support for Windows Essentials in January 2017, and the software is no longer available for download.
If you have Windows Essentials installed on your computer and you no longer use or need these applications, you may want to uninstall them to free up space and remove any potential security risks. Uninstalling Windows Essentials is a straightforward process, but it’s important to follow the correct steps to ensure that your computer remains in good condition.
In this article, we will guide you through the process of uninstalling Windows Essentials from your computer. We’ll provide step-by-step instructions and highlight any important considerations or potential issues that you may encounter along the way. Whether you’re looking to uninstall Windows Essentials to free up space or simply no longer use the applications, this guide will help you navigate the process.
Reasons for Uninstalling Windows Essentials
There are several reasons why you may want to uninstall Windows Essentials from your computer. These include:
- Lack of Use: If you find that you rarely or never use the applications included in Windows Essentials, it may be unnecessary to keep them installed on your computer.
- Compatibility Issues: Windows Essentials may not be compatible with certain hardware or software configurations. If you experience compatibility issues or conflicts, uninstalling Windows Essentials may be a solution.
- Performance Concerns: Some users have reported that Windows Essentials, particularly Messenger, can consume system resources and slow down their computer. Uninstalling Windows Essentials may help improve system performance.
- Privacy Concerns: Windows Essentials applications like Messenger may collect and share personal information. If you have privacy concerns or prefer to limit the data collected by Microsoft, uninstalling Windows Essentials can help address these concerns.
Before uninstalling Windows Essentials, it is important to consider these factors and evaluate whether you truly need the applications included or if there are alternative solutions available that better fit your needs.
Preparing for Uninstallation
Before you uninstall Windows Essentials from your computer, it is important to take certain steps to ensure a smooth process. Here are some preparations you can make:
- Backup your data: Prior to uninstalling Windows Essentials, it is recommended to create a backup of any important files or data that are stored within the applications. This will prevent any loss of data in case something goes wrong during the uninstallation process.
- Check for alternative software: Windows Essentials includes a range of applications such as Windows Live Mail and Windows Live Messenger. Before uninstalling these applications, make sure to check if there are any alternative software options available that you can use to fulfill the same purpose.
- Save login information: If you use applications like Windows Live Mail or Windows Live Messenger, make sure to save any login information, such as usernames and passwords, as you may need them if you decide to switch to alternative software or reinstall Windows Essentials in the future.
- Review system requirements: Some applications within Windows Essentials may have specific system requirements. Before uninstalling, review the system requirements for any alternative software you plan to use to ensure that your computer meets those requirements.
- Consider user preferences: If you have customized any settings or preferences within Windows Essentials applications, take note of those preferences or make a list. This will help you recreate those settings if you decide to switch to alternative software.
By following these preparation steps, you can minimize any potential difficulties or data loss during the uninstallation process of Windows Essentials.
Step-by-Step Guide to Uninstalling Windows Essentials
Uninstalling Windows Essentials can be a straightforward process if you follow these step-by-step instructions:
- Open the Control Panel: Click on the Start button and then select “Control Panel” from the right-hand side menu.
- Open the Programs and Features window: In the Control Panel window, click on the “Programs” category and then select “Uninstall a program” under the “Programs and Features” section.
- Locate Windows Essentials: In the Programs and Features window, scroll through the list of installed programs and find “Windows Essentials.”
- Select Windows Essentials for uninstallation: Click on “Windows Essentials” to highlight it, and then click on the “Uninstall” button located above the list of installed programs.
- Confirm the uninstallation: A confirmation window will appear, asking if you want to uninstall Windows Essentials. Click “Yes” to proceed.
- Follow the uninstallation wizard: Windows will launch the Windows Essentials uninstallation wizard. Follow the on-screen instructions to complete the uninstallation process. You may be asked to confirm your choice and to specify whether you want to remove all related files and settings.
- Wait for the uninstallation to finish: The uninstallation process may take a few moments. Avoid interrupting the process or turning off your computer until it is complete.
- Restart your computer: Once the uninstallation process finishes, you will be prompted to restart your computer. Save any unsaved work and click “Restart” to reboot your system.
- Verify the uninstallation: After your computer restarts, check the Programs and Features window or search for Windows Essentials to confirm that it has been successfully uninstalled.
Congratulations! You have successfully uninstalled Windows Essentials from your computer using this step-by-step guide.
Troubleshooting Uninstallation Issues
If you are experiencing problems with uninstalling Windows Essentials from your computer, here are some troubleshooting tips to help you resolve the issues:
- Restart your computer: Sometimes, a simple restart can fix installation-related issues. Before trying anything else, restart your computer and then attempt to uninstall Windows Essentials again.
- Disable antivirus software: Antivirus software can sometimes interfere with the uninstallation process. Temporarily disable your antivirus software and then try uninstalling Windows Essentials.
- Use the official uninstallation tool: Microsoft provides an official uninstallation tool for Windows Essentials. Download and run the tool to completely remove the software from your computer.
- Check for conflicting programs: Sometimes, other programs or applications can interfere with the uninstallation process. Check if any other programs are running in the background and close them before attempting to uninstall Windows Essentials.
- Manually remove Windows Essentials: If all else fails, you can try manually removing Windows Essentials from your computer. This involves deleting files and registry entries related to the software. It is recommended to backup your computer before attempting this method.
- Contact Microsoft Support: If you have tried all the troubleshooting steps mentioned above and are still unable to uninstall Windows Essentials, it is recommended to contact Microsoft Support for further assistance. They will be able to provide you with specific guidance based on your individual situation.
By following these troubleshooting tips, you should be able to resolve any issues you may encounter while uninstalling Windows Essentials from your computer.
Removing Leftover Files and Registry Entries
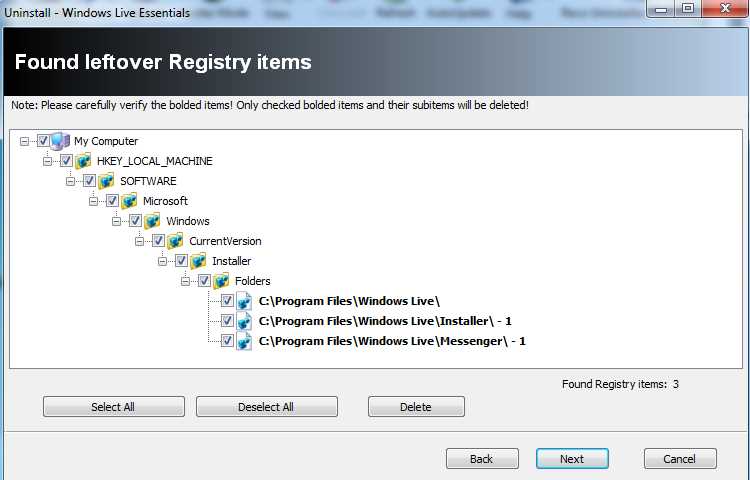
After uninstalling Windows Essentials, you might still have some leftover files and registry entries that need to be removed. These remnants can take up disk space and potentially cause issues if not properly cleaned up.
Here are the steps to remove leftover files and registry entries:
- Remove leftover files:
- Open the File Explorer by pressing the Windows key + E on your keyboard.
- Navigate to the following locations and delete any remaining Windows Essentials files:
- C:\Program Files\Windows Live\
- C:\Program Files (x86)\Windows Live\
- C:\ProgramData\Microsoft\Windows Live\
- C:\Users\YourUsername\AppData\Local\Microsoft\
- Clean up the registry:
- Press the Windows key + R on your keyboard to open the Run dialog box.
- Type “regedit” and click OK to open the Registry Editor.
- Backup your registry by clicking on File in the menu bar, selecting Export, and saving the backup file to a safe location.
- Navigate to the following locations and delete any remaining Windows Essentials registry entries:
- HKEY_CURRENT_USER\Software\Microsoft\Windows Live
- HKEY_LOCAL_MACHINE\SOFTWARE\Microsoft\Windows Live
Once you have completed these steps, all leftover files and registry entries related to Windows Essentials should be removed. It’s always a good idea to double-check and make sure everything has been deleted properly. If you encounter any issues or need further assistance, consider reaching out to Microsoft support for help.
Alternative Options to Windows Essentials
If you have decided to uninstall Windows Essentials from your computer, there are several alternative options available that can provide similar functionality. Here are a few alternatives to consider:
- OpenOffice: OpenOffice is a free and open-source office suite that includes a word processor, spreadsheet program, presentation software, and more. It provides many of the same features as Microsoft Office and can be a great alternative if you are looking for a free option.
- LibreOffice: LibreOffice is another free and open-source office suite that offers a word processor, spreadsheet program, presentation software, and other tools. It is compatible with Microsoft Office file formats and provides a similar user interface.
- Google Docs: Google Docs is a web-based office suite that allows you to create and edit documents, spreadsheets, and presentations online. It offers collaboration features, cloud storage, and can be accessed from any device with an internet connection.
- WPS Office: WPS Office is a free office suite that includes a word processor, spreadsheet program, and presentation software. It is compatible with Microsoft Office file formats and offers a modern and intuitive user interface.
- Adobe Acrobat Reader DC: If you primarily use Windows Essentials for reading PDF documents, Adobe Acrobat Reader DC is a popular alternative. It is a free software that allows you to view, print, and annotate PDF files.
- GIMP: GIMP is a free and open-source image editing software that can be used as an alternative to Windows Essentials’ photo editing tools. It provides a wide range of features and is suitable for both basic and advanced editing tasks.
These are just a few examples of alternative options to Windows Essentials. Depending on your specific needs and preferences, there may be other software available that suits you better. Take the time to explore different options and find one that meets your requirements.
Reinstalling or Repairing Windows Essentials
If you are experiencing issues with Windows Essentials or if it was not properly uninstalled, you may need to reinstall or repair the software. Reinstalling or repairing Windows Essentials can help resolve any problems and ensure that the software is functioning properly on your computer.
Here are the steps to reinstall or repair Windows Essentials:
- Download the installer: Go to the official Microsoft website and download the latest version of the Windows Essentials installer.
- Run the installer: Locate the downloaded installer file and double-click on it to run the installation wizard.
- Select repair or reinstall: The installer will give you the option to repair or reinstall Windows Essentials. Choose the appropriate option based on your specific needs.
- Follow the prompts: Follow the on-screen instructions provided by the installer to complete the repair or reinstallation process.
- Restart your computer: Once the process is complete, restart your computer to ensure that the changes take effect.
If you chose to repair Windows Essentials, the installer will attempt to fix any issues with the software without uninstalling and reinstalling it. This can be a quicker solution if you are experiencing minor problems.
If you chose to reinstall Windows Essentials, the installer will first uninstall the previous version of the software and then install the latest version. This can be useful if the software was not properly uninstalled or if you are experiencing major issues that cannot be resolved through repairing.
Keep in mind that reinstalling or repairing Windows Essentials may require an internet connection to download the necessary files. Make sure you have a stable internet connection before proceeding.
Note: Windows Essentials has been discontinued by Microsoft, and as a result, it may not be available for download from the official Microsoft website. However, you might still be able to find the installer from trusted third-party sources.
Final Thoughts and Recommendations
In conclusion, uninstalling Windows Essentials can be a simple process if you follow the correct steps and ensure that you have backup copies of any important files or data. Here are some final thoughts and recommendations to consider:
- Backup your files:
- Follow the correct steps:
- Check for alternative software:
- Stay updated:
- Ask for help if needed:
Before uninstalling Windows Essentials, it is essential to create backup copies of all your important files and data. This will ensure that you do not lose any valuable information during the uninstallation process.
Make sure to follow the correct steps for uninstalling Windows Essentials. This may involve accessing the Control Panel, navigating to the Programs section, and selecting the option to uninstall the Windows Essentials software.
After uninstalling Windows Essentials, consider checking for alternative software that can provide similar features and functionalities. There are plenty of third-party applications available that can fulfill your needs and preferences.
Regularly check for updates and security patches for the software you use. This will help ensure that your system remains protected from any vulnerabilities or threats.
If you encounter any difficulties or have questions during the uninstallation process, do not hesitate to ask for help. Seek assistance from professionals or online communities who can provide guidance and support.
By following these recommendations, you can successfully uninstall Windows Essentials and make informed decisions regarding the alternative software you choose to use. Remember to prioritize backup and security to safeguard your important files and ensure a smooth transition to new software.
FAQ:
What is Windows Essentials?
Windows Essentials is a suite of free programs developed by Microsoft that includes a collection of tools and apps such as Windows Live Mail, Movie Maker, Photo Gallery, and more. It was designed to provide users with essential programs for communication, photo editing, video editing, and other tasks.
What will happen if I uninstall Windows Essentials?
If you uninstall Windows Essentials, all the programs and apps included in the suite, such as Windows Live Mail, Movie Maker, and Photo Gallery, will be removed from your computer. Any data or files associated with these programs may also be deleted. Make sure to back up any important data before uninstalling to avoid losing any important files.
Can I reinstall Windows Essentials after uninstalling it?
No, you cannot reinstall Windows Essentials after uninstalling it. Microsoft discontinued the Windows Essentials suite in 2017 and no longer provides official support or downloads for the software. However, you may be able to find alternative programs or apps with similar functionality from other software developers.