
Are you tired of your iPhone screen being too bright, even at its lowest setting? Do you find yourself squinting in the dark because the screen is still too harsh? Don’t worry, we have got you covered! In this step-by-step guide, we will show you how to adjust your iPhone brightness to even lower levels, allowing for a more comfortable viewing experience, especially in low-light situations.
First, let’s start by accessing the settings on your iPhone. Locate the “Settings” app on your home screen and tap on it to open. Once you are in the settings menu, scroll down and find the “Display & Brightness” option. Tap on it, and you will see various settings related to your iPhone’s display.
Now that you are in the “Display & Brightness” menu, you will see a slider labeled “Brightness.” This slider allows you to adjust the brightness level of your iPhone screen. However, the lowest level of brightness offered by default may still be too bright for your liking. That’s where the Accessibility options come in handy.
To access the Accessibility options, go back to the main settings menu and find the “Accessibility” option. Tap on it, and you will see a wide range of options related to improving the accessibility of your iPhone. Scroll down and find the “Display & Text Size” option, then tap on it to open.
Finally, in the “Display & Text Size” menu, you will find a slider labeled “Reduce White Point.” Enabling this option will further decrease the intensity of bright colors, making the screen even dimmer. Adjust the slider to your desired level, and you will see the difference immediately. Experiment with different levels until you find the perfect balance between brightness and readability.
By following these simple steps, you can easily adjust your iPhone brightness to even lower levels than the default settings allow. Whether it’s reading in bed without disturbing your partner or using your phone in a dark theater, you can now enjoy a more comfortable and less straining viewing experience on your iPhone. Don’t let brightness be a hindrance; take control and personalize your iPhone’s display brightness to suit your needs!
Why Adjusting iPhone Brightness Can Be Useful
Adjusting the brightness level of your iPhone can have several advantages and provide a better user experience. Here are some reasons why adjusting iPhone brightness can be useful:
- Save Battery Life: Lowering the brightness of your iPhone can help conserve battery power, allowing you to use your device for a longer period of time without charging.
- Reduce Eye Strain: By lowering the brightness level, you can reduce the strain on your eyes, especially when using your iPhone in dimly lit environments.
- Enhance Privacy: Decreasing the iPhone brightness can help prevent others from easily seeing what you are doing on your device, providing an added level of privacy.
- Improve Sleep: Dimming the iPhone screen before bedtime can aid in better sleep, as the bright light emitted by screens can interfere with the production of melatonin, a hormone that regulates sleep.
- Minimize Distraction: Lowering the brightness can help reduce distractions, particularly in situations where you need to focus on a specific task or activity.
By adjusting the brightness level, you can customize the display of your iPhone to suit your preferences, environment, and specific needs at any given time. It provides flexibility and control over your device’s screen brightness, ultimately enhancing your overall user experience.
Step 1: Open the Settings App on Your iPhone
To adjust the brightness of your iPhone to even lower levels, you’ll need to access the settings. Follow these steps to open the Settings app on your device:
- Locate the “Settings” app on your iPhone’s home screen. It has a gray icon with gears.
- Tap on the “Settings” app to open it.
Alternatively, you can also swipe down from the top right corner of the screen to open the Control Center and tap on the “Settings” icon.
Once you have opened the Settings app, you can proceed to the next step to adjust the brightness settings on your iPhone.
Step 2: Select the Display & Brightness Option
Once you have unlocked your iPhone and are on the home screen, look for the “Settings” app. This can usually be found on the first page of your apps or by swiping down on the home screen and using the search function.
Open the “Settings” app and scroll down until you find the “Display & Brightness” option. It should be towards the top of the list, just below the “Sounds & Haptics” option. Tap on this option to proceed.
Within the “Display & Brightness” menu, you will find various display and brightness settings that you can adjust. These settings allow you to customize the appearance and brightness of your iPhone’s screen.
Look for the “Brightness” option, which is usually located at the top of the menu. By default, the brightness level is set to auto-adjust based on the ambient light conditions. However, to adjust the brightness to even lower levels, you will need to disable the auto-brightness feature.
To disable auto-brightness, swipe the toggle switch to the left until it turns off and the switch becomes grayed out. Now, you will have full control over the brightness level of your iPhone’s screen.
Once you have disabled auto-brightness, you can manually adjust the brightness level by dragging the slider to the left. As you drag the slider to the left, the screen brightness will decrease. Find the desired brightness level that suits your preferences.
Keep in mind that lowering the brightness level too much may make the screen difficult to read in bright environments. It’s important to find a balance between reducing eye strain and maintaining readability.
After adjusting the brightness level to your liking, you can exit the “Settings” app and return to using your iPhone as usual. The new brightness level will be in effect until you change it again.
Step 3: Adjust the Brightness Level Using the Slider
Once in the Display & Brightness settings, you will see a slider labeled “Brightness” at the top of the screen. This slider allows you to manually adjust the brightness level of your iPhone to your desired preference.
To adjust the brightness level, simply slide the button to the left or right. Sliding the button to the left will decrease the brightness, making the screen dimmer. Sliding the button to the right will increase the brightness, making the screen brighter.
As you slide the button, you will notice that the screen brightness adjusts in real time, allowing you to see the changes as you make them. This makes it easy to find the perfect brightness level for your needs.
If you want to take advantage of the iPhone’s True Tone technology, you can toggle the switch labeled “True Tone” located just below the Brightness slider. Turning on True Tone will automatically adjust the display’s color temperature based on ambient lighting conditions, providing a more comfortable viewing experience.
It’s important to find a balance with the brightness level that works best for you. Setting the brightness too low may strain your eyes, especially in well-lit environments. On the other hand, setting the brightness too high can drain your iPhone’s battery quickly.
Once you have adjusted the brightness level to your liking, you can exit the Display & Brightness settings and continue using your iPhone with the new brightness settings in place.
Step 4: Use the Auto-Brightness Feature for Adaptive Brightness
The iPhone also has a feature called Auto-Brightness that allows the device to adjust its screen brightness based on the surrounding lighting conditions. This feature can help in situations where you need to dim the screen even further or increase the brightness in bright environments.
Enabling the Auto-Brightness feature is simple. Just follow these steps:
- Open the Settings app on your iPhone.
- Scroll down and tap on “Display & Brightness”.
- Toggle the “Auto-Brightness” switch to the right to turn it on.
Once enabled, your iPhone’s screen will automatically adjust its brightness based on the ambient light sensor. This means that if you’re in a dark room, the screen brightness will be lower, making it easier on your eyes. On the other hand, if you’re outside in bright sunlight, the screen brightness will increase to make it more visible.
Keep in mind that the Auto-Brightness feature may not always perfectly match your desired brightness level. If you find that the screen is still too bright or too dim, you can manually adjust the brightness using the steps mentioned in the previous steps of this guide.
Step 5: Enable the Night Shift Mode for Lower Blue Light
Another way to further reduce the brightness of your iPhone’s screen is to enable the Night Shift mode. This mode adjusts the colors on your screen to be warmer and filters out the blue light, making it easier on your eyes, especially in low light conditions.
To enable Night Shift mode, follow these steps:
- Open the Settings app on your iPhone.
- Scroll down and tap on “Display & Brightness”.
- Tap on “Night Shift”.
- Here, you can schedule Night Shift mode to turn on automatically at a specific time or manually enable it whenever you want. Choose the option that suits you best.
- You can also adjust the warmth of the screen by dragging the “Color Temperature” slider to the left for a warmer tone.
Once you have enabled Night Shift mode, your screen will have reduced brightness and less blue light, providing a more comfortable viewing experience, especially during nighttime or in dark environments.
Step 6: Use the Zoom Feature for Even Lower Levels of Brightness
If you want to take your iPhone’s brightness levels even lower, you can utilize the zoom feature. The zoom feature allows you to zoom in on your screen, which in turn can make your display appear darker.
To activate the zoom feature, follow these steps:
- Open the “Settings” app on your iPhone.
- Tap on “Accessibility.”
- Tap on “Display & Text Size.”
- Under the “Vision” section, you will find the “Zoom” option. Enable it by tapping on the toggle switch.
- Once the zoom feature is enabled, you can adjust the level of zoom by using the slider.
- Begin by dragging the slider towards the right to zoom in. As you zoom in, you will notice that the brightness of your screen decreases.
- Stop adjusting the zoom level when you have reached the desired brightness level.
- Exit the settings and continue using your iPhone with the lower brightness level achieved through the zoom feature.
Note: Keep in mind that using the zoom feature may affect the overall visibility and usability of your iPhone’s screen. It may make certain elements appear larger or distorted, so it’s important to find a balance that works for your needs.
Step 7: Save Battery Life by Adjusting iPhone Brightness
One of the main benefits of lowering your iPhone’s brightness is that it can help conserve battery life. The screen brightness is one of the biggest energy drains on your device, so by reducing it, you can extend your battery’s life between charges.
Here’s how to adjust your iPhone’s brightness to save battery life:
- Open the Settings app on your iPhone.
- Tap on “Display & Brightness.”
- Drag the brightness slider to the left to decrease the brightness level.
- You can also enable the “Auto-Brightness” feature, which automatically adjusts the screen brightness based on ambient light conditions.
- If you want to further optimize battery life, you can enable the “Low Power Mode” feature. This feature reduces overall device performance and restricts certain background activities to conserve battery power.
- Keep in mind that lowering the brightness level too much can make it difficult to see the screen, especially in bright environments. So, adjust it to a level that is comfortable for you while still saving battery life.
By following these steps and adjusting your iPhone’s brightness, you can maximize battery life and ensure that your device lasts longer between charges.
FAQ:
Why would I want to adjust my iPhone brightness to lower levels?
Lowering the brightness on your iPhone can help reduce eye strain, save battery life, and make it easier to use your iPhone in low-light environments.
How do I adjust the brightness on my iPhone?
To adjust the brightness on your iPhone, go to the “Settings” app, then tap on “Display & Brightness.” From there, use the slider to adjust the brightness level to your desired setting.
Can I adjust the brightness levels on my iPhone beyond the default settings?
Yes, you can adjust the brightness levels on your iPhone beyond the default settings. By using the “Accessibility” options, you can lower the brightness levels even further than what is possible through the regular settings.
Is it possible to adjust the brightness levels on specific apps?
No, it is not possible to adjust the brightness levels on specific apps. The brightness settings on your iPhone apply to the entire device and cannot be customized on an app-by-app basis.
Will adjusting the brightness on my iPhone affect the quality of the display?
Adjusting the brightness on your iPhone will not affect the quality of the display. The display will still be clear and sharp, but the brightness level will simply be adjusted to a lower setting.
Are there any other ways to adjust the brightness on my iPhone?
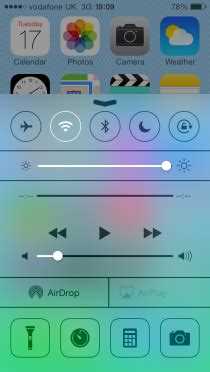
Yes, besides using the “Settings” app, you can also adjust the brightness on your iPhone by swiping up from the bottom of the screen to access the Control Center. From there, you can use the brightness slider to adjust the brightness level quickly and easily.
Can I schedule my iPhone to automatically adjust the brightness levels?
Yes, you can schedule your iPhone to automatically adjust the brightness levels. This can be done by going to the “Settings” app, then tapping on “Display & Brightness” and selecting the “Automatic” option. From there, you can set a schedule for when you want your iPhone’s brightness to adjust automatically.