
If you have recently purchased a new iPhone or need to restore your existing one, you may be wondering where to find the restore from iCloud feature. Restoring from iCloud is a convenient way to transfer all your apps, settings, and data to a new device or reset your current device to its factory settings.
To find the restore from iCloud option on your iPhone, you will need to go to the Settings app. Open the app and tap on your Apple ID at the top of the screen. From there, tap on “iCloud” and then on “iCloud Backup” to access the restore feature.
Once you are in the iCloud Backup menu, you will see a list of your previous backups. You can choose the backup you want to restore from by tapping on it. Make sure you select a backup that contains the data you want to transfer or restore.
After selecting the backup, you can choose to restore all data or select specific types of data to restore, such as apps, contacts, or photos. Once you have made your selection, tap on “Restore” and wait for the process to complete. Depending on the size of your backup and your internet connection, this process may take some time.
That’s it! You have now successfully found and used the restore from iCloud feature on your iPhone. Whether you are setting up a new device or resetting an old one, iCloud makes the process quick and easy by transferring all your important data and settings.
How to Restore from iCloud on iPhone
Restoring your iPhone from an iCloud backup can be a convenient way to transfer your data and settings to a new device or recover lost information. Here’s how you can restore from iCloud on your iPhone:
- Ensure that your iPhone is connected to a stable Wi-Fi network.
- On your iPhone’s Home screen, tap on the “Settings” app.
- In the Settings menu, tap on your Apple ID at the top of the screen.
- Under your Apple ID, tap on “iCloud.”
- In the iCloud menu, scroll down and tap on “iCloud Backup.”
- Make sure that the “iCloud Backup” toggle switch is turned on. If it’s already on, you can skip this step.
- To initiate a backup of your iPhone’s data, tap on “Back Up Now.”
Once your iPhone has finished backing up to iCloud, you can proceed with the restore process:
- On your iPhone’s Home screen, tap on the “Settings” app.
- In the Settings menu, tap on your Apple ID at the top of the screen.
- Under your Apple ID, tap on “iCloud.”
- In the iCloud menu, scroll down and tap on “iCloud Backup.”
- Under the “Restore from iCloud Backup” section, tap on “Restore from Backup.”
- You will be prompted to sign in to iCloud with your Apple ID and password. Enter the required information.
- Choose the backup you want to restore from the list of available backups.
- Tap on “Restore” to confirm your selection and start the restore process.
Depending on the size of the backup and your internet connection speed, the restore process may take some time. Make sure to keep your iPhone connected to Wi-Fi and plugged into a power source until the restore is complete.
After the restore is finished, your iPhone will restart and begin syncing your data from iCloud. Once the sync is complete, you can start using your iPhone with the restored data and settings.
Note: Restoring from an iCloud backup will overwrite any existing data on your iPhone, so make sure to back up any new or important information before starting the restore process.
Access iCloud Settings on iPhone
If you want to access iCloud settings on your iPhone, follow the steps below:
- Open the “Settings” app on your iPhone.
- Scroll down and tap on your name at the top of the Settings.
- In the Apple ID section, you will find your iCloud account information, including your name, email, and photo. Tap on it to access your iCloud settings.
Once you are in the iCloud settings, you will see various options and settings related to your iCloud account:
- iCloud Storage: This section shows the storage usage of your iCloud account. You can manage your iCloud storage, upgrade or downgrade the storage plan, and delete old backups to free up space.
- iCloud Backup: Here, you can enable or disable iCloud backups for your iPhone. You can also see the last backup date and time and manually back up your iPhone to iCloud.
- Photos: In this section, you can enable or disable iCloud Photo Library, Shared Albums, and My Photo Stream. It also allows you to optimize iPhone Storage, which automatically manages the size of your photo and video library to save space.
- Contacts, Calendars, Reminders: You can choose to sync your contacts, calendars, and reminders with iCloud. This ensures that your important data is backed up and accessible across all your devices.
- Find My: This feature enables you to locate your iPhone, iPad, or Mac using the Find My app. You can also enable or disable Find My iPhone and Find My network.
- iCloud Drive: If you use iCloud Drive, you can manage your files stored in iCloud, enable or disable app access to iCloud Drive, and choose whether to use cellular data for iCloud Drive.
- Notes: In this section, you can choose to save your notes to iCloud and enable or disable syncing of notes across your devices.
These are just a few examples of the settings available in iCloud settings on your iPhone. Depending on your preferences and device capabilities, you may find additional options and settings.
Sign in to iCloud on iPhone
To access your iCloud account on your iPhone, follow these steps:
- Unlock your iPhone by entering your passcode or using Touch ID/Face ID.
- Tap on the “Settings” app on your home screen. It is represented by a gear icon.
- Scroll down and tap on your name at the top of the settings screen. This will open the iCloud settings.
- If you are not already signed in to iCloud on your iPhone, tap on “Sign in to your iPhone” at the top of the screen.
- Enter your Apple ID and password in the provided fields, then tap on “Sign In”.
- If you have enabled two-factor authentication on your Apple ID, you may be prompted to enter a verification code sent to your trusted device.
- Once signed in, you can customize your iCloud settings by enabling or disabling various features such as iCloud Drive, Photos, Contacts, etc.
Signing in to iCloud on your iPhone allows you to access your iCloud email, contacts, calendar, notes, and other iCloud services directly on your device. It also enables automatic backups of your device to iCloud and synchronization of data across your Apple devices.
If you have trouble signing in to iCloud on your iPhone, make sure you have a stable internet connection and that your Apple ID credentials are correct. If you’ve forgotten your password, you can tap on “Forgot Apple ID or Password?” on the sign-in screen to reset it.
Enable iCloud Backup on iPhone

Enabling iCloud Backup on your iPhone is a simple process that allows you to securely store your device’s data in the cloud. This way, you can easily restore your data if you ever lose or switch to a new iPhone.
To enable iCloud Backup, follow these steps:
- Go to the Settings app on your iPhone.
- Tap on your Apple ID at the top of the screen.
- Select “iCloud” from the list of options.
- Scroll down and tap on “iCloud Backup”.
- Toggle the switch next to “iCloud Backup” to turn it on.
- If prompted, tap on “Back Up Now” to initiate an immediate backup or wait for the automatic backups to occur.
Once enabled, your iPhone will automatically back up your data when it is connected to Wi-Fi, charging, and locked. It is recommended to keep your iPhone connected to Wi-Fi and charging overnight to ensure regular backups.
You can check the status of your iCloud backups by going to Settings > [Your Name] > iCloud > iCloud Backup. From there, you can see the date and time of your last backup and the size of the backup.
By enabling iCloud Backup, you can have peace of mind knowing that your iPhone’s data is safe and easily restorable in case of any unforeseen circumstances.
Select Restore from iCloud Backup on iPhone
If you want to restore your iPhone from an iCloud backup, the process is easy and straightforward. Follow the steps below to select “Restore from iCloud Backup” option on your iPhone:
- Ensure that your iPhone is connected to a Wi-Fi network. iCloud backups can consume a significant amount of data, so it is recommended to use Wi-Fi instead of cellular data.
- Turn on your iPhone and go to the “Apps & Data” screen.
- Tap on the “Restore from iCloud Backup” option. This will prompt you to sign in to your iCloud account using your Apple ID and password.
- After signing in, you will be presented with a list of available iCloud backups. Choose the backup that you want to restore from. Make sure to select the most recent backup that contains the data you want to restore.
- Tap on the selected backup to start the restoration process. The restoration process might take some time depending on the size of the backup and your internet connection speed.
- Once the restoration is complete, your iPhone will restart and you can proceed with the setup process. During the setup, you may be asked to enter your Apple ID and password again.
- Follow the on-screen instructions to complete the setup and you will see the home screen with your restored data and apps.
Note: It is important to keep in mind that restoring from an iCloud backup will overwrite all the existing data on your iPhone. Therefore, it is recommended to backup your iPhone before performing a restore to avoid any data loss.
By following these steps, you can easily select “Restore from iCloud Backup” on your iPhone and restore your device to a previous backup.
Choose Backup to Restore on iPhone
When restoring your iPhone from an iCloud backup, you have the option to choose which backup to restore from. This can be useful if you have multiple backups stored in your iCloud account, or if you want to restore from a specific backup that contains certain data or settings.
To choose a backup to restore on your iPhone, follow these steps:
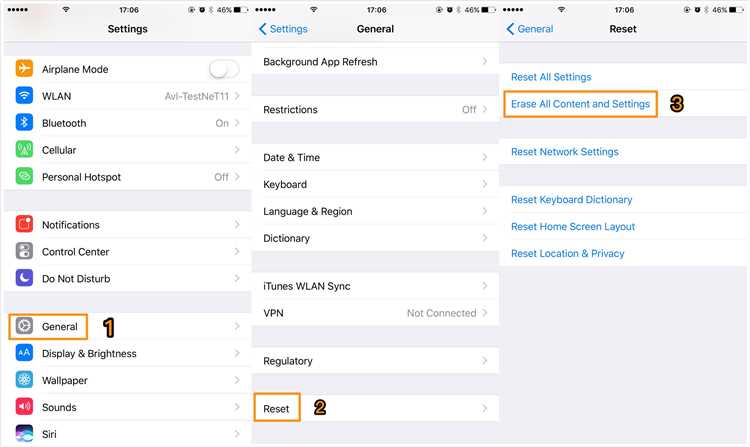
- Go to the “Settings” app on your iPhone.
- Scroll down and tap on “General”.
- Tap on “Reset”.
- Tap on “Erase All Content and Settings”.
- On the “Apps & Data” screen, tap on “Restore from iCloud Backup”.
- Sign in to your iCloud account with your Apple ID and password.
- Choose a backup from the list of available backups. The backups are listed by date and time, so you can select the most recent backup or a specific backup that you want to restore from.
- Tap on the backup you want to restore from, and then tap on “Restore”.
Note: Restoring your iPhone from an iCloud backup will erase all the current data and settings on your device and replace them with the data and settings from the chosen backup. Make sure to back up any important data or settings that you want to keep before proceeding with the restore process.
Once the restore process is complete, your iPhone will restart and you can set it up using the restored backup. This will include your apps, photos, messages, contacts, and other data that were included in the chosen backup.
It’s important to have a stable internet connection while restoring from an iCloud backup, as it requires downloading the backup data from iCloud servers. The time it takes to restore from a backup can vary depending on the size of the backup and the speed of your internet connection.
If you don’t have an iCloud backup available or want to restore from another source, you can also choose to restore your iPhone from an iTunes backup or set it up as a new device.
Wait for the Restore Process on iPhone
After initiating the restore process from iCloud on your iPhone, it is important to have patience and wait for the process to complete. The length of time it takes will vary depending on the size of the backup and the speed of your internet connection. During this time, it is crucial to not interrupt the process or turn off your device.
While waiting for the restore process to finish, you may see a progress bar on your iPhone’s screen. This progress bar indicates the estimated time remaining for the restore to complete. It is advisable to keep your device connected to a stable Wi-Fi network and plugged into a power source to ensure a smooth and uninterrupted restore.
During the restore process, your iPhone will download the necessary data from your iCloud backup and configure your device settings accordingly. Once the restore is complete, your iPhone will restart, and you will be prompted to sign in with your Apple ID and set up your device.
It is important to note that if you experience any issues or errors during the restore process, you can contact Apple Support for further assistance. They can provide guidance and troubleshooting steps to help resolve any problems you may encounter.
Conclusion
Waiting for the restore process on your iPhone may require some patience, but it is essential to ensure a successful restoration of your data and settings. By following the recommended steps and allowing the process to complete uninterrupted, you can regain access to your backed-up data and continue using your iPhone as before.
Set up iPhone after Restore from iCloud
After restoring your iPhone from iCloud, you will need to go through the setup process before you can start using your device. Here are the steps to set up your iPhone:
- Select Language and Region: Choose your preferred language and region for your device.
- Connect to Wi-Fi: Connect your iPhone to a Wi-Fi network to proceed with the setup.
- Enable or Disable Location Services: Decide whether you want to enable or disable location services on your device.
- Set up Touch ID or Face ID: If your device supports it, you can set up Touch ID or Face ID for added security.
- Create a Passcode: Set up a passcode to protect your device from unauthorized access.
- Sign in with Apple ID: Enter your Apple ID and password to sign in and access your iCloud data.
- Terms and Conditions: Review and accept the terms and conditions for using your iPhone.
- Restore Apps and Data: Choose whether you want to restore your apps and data from iCloud or set up your device as new.
- Set up Siri: Configure Siri settings, including voice recognition and activation options.
- Apple Pay: Set up Apple Pay if you wish to use it for making payments.
- Choose Display Settings: Configure display settings such as text size, bold text, and display zoom.
- Enable or Disable App Analytics: Decide whether you want to allow app developers to collect analytics data from your device.
- Sign in with Apple: Choose whether you want to use Sign in with Apple for apps and websites.
- iCloud Keychain: Set up iCloud Keychain to securely store passwords and credit card information.
- Screen Time: Configure Screen Time settings to manage your device usage.
- Finish Setting Up: Complete the remaining steps to finish setting up your iPhone.
Once you have completed these steps, your iPhone will be set up and ready to use with your restored iCloud data.
Verify Restored Data on iPhone
After restoring your iPhone from iCloud, it is important to verify that all your data has properly been restored. Here are some steps to help you confirm that your data is intact:
- Check contacts and messages: Open the Contacts and Messages apps and ensure that all your contacts and messages are present.
- Review photos and videos: Open the Photos app and navigate through your albums to confirm that all your pictures and videos have been restored.
- Test apps: Open your apps one by one and make sure they are functioning properly. Test any app-specific data or settings to ensure they have been restored correctly.
- Verify settings: Go to the Settings app and check that your previous settings, such as Wi-Fi networks, wallpapers, and display preferences, have been restored.
- Check Safari bookmarks and history: Open the Safari app and confirm that your bookmarks and browsing history have been restored.
- Review notes and reminders: Open the Notes and Reminders apps and ensure that all your notes and reminders are present.
- Check calendar events: Open the Calendar app and verify that all your events and appointments have been restored.
- Test music and podcasts: Open the Music and Podcasts apps and play some songs or podcasts to make sure your media has been properly restored.
- Verify Health data: Open the Health app and review your health and fitness data to ensure it has been restored correctly.
- Test FaceTime and Messages capabilities: Try making a FaceTime call and sending a text message to confirm that these communication features are working as expected.
If you encounter any missing or corrupted data during the verification process, you may need to repeat the restore process or contact Apple Support for further assistance.
FAQ:
Can I restore from iCloud without resetting my iPhone?
No, in order to restore from iCloud on your iPhone, you will need to reset your iPhone and erase all content and settings. This is because the restore process replaces all the data on your iPhone with the data from your iCloud backup. Therefore, it is important to make sure you have a recent backup before initiating the restore process.
How long does it take to restore from iCloud on iPhone?
The time it takes to restore from iCloud on your iPhone can vary depending on the size of the backup and the speed of your internet connection. In general, it can take anywhere from a few minutes to several hours. It is recommended to connect your iPhone to Wi-Fi and ensure it has a stable internet connection while restoring from iCloud to avoid any interruptions.