
Do you own an iPod Classic and wish you could give it a more personalized touch? Renaming your device can be a simple and fun way to make it unique and reflect your personality. In this article, we will guide you through the steps to easily rename your iPod Classic and make it truly yours.
First and foremost, to rename your iPod Classic, you will need to have the latest version of iTunes installed on your computer. iTunes is the software used to manage and sync your iPod Classic, and it offers various features to personalize your device. If you don’t have iTunes installed, you can download it for free from the Apple website.
Once you have iTunes installed, connect your iPod Classic to your computer using the USB cable. If your iPod Classic is locked, unlock it by moving the Hold switch to the off position. iTunes should automatically open and recognize your device. If it doesn’t, you can manually open iTunes and select your iPod Classic from the list of devices in the top left corner.
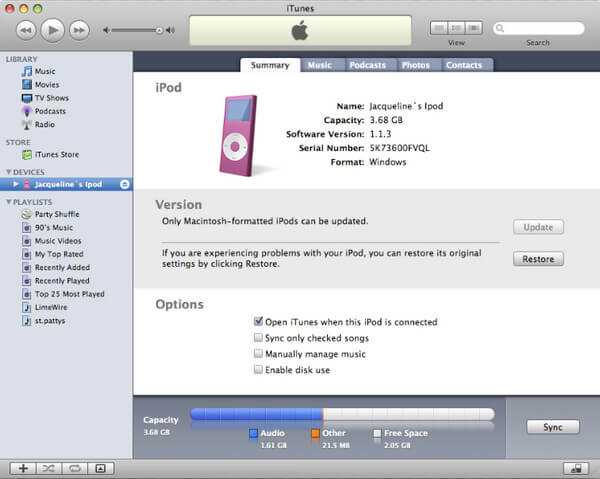
Next, navigate to the “Summary” tab in iTunes, which can be found by clicking on your iPod Classic’s icon in the top left corner. In the “Name” field, you will see the current name of your iPod Classic. To rename it, simply click on the name and type in your desired new name. Make sure to choose a name that is unique and easy to remember. Once you are satisfied with the new name, press Enter or click outside of the field to save the changes.
Congratulations! You have successfully renamed your iPod Classic. Disconnect it from your computer and enjoy your newly personalized device. Feel free to change the name as often as you like to keep it fresh and exciting. Now you can proudly show off your unique iPod Classic to your friends and family.
Why Rename Your iPod Classic?
Renaming your iPod Classic can provide a personalized touch to your device and make it easier to identify among other similar devices. Here are several reasons why you might want to rename your iPod Classic:
-
Personalization: By giving your iPod Classic a unique name, you can reflect your own personality and style. Whether it’s your nickname, a favorite quote, or a combination of words, renaming your iPod Classic allows you to make it truly yours.
-
Easy Identification: If you have multiple iPod Classics or share your device with others, renaming it can make it easier to differentiate yours from others. This can prevent mix-ups and confusion, especially when connecting your device to computers or other devices.
-
Organization: Renaming your iPod Classic can help you stay organized. By using a descriptive name, you can quickly identify the content or purpose of the device. For example, you could name it “Workout Playlist” or “Study Tunes” to keep track of specific music playlists.
-
Privacy: If you prefer to keep your personal information private, renaming your iPod Classic can help. Instead of using your name or other easily identifiable information, you can choose a generic or anonymous name to maintain your privacy.
Overall, renaming your iPod Classic adds a personal touch to the device and can improve its functionality by making it easier to identify and organize. It’s a simple and fun way to make your iPod Classic unique to you.
Step 1: Backup Your Device
Before renaming your iPod Classic, it is important to create a backup of all your files and settings. This will ensure that you don’t lose any important data during the renaming process. Follow the steps below to back up your device:
- Connect your iPod Classic to your computer using the USB cable.
- Open iTunes on your computer. If iTunes does not open automatically, you can open it manually.
- Select your iPod Classic from the list of devices in iTunes.
- Click on the “Summary” tab in the main iTunes window.
- Under the “Backups” section, click on the “Back Up Now” button.
- Wait for the backup process to complete. This may take a few minutes depending on the amount of data on your device.
- Once the backup is complete, disconnect your iPod Classic from your computer.
By following these steps, you will have a recent backup of your iPod Classic’s data and settings. This backup will be useful in case anything goes wrong during the renaming process or if you want to restore your device to its previous state.
Step 2: Connect Your iPod Classic
Before you can rename your iPod Classic, you’ll need to connect it to your computer. Follow these steps to establish a connection:
- Locate the USB cable that came with your iPod Classic.
- Plug one end of the USB cable into the port on your iPod Classic.
- Plug the other end of the USB cable into a USB port on your computer. Make sure it is a functioning USB port.
- Your computer should recognize the iPod Classic and establish a connection.
- Once connected, your iPod Classic may display a message on its screen prompting you to “Trust This Computer.” Select “Trust” to continue.
It is important to ensure that your iPod Classic is properly connected to your computer before proceeding to the next step.
| Troubleshooting Tips |
|---|
| No Connection: If your iPod Classic does not establish a connection with your computer, try the following: |
|
Step 3: Open iTunes
Once you have connected your iPod Classic to your computer using the appropriate cable, it’s time to open iTunes. This is the software you will use to manage your iPod, including renaming it.
Here are the steps to open iTunes:
- Locate the iTunes icon on your computer. It is usually found on the desktop, in the taskbar, or in the Applications folder.
- Click on the iTunes icon to launch the software.
- If prompted, enter your Apple ID and password to sign in to your iTunes account. If you don’t have an Apple ID, you can create one for free.
- Once you are signed in, you will see the iTunes interface with various options and menus.
Now that iTunes is open and you are signed in, you are ready to proceed to the next step: renaming your iPod Classic.
Step 4: Select Your iPod Classic
Once your iPod Classic is connected to your computer, you will need to select it in order to rename it.
Here are the steps to select your iPod Classic:
- Open iTunes on your computer.
- Click on the device icon located at the top left corner of the iTunes window. The device icon looks like a small iPod.
- A drop-down menu will appear, showing all the devices connected to your computer. Look for your iPod Classic in the list and click on it.
- You have now selected your iPod Classic.
Once you have selected your iPod Classic, you will be able to proceed with renaming it.
Step 5: Rename Your iPod Classic
Once you have connected your iPod Classic to your computer and opened iTunes, you can easily rename it using the following steps:
- Click on the iPod icon in the top-left corner of the iTunes window to go to the device’s summary page.
- Under the “Settings” tab, locate the “Name” field.
- Click on the existing name of your iPod Classic to highlight it.
- Type in the new name that you want to assign to your iPod Classic.
- Press Enter or click outside the text field to save the new name.
Note: Make sure that your new iPod Classic name complies with the naming guidelines provided by Apple. The name should not contain any special characters or symbols.
Once you have renamed your iPod Classic, the new name will be displayed in iTunes and will also appear when you connect your device to other computers or devices.
FAQ:
Why would I want to rename my iPod Classic?
Renaming your iPod Classic allows you to easily distinguish it from other devices when connecting it to your computer or syncing it with iTunes.
Can I rename my iPod Classic without using iTunes?
No, you cannot rename your iPod Classic without using iTunes. iTunes provides the necessary tools and settings to manage your iPod Classic, including renaming it.
Is it possible to use special characters or emojis in the iPod Classic’s name?
No, the iPod Classic’s name can only consist of alphanumeric characters (A-Z, a-z, 0-9) and basic punctuation marks. Special characters or emojis are not supported.
Will renaming my iPod Classic affect its functionality or data?
No, renaming your iPod Classic will not affect its functionality or data. It is a purely cosmetic change and has no impact on how the device functions or stores your media files.