
Having a Mac allows you to seamlessly stay connected with your friends and family through iMessage. However, what do you do when someone sends you a message from a non-iMessage platform? Luckily, there are ways to receive non iMessages on your Mac as well.
Using a Third-Party Messaging App
If you want to receive messages from platforms like WhatsApp, Messenger, or Slack on your Mac, you can use third-party messaging apps. These apps act as a bridge between your Mac and the messaging platforms, allowing you to receive and respond to messages directly on your computer.
One popular example is Franz, which supports a multitude of messaging platforms. Simply download and install the app on your Mac, sign in to your accounts, and you’ll be able to receive and respond to messages without needing to switch between devices.
Syncing Messages with Your iPhone
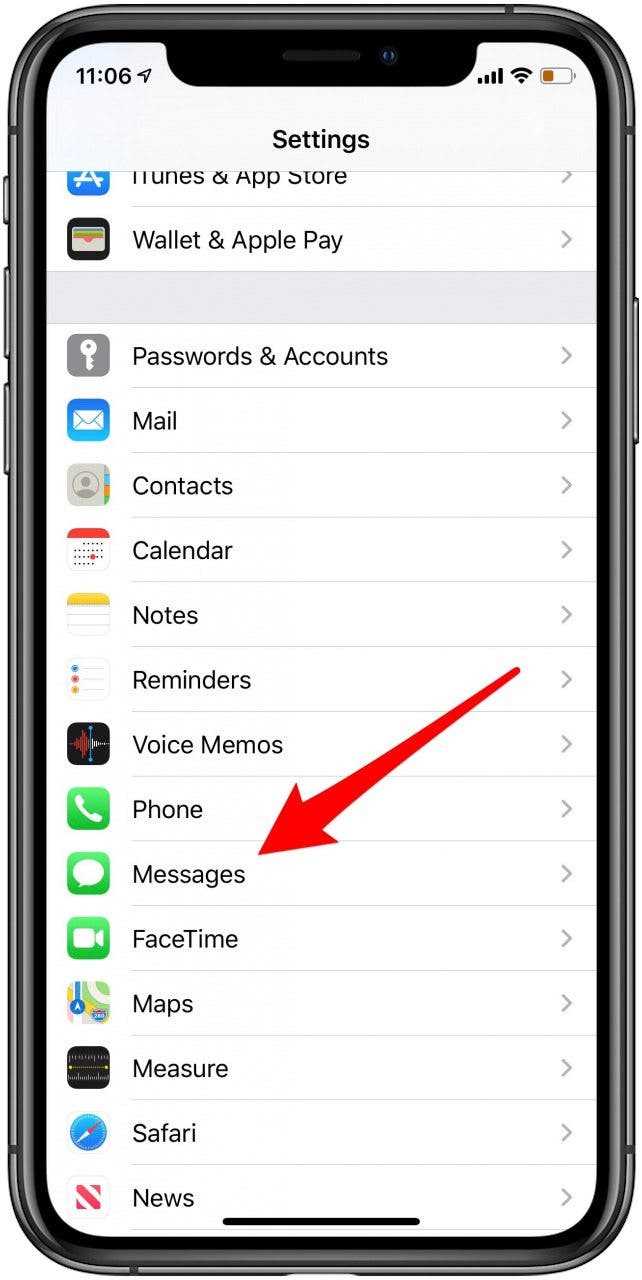
If you’re an iPhone user, you can also sync your messages with your Mac using the Messages app. By enabling the “Text Message Forwarding” feature on your iPhone, you can receive and respond to text messages from non-iMessage platforms directly on your Mac.
To enable this feature, open the Settings app on your iPhone, tap on “Messages,” and then select “Text Message Forwarding.” From there, you can choose which devices you want to allow to send and receive text messages.
Once set up, you’ll be able to view and reply to text messages from non-iMessage users on your Mac using the Messages app.
With these methods, you no longer have to worry about missing out on important messages from non iMessage platforms. Stay connected and stay productive with your Mac.
How to Enable Non iMessages on Mac
Step 1: Open the Messages app on your Mac. You can find it in the Applications folder or by searching for it in Spotlight.
Step 2: Go to the “Messages” menu in the top menu bar and select “Preferences.”
Step 3: In the Preferences window, click on the “Accounts” tab.
Step 4: Look for the iMessage account that is already set up on your Mac. It should be listed in the left sidebar.
Step 5: Below the iMessage account, you will see a checkbox labeled “Enable this account.” Make sure this checkbox is checked.
Step 6: Now, click on the “+” button below the left sidebar to add a new account.
Step 7: In the “Add Account” window, select the type of account you want to add. This can be a Google account, Yahoo! account, or any other supported account.
Step 8: Enter your account details, including your email address and password. Click on the “Sign In” button to continue.
Step 9: Once your account is added, you will see it listed in the left sidebar. Make sure the checkbox next to your account is checked to enable it.
Step 10: Close the Preferences window. Your Mac is now set up to receive non iMessages.
Step 11: To receive non iMessages, simply open the Messages app on your Mac and send a message to someone using their email address or phone number. Your Mac will now send and receive messages from non iMessage contacts as well.
Activate Non iMessages on Mac
If you want to receive non iMessages on your Mac, you can follow these steps to activate the feature:
- Open the Messages app on your Mac by clicking on the Messages icon in the dock or by searching for it in Spotlight.
- Go to the “Messages” menu at the top of the screen and select “Preferences.”
- In the Preferences window, click on the “Accounts” tab.
- Click on the “+” button at the bottom left corner of the window to add a new account.
- A list of messaging services will be displayed. Select the non iMessage service that you want to activate on your Mac.
- Enter your account details for the selected messaging service, such as your username and password.
- Click on the “Sign In” or “Connect” button to connect your account to the Messages app.
- Once your account is connected, you should start receiving non iMessages on your Mac.
If you want to add multiple non iMessage accounts to your Mac, simply repeat steps 4-8 for each account you want to add.
Please note that the availability of non iMessage services may vary depending on your region and the messaging services you use. Some messaging services may require additional configuration or setup steps.
Now that you have activated non iMessages on your Mac, you can enjoy the convenience of receiving and sending messages from different messaging services all in one app.
Configure Non iMessage Preferences
By default, your Mac is configured to receive only iMessages. However, you can also configure your Mac to receive non iMessages, such as text messages and phone calls from your iPhone. This can be useful if you want to stay connected even when your iPhone is not nearby or if you prefer to use your Mac for communication.
To configure non iMessage preferences on your Mac, follow these steps:
- Open the Messages app on your Mac by clicking on the Messages icon in the Dock or by searching for it in Spotlight.
- In the menu bar, click on “Messages” and then select “Preferences”.
- In the Preferences window, click on the “Accounts” tab.
- Under the “iMessage” section, make sure your Apple ID is selected and that the option to “Enable this account” is checked.
- Under the “You can be reached for messages at” section, make sure your phone number is listed and that the checkbox next to it is checked. If your phone number is not listed, you may need to sign in with your Apple ID.
- Next, click on the “Settings” tab.
- Under the “Settings” tab, you will see a list of preferences for non iMessages.
- For text messages, make sure the checkbox next to “Enable this account” is checked.
- For phone calls, make sure the checkbox next to “Enable this account” is checked.
- Optional: You can also customize how you receive phone calls by selecting the option that works best for you under the “Start new conversations from” section.
Once you have finished configuring your non iMessage preferences, you will be able to receive text messages and phone calls on your Mac, in addition to iMessages. You can reply to these messages and calls directly from your Mac, just like you would with iMessages.
Note that in order to use these features, your iPhone must be nearby and connected to the same Wi-Fi network as your Mac. Additionally, make sure that both your iPhone and your Mac are signed in with the same Apple ID.
Customize Non iMessage Notifications
If you want to customize the notifications for non iMessage messages on your Mac, you can easily do so in the Messages app settings. Here’s how:
- Open the Messages app on your Mac.
- Click on “Messages” in the menu bar and select “Preferences” from the dropdown menu.
- In the Preferences window, click on the “General” tab.
- Under the “Notifications” section, you can customize how you receive notifications for non iMessage messages.
- Enable or disable the “Show message notifications” option to control whether or not you want to receive notifications for non iMessage messages.
- If you want to receive notifications for non iMessage messages, you can further customize the notification settings by clicking on the “Options” button.
- In the “Options” menu, you can choose how notifications are displayed, whether they appear as banners or alerts.
- You can also select the duration for which the notification is displayed, from 5 seconds up to 1 minute.
- Additionally, you can choose the sound that is played when a non iMessage message is received.
- After customizing the notification settings to your preference, click “OK” to save the changes.
By following these steps, you can easily customize the notifications for non iMessage messages on your Mac and ensure that you receive them in a way that suits your needs.
Manage Non iMessage Contacts
While your Mac is primarily used for iMessage conversations with other Apple devices, you can also manage non iMessage contacts if needed. Here are a few ways to manage non iMessage contacts on your Mac:
1. Adding Non iMessage Contacts to your Contacts App
You can add non iMessage contacts to your Contacts app on your Mac. This will enable you to have all your contacts in one place, regardless of whether they use iMessage or not.
To add a non iMessage contact to your Contacts app, follow these steps:
- Open the Contacts app on your Mac.
- Click on the “+” button at the bottom left of the app to add a new contact.
- Enter the contact’s name, phone number, email address, and any other relevant information.
- Click on “Add” to save the contact.
2. Sending and Receiving SMS Texts with Non iMessage Contacts
If you have an iPhone and have enabled the “Text Message Forwarding” feature, you can send and receive SMS texts with non iMessage contacts on your Mac. This feature allows you to use your Mac to text contacts who do not use iMessage.
To enable Text Message Forwarding on your iPhone, follow these steps:
- Open the Settings app on your iPhone.
- Tap on “Messages”.
- Select “Text Message Forwarding”.
- Toggle the switch next to your Mac’s name to enable Text Message Forwarding.
- Enter the verification code that appears on your Mac.
Once enabled, you can send and receive SMS texts with non iMessage contacts on your Mac using the Messages app.
3. Using Third-Party Messaging Apps
If you frequently communicate with non iMessage contacts, you can also use third-party messaging apps that are available on the Mac App Store. These apps support various messaging platforms and enable you to send and receive messages with contacts using different messaging services.
To use a third-party messaging app, simply download and install the app from the Mac App Store, and follow the instructions to set it up with your non iMessage contacts.
Conclusion
Although iMessage is the default messaging platform on Apple devices, managing non iMessage contacts on your Mac is still possible. By adding non iMessage contacts to your Contacts app, enabling Text Message Forwarding on your iPhone, or using third-party messaging apps, you can communicate with all your contacts seamlessly on your Mac.
Receive Non iMessages on Mac
Even though Mac and iPhone users enjoy the convenience of iMessage, there are still instances where you need to receive and manage non iMessages on your Mac. Whether it’s text messages from Android users or other types of messaging apps, there are ways to integrate them into your Mac workflow.
1. Forward Messages from Your iPhone
If you receive non iMessages on your iPhone, you can set up your iPhone to automatically forward them to your Mac. Here’s how:
- On your iPhone, go to “Settings” > “Messages” > “Text Message Forwarding”.
- You will see a list of devices that are linked to your Apple ID. Toggle on your Mac to enable message forwarding.
- Your Mac will display a verification code. Enter this code on your iPhone to complete the setup.
Now, whenever you receive a non iMessage on your iPhone, it will also show up on your Mac.
2. Use a Third-Party Messaging App
There are several third-party messaging apps available on the Mac App Store that allow you to send and receive non iMessages. These apps integrate with different messaging services like WhatsApp, Slack, and Facebook Messenger, giving you a unified messaging experience on your Mac.
Simply search for the messaging app you want to use in the Mac App Store, download and install it, and follow the setup instructions. Once configured, you will be able to receive and respond to non iMessages directly from your Mac.
3. Utilize a Virtual Android Device
If you frequently receive text messages from Android users and want to manage them on your Mac, you can create a virtual Android device using software like BlueStacks or Genymotion. These programs allow you to run Android apps on your Mac.
Once you have set up the virtual Android device, install a messaging app of your choice and link it to your phone number. Then, you can receive and respond to text messages on your Mac, just as if you were using an Android phone.
4. Sync Messaging Platforms with a Cloud Service
If you use messaging apps that offer cloud syncing, like WhatsApp or Telegram, you can set up these apps to sync across your devices using the cloud service. This way, you can receive and manage messages from other platforms on your Mac.
Check the settings of the messaging app you want to use and look for options related to cloud syncing. Enable the feature and sign in to your account to access your messages on your Mac.
Conclusion
With these methods, you can receive and manage non iMessages on your Mac, whether it’s through message forwarding, third-party messaging apps, virtual Android devices, or cloud syncing. This allows you to have a seamless messaging experience across devices, helping you stay connected and organized.
Secure Non iMessage Communications
While iMessage provides end-to-end encryption for messages sent between Apple devices, non iMessage communications may not have the same level of security. It’s important to take steps to ensure the privacy and security of your non iMessage conversations on your Mac.
1. Use Encrypted Messaging Apps
Consider using encrypted messaging apps for non iMessage communications on your Mac. These apps use encryption technology to secure the content of your messages, ensuring that only the intended recipients can access them. Some popular encrypted messaging apps include Signal, Telegram, and WhatsApp.
2. Enable Two-Factor Authentication
Enable two-factor authentication for any accounts or services you use for non iMessage communications on your Mac. Two-factor authentication adds an extra layer of security by requiring a secondary verification method, such as a code sent to your phone, in addition to your password. This helps to prevent unauthorized access to your accounts.
3. Keep Software and Apps Updated
Regularly update your Mac’s operating system, as well as any apps or software you use for non iMessage communications. Updates often contain important security patches and bug fixes that help protect against potential vulnerabilities or exploits. Set up automatic updates to ensure you’re always running the latest version.
4. Be Cautious with Public Wi-Fi
Avoid using public Wi-Fi networks for non iMessage communications on your Mac, as they can be insecure and prone to eavesdropping. If you must use a public Wi-Fi network, consider using a virtual private network (VPN) to encrypt your connection and protect your data from being intercepted.
5. Use Strong, Unique Passwords
Use strong, unique passwords for your accounts and services used for non iMessage communications on your Mac. A strong password should be at least 8 characters long, include a combination of letters (both uppercase and lowercase), numbers, and special characters. Avoid reusing passwords across multiple accounts.
6. Be Mindful of Phishing Attempts
Be cautious of phishing attempts that could compromise the security of your non iMessage communications on your Mac. Phishing emails, messages, or websites may try to trick you into revealing sensitive information or login credentials. Be wary of unexpected requests, and always double-check the legitimacy of any communication before providing personal information.
7. Regularly Backup Your Data
Regularly backup your data to ensure you don’t lose important non iMessage communications on your Mac. Use Time Machine or another backup solution to create regular backups of your files. This way, if anything happens to your Mac, you can restore your data and continue your non iMessage conversations without loss.
Conclusion
By following these steps, you can enhance the security of your non iMessage communications on your Mac. Taking proactive measures to protect your privacy and sensitive information is essential in today’s digital world.
Troubleshoot Non iMessage Issues
If you are experiencing issues receiving non iMessages on your Mac, there are several troubleshooting steps you can follow to resolve the problem:
- Check your internet connection: Make sure your Mac is connected to the internet. Non iMessages require an active internet connection to be received on your Mac.
- Verify compatibility: Ensure that the non iMessage service you are trying to receive messages from is compatible with your Mac. Some messaging services may have specific requirements or limitations.
- Update software: Make sure your Mac’s operating system, as well as the messaging app you are using, are up to date. Software updates often include bug fixes and improvements that can resolve compatibility issues.
- Check message settings: Review the settings in your messaging app to ensure that non iMessages are enabled and configured correctly. Look for any options or preferences related to receiving messages from non Apple devices.
- Restart messaging app: Try quitting and relaunching the messaging app you are using. Sometimes, restarting the app can resolve temporary glitches or issues.
- Restart your Mac: If the issue persists, try restarting your Mac. This can help refresh system processes and clear any temporary issues that may be affecting the receipt of non iMessages.
- Check firewall settings: If you have a firewall enabled on your Mac, make sure it is not blocking the incoming non iMessage messages. Adjust the firewall settings accordingly to allow the messaging service.
- Contact support: If you have tried all the above troubleshooting steps and are still unable to receive non iMessages on your Mac, consider reaching out to the support team of the messaging service or Apple support for further assistance.
By following these troubleshooting steps, you should be able to resolve most issues related to receiving non iMessages on your Mac and ensure a smooth messaging experience.
FAQ:
Can I receive non iMessages on my Mac?
Yes, you can receive non iMessages on your Mac by enabling the “Text Message Forwarding” feature. This allows your iPhone to send and receive SMS and MMS messages on your Mac.
What types of messages can I receive on my Mac?
You can receive SMS and MMS messages on your Mac. SMS messages are simple text messages, while MMS messages can contain multimedia such as photos or videos.
Can I reply to non iMessages on my Mac?
Yes, you can reply to SMS and MMS messages on your Mac. When you receive a non iMessage, you can click on the notification to open the Messages app on your Mac and type a reply. The reply will be sent as an SMS or MMS from your iPhone.