
Nowadays, protecting our privacy is more important than ever. One way to do so is by blocking our caller ID when making phone calls. On an iPhone, this can be done easily with just a few simple steps. In this step-by-step guide, we will show you how to permanently block your caller ID on an iPhone, ensuring your privacy and keeping your personal information secure.
Step 1: Open the Settings App
Start by opening the Settings app on your iPhone. This can be found on your home screen, typically represented by a gray icon with gears. Tap on it to launch the app.
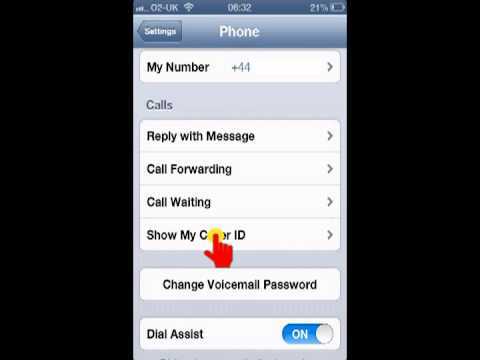
Step 2: Scroll Down and Tap on the “Phone” Option
In the Settings app, scroll down until you see the option “Phone”. It should be in the fifth group of options. Tap on it to open the Phone settings.
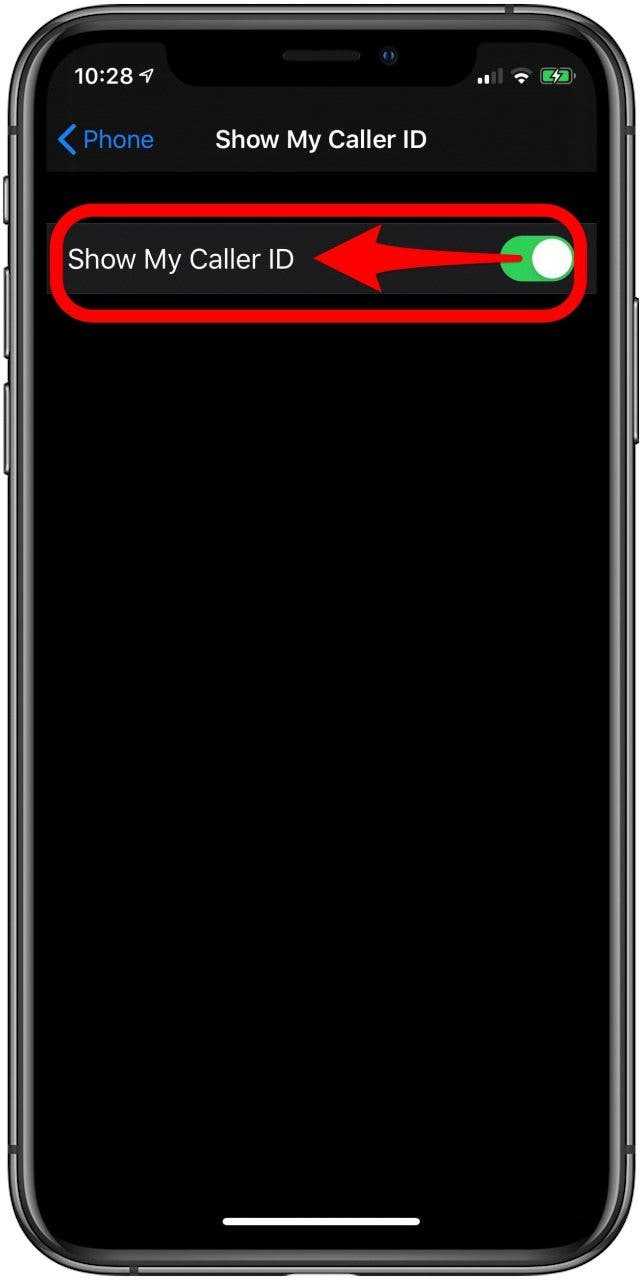
Step 3: Tap on the “Show My Caller ID” Option
In the Phone settings, locate the option “Show My Caller ID”. It should be near the top of the screen. Tap on it to access the Caller ID settings.
Step 4: Disable the “Show My Caller ID” Option
In the Caller ID settings, you will see a toggle switch next to the option “Show My Caller ID”. By default, this switch is turned on, indicating that your Caller ID is visible to others. To permanently block your Caller ID, simply toggle off this switch.
Step 5: Verify That Your Caller ID is Blocked
To verify that your Caller ID is now blocked, you can make a test call to another phone, or ask a friend to call you from their phone. Your phone number should appear as “Private” or “Blocked” on their caller ID display.
By following these simple steps, you can easily and permanently block your caller ID on an iPhone. This will help protect your privacy and keep your personal information secure while making phone calls. Remember to toggle the “Show My Caller ID” switch back on if you ever want to display your Caller ID again. Stay safe and enjoy your newfound privacy!
How to Hide Your Caller ID on iPhone
When making a call from your iPhone, you may want to hide your caller ID for privacy reasons. Here’s a step-by-step guide on how to do it:
- Open the Settings app – Look for the icon with grey gears on your home screen and tap on it.
- Scroll down and tap on “Phone” – In the Settings app, you will see a list of different options. Scroll down until you find the “Phone” option and tap on it.
- Select “Show My Caller ID” – In the Phone settings, you will find an option called “Show My Caller ID.” Tap on it to change the setting.
- Toggle the switch to off – By default, the switch is turned on, which means your caller ID is visible during calls. Tap on the switch to turn it off and hide your caller ID.
- Exit the Settings app – Once you have turned off the caller ID display, you can simply exit the Settings app by pressing the home button or swiping up from the bottom of the screen.
That’s it! Your caller ID will now be hidden when making calls from your iPhone. Keep in mind that hiding your caller ID may affect your ability to reach certain individuals or organizations that require caller ID information for security or identification purposes.
Understand the Benefits of Blocking Your Caller ID
Blocking your caller ID on iPhone can be a useful feature for a variety of reasons. Whether you want to maintain your privacy, protect yourself from unwanted calls, or simply keep your personal number hidden, blocking your caller ID can offer several benefits:
- Privacy: Blocking your caller ID ensures that your personal phone number remains private and is not revealed to the person you are calling.
- Protection from unwanted calls: By blocking your caller ID, you can prevent telemarketers and other unwanted callers from identifying your phone number and contacting you.
- Security: Blocking your caller ID can help protect you from potential fraud or identity theft by making it harder for scammers to reach you or obtain your personal information.
- Professionalism: When making business calls, blocking your caller ID can give you a more professional image, especially if you are calling from a personal phone.
- Freedom to choose when to share your number: By blocking your caller ID, you have more control over when and with whom you choose to share your phone number.
- Prevent unwanted callbacks: If you make a call to someone and don’t want them to be able to call you back directly, blocking your caller ID can help prevent unwanted callbacks.
Overall, blocking your caller ID on iPhone can help you maintain your privacy, protect yourself from unwanted calls, and give you more control over your communication with others.
Check If Your Carrier Supports Caller ID Blocking
To permanently block your caller ID on your iPhone, you need to check if your carrier supports this feature. Not all carriers provide the option to block your caller ID, so it’s important to verify this before proceeding.
Here are the steps to check if your carrier supports caller ID blocking:
- Open the Settings app on your iPhone.
- Scroll down and tap on “Phone”.
- Tap on “Show My Caller ID”.
If you see the “Show My Caller ID” option, it means that your carrier supports caller ID blocking. You can proceed with the steps to permanently block your caller ID on your iPhone. If you don’t see the option, it means that your carrier does not support this feature. In this case, you can contact your carrier to inquire about their caller ID blocking options or consider using a third-party app or service to achieve the same result.
Enable Caller ID Blocking in iPhone Settings
Caller ID blocking prevents your phone number from being visible to the person you are calling. If you want to enable permanent caller ID blocking on your iPhone, you can easily do so by following these steps:
- Open the ‘Settings’ app on your iPhone home screen.
- Scroll down and tap on ‘Phone’.
- In the ‘Phone’ settings, tap on ‘Show My Caller ID’.
- You will see a switch next to ‘Show My Caller ID’. By default, this switch is turned on, which means your caller ID is visible to others. To block your caller ID permanently, toggle this switch off.
- Once you’ve turned off the switch, your Caller ID will be blocked for all outgoing calls from your iPhone.
You can always go back to the ‘Show My Caller ID’ settings and toggle the switch on to enable caller ID for specific calls if you want.
It’s important to note that enabling caller ID blocking on your iPhone may not work in all cases. Some mobile networks or phone service providers may not support permanent caller ID blocking or may display your number regardless of the settings on your device. Additionally, certain emergency services may not accept blocked calls.
By following these simple steps, you can enable permanent caller ID blocking on your iPhone and keep your phone number private when making calls.
Hide Your Caller ID for a Specific Call
If you want to block your caller ID for just one specific call on your iPhone, you can use the following steps:
- Open the Phone app on your iPhone.
- Tap on the Keypad tab at the bottom of the screen.
- Enter the phone number that you want to call with your caller ID hidden.
- Before tapping on the Call button, add the code for blocking your caller ID by entering *67 before the phone number. For example, if you want to call the number 555-123-4567, enter *675551234567.
- Tap on the Call button to make the call.
By following these steps, your caller ID will be hidden for that specific call. The recipient of your call will see “Unknown” or “Blocked” instead of your phone number.
Note that this method may not work for all carriers and countries. Some carriers may have different codes for blocking your caller ID. Make sure to check with your carrier for the correct code to use if *67 does not work.
Block Caller ID for All Outgoing Calls
If you want to permanently block your Caller ID for all outgoing calls on your iPhone, you can follow these steps:
- Open the Settings app on your iPhone.
- Scroll down and tap on Phone.
- Tap on Show My Caller ID.
- By default, the toggle next to Show My Caller ID is enabled. Tap on the toggle to disable it.
- Once disabled, your Caller ID will be blocked for all outgoing calls from your iPhone.
If you want to unblock your Caller ID for future outgoing calls, you can repeat the steps above and enable the toggle next to Show My Caller ID.
Blocking your Caller ID can be useful for maintaining privacy or when you don’t want the person you’re calling to see your phone number. However, keep in mind that some recipients may not answer calls with blocked Caller IDs, so use this feature judiciously.
Use a Third-Party App to Block Your Caller ID
If you want to block your caller ID on your iPhone permanently, you can use a third-party app. These apps offer additional features and flexibility compared to the built-in options on your iPhone. Here is a step-by-step guide on how to use a third-party app to block your caller ID:
- Open the App Store on your iPhone.
- Search for a third-party app that allows you to block your caller ID. Some popular options include “Hide My Number,” “Caller ID Faker,” and “Ghostly.”
- Choose and download the app that suits your preferences.
- Launch the app once it is installed on your iPhone.
- Follow the on-screen instructions to set up the app and grant the necessary permissions.
- Once the app is set up, launch it whenever you want to block your caller ID.
- Enter the recipient’s phone number or choose a contact from your address book.
- Select the option to block your caller ID.
- Confirm the action and make the call using the app.
Using a third-party app to block your caller ID can be advantageous as it may provide additional features such as call recording, call forwarding, or customizable caller ID settings. However, keep in mind that some apps may require a subscription or may have limitations in certain countries or regions.
Troubleshooting Caller ID Blocking Issues
If you are experiencing any issues with permanently blocking your Caller ID on your iPhone, here are a few troubleshooting steps you can try:
- Check your carrier’s settings: Some carriers may have their own settings that override the iPhone’s Caller ID blocking feature. Contact your carrier and verify if they have any restrictions on Caller ID blocking.
- Restart your iPhone: A simple restart can often resolve minor software glitches. Press and hold the power button until you see the “slide to power off” option. Slide to power off, wait a few seconds, then press and hold the power button again to turn your iPhone back on.
- Update your iPhone: Make sure that your iPhone is running the latest version of iOS. Outdated software can sometimes cause compatibility issues. To check for updates, go to Settings, then General, and select Software Update.
- Reset network settings: Resetting network settings can sometimes fix issues related to cellular connectivity. Go to Settings, then General, and select Reset. Choose “Reset Network Settings” and enter your passcode if prompted. Note that this will remove your saved Wi-Fi passwords.
- Disable and re-enable Caller ID blocking: Turn off the Caller ID blocking feature in the Phone settings, wait a few seconds, then turn it back on. This can help refresh the settings and resolve any temporary issues.
- Contact Apple Support: If none of the above steps resolve your issue, it may be necessary to contact Apple Support for further assistance. They can provide more specific troubleshooting steps or determine if there is a hardware-related issue with your device.
Remember, the availability of Caller ID blocking can vary depending on your carrier and location. Some countries or carriers may not support this feature, so it’s important to check with your specific provider for more information.
By following these troubleshooting steps, you should be able to resolve most issues related to permanently blocking your Caller ID on your iPhone.
FAQ:
Can I block my caller ID for specific contacts only?
Unfortunately, it is not possible to block your caller ID for specific contacts only on the iPhone. When you block your caller ID, it blocks it for all outgoing calls.
What happens when I block my caller ID?
When you block your caller ID, the person you are calling will see “Private” or “Unknown” on their caller ID display, depending on their phone carrier and settings.
Are there any other ways to hide my caller ID on iPhone?
Yes, besides permanently blocking your caller ID, you can also use the *67 prefix before dialing a phone number to temporarily block your caller ID for that specific call. For example, if you want to call 555-123-4567, you would dial *675551234567. This method will only hide your caller ID for that particular call.
Will blocking my caller ID work for FaceTime calls as well?
Yes, blocking your caller ID will work for both regular phone calls and FaceTime calls. Your caller ID will be blocked for all outgoing calls made from your iPhone, regardless of whether it is a phone call or a FaceTime call.
Can I unblock my caller ID after blocking it?
Yes, you can unblock your caller ID by following the same steps mentioned earlier. Simply go to your iPhone’s “Settings” app, tap on “Phone”, and toggle the switch next to “Show My Caller ID” to the on position. Your caller ID will then be unblocked for all outgoing calls.
Is there any way to block my caller ID permanently without using the iPhone settings?
No, the only way to permanently block your caller ID on an iPhone is through the iPhone settings. There are no alternative methods to permanently block your caller ID without accessing the phone’s settings.