
Backing up your iPhone to iCloud is an essential step to ensure that your data is safe and easily accessible. However, there may be times when you need to manually force a sync with iCloud to ensure that all your recent changes and updates are backed up.
Fortunately, forcing a sync with iCloud on your iPhone is a straightforward process that can be completed in just a few simple steps.
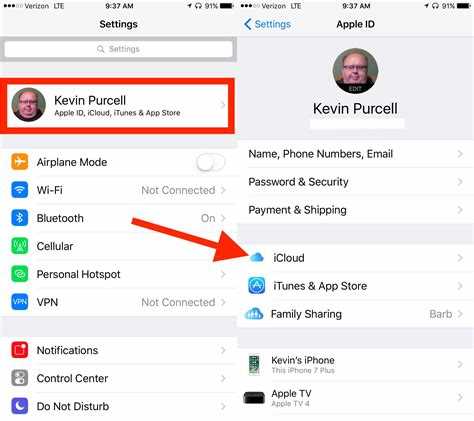
To force sync your iPhone with iCloud, start by opening the Settings app on your device. Scroll down and tap on your Apple ID banner at the top of the screen.
Next, tap on “iCloud” and then choose “iCloud Backup.” Here, you will find an option to “Back Up Now.” Tap on this option to initiate a manual backup of your iPhone to iCloud. This will force a sync with iCloud and ensure that all your data is up to date and backed up.
Sync Your iPhone with iCloud
If you want to keep your iPhone synchronized with iCloud, follow these simple steps:
- Connect to Wi-Fi: Make sure your iPhone is connected to a Wi-Fi network. To do this, go to the Settings app and tap on Wi-Fi. Select a network from the list and enter the password if prompted.
- Enable iCloud Backup: Open the Settings app and tap on your name at the top. Then tap on “iCloud” and select “iCloud Backup”. Toggle on the “iCloud Backup” switch.
- Backup all data: Tap on “Back Up Now” to create a backup of all your iPhone data on iCloud. Ensure that your iPhone is connected to Wi-Fi and charging during this process to avoid any interruptions.
- Sync apps and data: To sync your apps and data with iCloud, go to the Settings app and tap on your name at the top. Then tap on “iCloud” and toggle on the switches for the apps and features you want to sync.
- Check iCloud storage: To see how much iCloud storage you have left, go to the Settings app and tap on your name at the top. Then tap on “iCloud” and select “Manage Storage”. Here, you can view your current storage usage and upgrade your iCloud storage plan if needed.
- Force sync: If you want to manually force a sync with iCloud, go to the Settings app and tap on your name at the top. Then tap on “iCloud” and select the app or feature you want to sync. Toggle off the switch and then toggle it back on to initiate a manual sync.
By following these steps, you can ensure that your iPhone is always in sync with iCloud, allowing you to access your data and files from any device connected to your iCloud account.
Learn How to Force Sync
Sometimes, your iPhone may not automatically sync with iCloud, leaving you with outdated data or missing files. In such cases, you can force sync your iPhone with iCloud to ensure that all your data is up to date. Here’s how you can do it:
- Make sure you have a stable internet connection on your iPhone.
- Open the Settings app on your iPhone.
- Scroll down and tap on your Apple ID, which is located at the top of the Settings menu.
- In the Apple ID menu, tap on “iCloud”.
- Scroll down to find the specific app or service that you want to force sync, such as “Photos” or “Contacts”.
- Tap on the app or service, and you will see a toggle switch next to it.
- Turn off the toggle switch to disable the syncing for that app or service.
- Wait for a few seconds, and then turn on the toggle switch to enable the syncing again.
- Your iPhone will now force sync with iCloud, ensuring that all your data is synced and up to date.
If the force sync does not work, you can try signing out of your iCloud account and then signing back in. This can help resolve any sync issues that you might be facing. To sign out of your iCloud account, go to the Apple ID menu in Settings, scroll to the bottom, and tap on “Sign Out”. Then, sign back in using your Apple ID and password.
By following these simple steps, you can easily force sync your iPhone with iCloud and keep all your data in sync across your devices. This is especially useful when you need to ensure that your most recent files, photos, and contacts are accessible from anywhere.
Simple Steps for Syncing
Syncing your iPhone with iCloud is a straightforward process that ensures your data is updated and accessible across all your devices. Follow these simple steps to force sync your iPhone with iCloud:
- Open the Settings app on your iPhone.
- Scroll down and tap on your name at the top of the screen.
- Select “iCloud” from the menu.
- Ensure that “iCloud Drive” is enabled by tapping the toggle switch next to it.
- Scroll down and tap on “iCloud Backup”.
- Tap on “Back Up Now” to initiate an immediate backup of your iPhone to iCloud.
- Wait for the backup process to complete. This may take a few minutes, depending on the size of your data.
Once the backup is complete, your iPhone will be synced with iCloud, and any changes or additions to your data will be reflected across all your devices connected to the same iCloud account. It is recommended to periodically force sync your iPhone with iCloud to ensure your data is always up to date and accessible.
Utilize iCloud for iPhone Syncing
iCloud is a powerful service that allows you to sync your iPhone with your other Apple devices seamlessly. By syncing your iPhone with iCloud, you can ensure that your data, such as contacts, calendars, photos, and more, is always up-to-date and readily accessible across all your devices.
To utilize iCloud for iPhone syncing, follow these simple steps:
- Set up iCloud on your iPhone:
- Go to your iPhone Settings.
- Tap on your name at the top of the Settings menu.
- Select “iCloud” from the list of options.
- Enter your Apple ID and password to sign in to iCloud.
- Toggle on the categories you want to sync, such as Contacts, Calendars, Photos, and more.
- Wait for your iPhone to finish syncing with iCloud.
- Enable iCloud sync for specific apps:
- Go to your iPhone Settings.
- Scroll down and tap on the name of the app you want to enable iCloud sync for.
- Toggle on the “iCloud” option for that specific app.
- Repeat this process for other apps you want to sync with iCloud.
- Ensure a stable internet connection:
- iCloud syncing requires a stable internet connection, so make sure your iPhone is connected to Wi-Fi or has a cellular data connection enabled.
- Manual sync:
- If you want to manually force a sync with iCloud, go to your iPhone Settings, tap on your name, then select “iCloud”. From there, tap on “iCloud Backup” and choose “Back Up Now” to initiate a manual sync.
By following these steps, you can effectively utilize iCloud for iPhone syncing. With iCloud, you can enjoy the convenience of having your data seamlessly synced across all your Apple devices, ensuring that you never miss a beat and always have your important information at your fingertips.
Sync Your iPhone Data Easily
Keeping your iPhone data in sync with iCloud is essential to ensure that all your important information is backed up and easily accessible. Syncing your iPhone with iCloud is a simple process that can be done in just a few steps. Here’s a guide on how to do it:
Step 1: Enable iCloud Sync
- Open “Settings” on your iPhone.
- Tap on your name at the top of the screen.
- Select “iCloud.”
- Scroll down and make sure “iCloud Backup” is turned on. This will automatically back up your iPhone data to iCloud.
Step 2: Choose What to Sync
Once iCloud sync is enabled, you can choose which types of data you want to sync.
- To sync your contacts, toggle the “Contacts” switch to the on position.
- To sync your calendars, toggle the “Calendars” switch to the on position.
- To sync your photos, toggle the “Photos” switch to the on position.
- You can also sync other types of data like messages, notes, and reminders, by toggling the respective switches to the on position.
Step 3: Perform a Manual Sync
If you want to force a sync with iCloud to ensure all your data is up to date, you can manually trigger a sync.
- Open “Settings” on your iPhone.
- Tap on your name at the top of the screen.
- Select “iCloud.”
- Scroll down and tap on “iCloud Backup.”
- Tap on “Back Up Now” to initiate a manual sync with iCloud.
Step 4: Check Your Sync Status
After performing a sync, you can check the sync status to ensure that everything has been successfully synced.
- Open “Settings” on your iPhone.
- Tap on your name at the top of the screen.
- Select “iCloud.”
- Scroll down to the “Backup” section.
- Here, you’ll see the date and time of the last backup, indicating that your iPhone data has been synced with iCloud.
By following these simple steps, you can easily sync your iPhone data with iCloud and ensure that your important information is always backed up and accessible. Remember to regularly perform manual syncs to keep your data up to date.+
Quickly Sync Your iPhone with iCloud
If you want to ensure that your iPhone is always up to date with the latest data and settings, you need to sync it with iCloud regularly. This can be done quickly and easily in just a few simple steps. Here’s how:
- Ensure that you have an active internet connection on your iPhone.
- Open the Settings app on your iPhone.
- Tap on your Apple ID at the top of the screen.
- Scroll down and tap on “iCloud”.
- Make sure that the toggle switch next to “iCloud Backup” is turned on.
- Tap on “Back Up Now”.
- Your iPhone will now begin syncing with iCloud. This process may take a few minutes, depending on the amount of data you have on your iPhone and the speed of your internet connection.
While your iPhone is syncing with iCloud, it’s important to keep your iPhone connected to a stable internet connection and avoid using other data-intensive apps or features on your iPhone. This will help ensure a smooth and successful sync.
Once the sync is complete, your iPhone will be backed up to iCloud, and any changes or updates made on your iPhone will be reflected in iCloud. This includes things like contacts, messages, photos, and app data.
By regularly syncing your iPhone with iCloud, you can have peace of mind knowing that your important data is always backed up and easily accessible in case of any issues with your iPhone.
Effortlessly Sync iPhone with iCloud
Syncing your iPhone with iCloud allows you to easily backup and access your data across all your devices. Whether you want to sync your photos, contacts, or apps, iCloud makes it effortless to keep everything up to date.
To get started with syncing your iPhone with iCloud, follow these simple steps:
- Open the Settings app on your iPhone.
- Tap on your name at the top of the screen.
- Select “iCloud” from the list of options.
- Toggle on the features you want to sync, such as Contacts, Calendars, Photos, Notes, and more.
- If prompted, sign in with your Apple ID.
- Wait for your iPhone to sync with iCloud. This may take a few moments depending on the amount of data you have.
Once your iPhone is synced with iCloud, any changes you make to your data will be reflected across all your devices. For example, if you add a new contact on your iPhone, it will automatically appear on your iPad and Mac as well.
It’s important to note that syncing with iCloud requires an active internet connection. Make sure you’re connected to Wi-Fi or have a cellular data plan.
If you ever need to force sync your iPhone with iCloud, you can do so by following these steps:
- Open the Settings app on your iPhone.
- Tap on your name at the top of the screen.
- Select “iCloud” from the list of options.
- Scroll down to the bottom and tap on “iCloud Backup” or “iCloud Sync” depending on your device’s iOS version.
- Tap on “Back Up Now” or “Sync Now” to initiate a manual sync with iCloud.
By following these steps, you can effortlessly sync your iPhone with iCloud and ensure your data is always backed up and accessible across all your devices.
Mastering iPhone Syncing with iCloud
iCloud is a powerful tool that allows you to sync your iPhone with your other Apple devices and keep your important data up to date. By following a few simple steps, you can become a pro at syncing your iPhone with iCloud.
Step 1: Set up iCloud on your iPhone
- Go to “Settings” on your iPhone.
- Tap on your Apple ID at the top of the screen.
- Select “iCloud” from the menu.
- Enable the toggle switch for the apps and data you want to sync with iCloud, such as contacts, calendars, and photos.
- Enter your Apple ID and password if prompted.
- Your iPhone is now set up with iCloud.
Step 2: Enable iCloud sync for specific apps
- Open the app you want to sync with iCloud, such as Contacts or Calendars.
- Tap the settings icon within the app, usually represented by a gear or three dots.
- Select “iCloud” or “Account” from the settings menu.
- Enable the toggle switch for iCloud sync.
- Repeat this process for each app you want to sync with iCloud.
Step 3: Force sync your iPhone with iCloud
If you want to manually force your iPhone to sync with iCloud:
- Connect your iPhone to a Wi-Fi or cellular network.
- Open the “Settings” app on your iPhone.
- Tap on your Apple ID at the top of the screen.
- Select “iCloud” from the menu.
- Scroll down and tap “iCloud Backup” or “iCloud Drive” depending on what you want to sync.
- Tap “Backup Now” or “Sync Now” to start the sync process.
Step 4: Troubleshooting iCloud syncing issues
If you encounter any issues with iCloud syncing, try the following:
- Check your internet connection: Ensure that your iPhone is connected to a stable Wi-Fi or cellular network.
- Restart your iPhone: Sometimes a simple restart can resolve syncing issues.
- Update your iOS: Make sure you are running the latest version of iOS on your iPhone.
- Reset iCloud settings: Go to “Settings” > “Your Apple ID” > “iCloud” > “Reset iCloud Settings” and follow the prompts.
- Contact Apple Support: If you are still experiencing issues, reach out to Apple Support for further assistance.
By following these steps and troubleshooting tips, you can master iPhone syncing with iCloud and ensure that your important data is always synced and up to date across all your devices.
Streamline iPhone Syncing with iCloud
Synchronizing your iPhone with iCloud is a convenient way to keep your data up-to-date and accessible across all your Apple devices. With a few simple steps, you can streamline the synchronization process and ensure that your iPhone is always in sync with your iCloud account.
To force sync your iPhone with iCloud:
- Enable iCloud Sync: Go to your iPhone’s Settings and tap on your Apple ID at the top of the screen. Then, tap on iCloud and make sure that the toggle switch next to the apps you want to sync is turned on.
- Manually Trigger Sync: Open the app you want to sync, such as Contacts or Calendar, and pull down on the screen to refresh the data. This will force the app to sync with iCloud and update any changes made on other devices.
- Check iCloud Settings: In your iPhone’s Settings, tap on your Apple ID and then on iCloud. Make sure that all the desired apps are selected for synchronization. Also, ensure that you are signed in to the correct iCloud account.
- Restart Your iPhone: Sometimes, restarting your iPhone can help resolve any syncing issues. Press and hold the power button until the “slide to power off” slider appears. Slide it to turn off your iPhone, and then press the power button again to turn it back on.
- Update iOS: Keeping your iPhone’s operating system up-to-date can fix any bugs or glitches that may affect synchronization. Go to Settings, tap on General, and then on Software Update. If an update is available, follow the instructions to install it.
By following these steps, you can streamline the syncing process and ensure that your iPhone stays in sync with iCloud. This will allow you to access and update your data seamlessly across all your Apple devices.
Note: The steps provided may vary slightly depending on your iPhone model and iOS version.
FAQ:
Why would I need to force sync my iPhone with iCloud?
You might need to force sync your iPhone with iCloud in order to ensure that all your data, including photos, contacts, and app data, is backed up and synced with iCloud. This can be useful before performing a software update or restoring your iPhone.
Can I force sync my iPhone with iCloud using a computer?
No, you cannot force sync your iPhone with iCloud using a computer. You can only do it directly on your iPhone by following the steps mentioned earlier.
How often should I force sync my iPhone with iCloud?
It is recommended to regularly sync your iPhone with iCloud to ensure that your data is backed up. You can manually force sync your iPhone with iCloud whenever you feel the need to, but it’s a good practice to do it at least once a week or before making any major changes to your device.
Will force syncing my iPhone with iCloud delete any data?
No, force syncing your iPhone with iCloud will not delete any data. It will only initiate a manual backup and sync of your data with iCloud. However, if you choose to restore your iPhone from an iCloud backup, it will replace the current data on your iPhone with the backed up data.