
Gmail is one of the most popular email providers worldwide, offering a simple and user-friendly interface, along with powerful features. If you want to use Gmail to send email through an external program or service, you will need to know the SMTP server settings. These settings are crucial for ensuring that your emails are sent successfully and securely.
In this step-by-step guide, we will walk you through the process of finding your Gmail SMTP server settings. Whether you’re a business owner trying to set up a professional email address or an individual looking to send emails from a different platform, this guide will provide you with the necessary instructions to get started.
Before we begin, it’s important to note that Gmail has specific security measures in place to prevent unauthorized access and spamming. You will need to enable access to less secure apps or generate an app-specific password for the program or service you wish to use with Gmail. This ensures that only legitimate and trusted sources can send emails on your behalf.
So, if you’re ready to configure your email program or service to send emails using Gmail, let’s dive in and discover the step-by-step process of finding your Gmail SMTP server settings!
Step 1: Accessing Gmail Account Settings
To configure the SMTP server settings for your Gmail account, you need to access your account settings. Follow these steps to access your Gmail account settings:
- Open a web browser and go to www.gmail.com.
- Enter your email address and password to sign in to your Gmail account.
- Once you are signed in, locate and click on the gear icon in the top-right corner of the Gmail interface. This will open a drop-down menu.
- In the drop-down menu, click on the “Settings” option. This will open the Gmail settings page.
Alternatively, you can directly access the Gmail settings page by entering the following URL in your web browser: https://mail.google.com/mail/u/0/#settings.
 |
|
| Step 3: Gear icon | Step 4: Gmail settings page |
Once you have accessed the Gmail settings page, you are ready to proceed to Step 2: Enabling IMAP/POP access.
Step 2: Enabling SMTP Server Settings
Once you have located the SMTP server settings for Gmail, the next step is to enable them in your Gmail account. Follow the steps below to enable SMTP server settings:
- Log in to your Gmail account using your credentials.
- Click on the gear icon in the top right corner of the page and select “Settings” from the dropdown menu.
- In the Settings page, navigate to the “Forwarding and POP/IMAP” tab.
- Scroll down to the “IMAP Access” section and click on the “Enable IMAP” radio button.
- Scroll down further to the “POP Download” section and click on the “Enable POP for all mail” radio button.
- Below the “POP Download” section, you will find the “IMAP Access” section. Make sure that both “Enable IMAP” and “Enable POP for all mail” are selected.
- Click on the “Save Changes” button at the bottom of the page to enable the SMTP server settings in your Gmail account.
Enabling the SMTP server settings allows your Gmail account to send and receive emails using an external email client or application. With these settings enabled, you can now proceed to configure your email client or application with the SMTP server information.
Step 3: Configuring SMTP Server Address
Now that you have your Gmail SMTP credentials ready, you need to configure your email client or application to connect to the Gmail SMTP server. This requires providing the SMTP server address, port number, and choosing the appropriate security settings.
Follow these steps to configure the SMTP server address:
- Open your email client or application where you want to send emails using the Gmail SMTP server.
- Locate the SMTP server settings or the section where you can add an SMTP server.
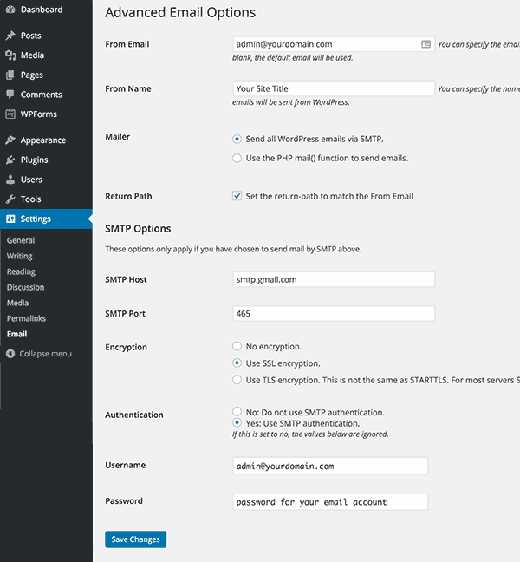
- Enter the SMTP server address for Gmail, which is smtp.gmail.com.
- Specify the port number for the SMTP server. For a secure connection, use 465. If you prefer to use STARTTLS encryption, use port 587.
- Choose the appropriate security settings. If you go with port 465, choose SSL/TLS encryption. If you go with port 587, choose STARTTLS encryption.
- Some email clients might require you to enable authentication. Enable it and enter your Gmail SMTP credentials – your email address and password.
Once you have configured the SMTP server address, port number, and security settings, you are ready to start sending emails through Gmail’s SMTP server using your email client or application.
Keep in mind that you may also need to adjust other settings, such as the display name, reply-to address, and other email-specific configurations, depending on your email client or application.
Step 4: Choosing SMTP Port
Once you know the server address and hostname for Gmail’s SMTP server, the next step is to choose the appropriate SMTP port for your email client or application. SMTP ports are used to establish a communication channel between your device and the email server.
Gmail offers two different SMTP ports that you can choose from:
- Port 587 (recommended): This is the standard SMTP port for email submission. It supports encryption and requires authentication. If you use this port, your emails will be encrypted and secure.
- Port 465: This port is used for SMTP over SSL (Secure Sockets Layer). It is the older method of securing email communications. If you choose this port, your emails will be encrypted, but it does not require authentication.
It is generally recommended to use port 587 as it provides better security through encryption and requires authentication. However, some older email clients or applications may only support port 465 for secure SMTP communication.
Here’s how to choose the SMTP port in commonly used email clients:
- Outlook: Go to the Account Settings menu, select your email account, click on More Settings, navigate to the Advanced tab, and choose the desired port under the Outgoing server (SMTP) section.
- Thunderbird: Open the Account Settings, select the Outgoing Server (SMTP), choose the server for your Gmail account, click on Edit, and update the port number in the Server Settings dialog.
- Apple Mail: Open the Preferences, go to the Accounts tab, select your Gmail account, navigate to the Outgoing Mail Server (SMTP) section, and choose the desired port from the dropdown menu.
Remember to save the changes and test the SMTP configuration to ensure that the chosen port is working correctly for your email client or application.
| SMTP Port | Encryption | Authentication |
|---|---|---|
| 587 | TLS (Transport Layer Security) | Required |
| 465 | SSL (Secure Sockets Layer) | Not required |
By following the steps mentioned above, you can easily choose the appropriate SMTP port for your Gmail account and ensure secure and reliable email communication.
Step 5: Authentication and Encryption
Once you have set up your SMTP server settings for Gmail, the next step is to configure the authentication and encryption options for your email client or application. These settings will ensure the security and privacy of your email communications.
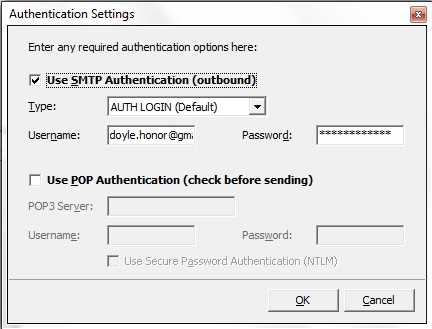
Authentication:
Gmail SMTP server requires secure authentication to send emails. Make sure you enable authentication in your email client’s settings by selecting the appropriate option. This will typically be labeled as “Enable authentication” or “Use secure authentication”. You may also need to enter your Gmail username and password for authentication.
Encryption:
Gmail SMTP server supports both SSL (Secure Sockets Layer) and TLS (Transport Layer Security) encryption protocols. It is highly recommended to enable encryption to protect your email transmissions from unauthorized access.
To enable encryption, you will need to select the appropriate encryption method in your email client’s settings. The options may vary depending on the client or application you are using, but commonly, you will find options like “SSL”, “TLS”, or “StartTLS”. Choose the option that matches your email client’s requirements and preferences.
Note: It is important to use encryption for authentication and data transmission to prevent unauthorized access to your email content. Without encryption, your emails may be intercepted and viewed by unauthorized individuals.
Confirm the changes in your email client’s settings and test your connection to ensure that authentication and encryption are working properly. You can send a test email to yourself or a trusted recipient to verify that the email is being sent securely.
Once you have completed these steps, you have successfully configured the authentication and encryption settings for your Gmail SMTP server. Your email communications will now be secure and protected.
Step 6: Testing SMTP Server Settings
Once you have configured your Gmail SMTP server settings, it is essential to test them to ensure everything is working correctly. Here are the steps to test your SMTP server settings:
- Open your email client or application that supports SMTP.
- Create a new email message.
- Enter your own email address in the “To” field.
- Compose a subject and message for the email.
- Click on the “Send” button.
If the email is sent successfully, it means your SMTP server settings are correct. However, if you encounter any issues or receive an error message, you may need to review and update your SMTP server settings.
Common issues and troubleshooting:
- Check if you have entered the correct SMTP server address. For Gmail SMTP, the server address is smtp.gmail.com and the port number is 587.
- Make sure you have enabled the option for “Allow Less Secure Apps” in your Gmail account settings. This allows your email client to access your Gmail account using SMTP.
- Double-check your username and password for the SMTP server. Ensure that you have entered them correctly.
- Ensure that your internet connection is working properly. Sometimes, connectivity issues can prevent your email client from sending emails.
By following these steps and troubleshooting any issues, you can verify the functionality of your SMTP server settings and ensure that you can send emails through Gmail’s SMTP servers successfully.
FAQ:
What is Gmail SMTP server?
Gmail SMTP server is an outgoing mail server provided by Google. It allows you to send emails using your Gmail account from any email client or application.
How do I find the SMTP server settings for Gmail?
Finding the SMTP server settings for Gmail requires you to navigate to your Gmail account settings. From there, you can access the “Forwarding and POP/IMAP” tab, where you will find the SMTP server settings for Gmail.
How do I set up Gmail SMTP server in Outlook?
To set up Gmail SMTP server in Outlook, you need to open Outlook and go to the “File” tab. From there, select “Add Account”. In the account setup wizard, choose the option to manually configure server settings and click “Next”. Enter your name, Gmail email address, SMTP server address (smtp.gmail.com), and your Gmail password. Select the appropriate SMTP port and the encryption method (SSL/TLS). Click “Test Account Settings” to ensure everything is working correctly, and then click “Finish” to complete the setup.