
Calibrating your iPhone screen is an essential task to ensure optimal display performance and accurate color representation. Whether you have noticed unusual color shifts or want to fine-tune your device’s screen for better visual experience, this step-by-step guide will walk you through the process of calibrating your iPhone screen.
Step 1: Prepare your iPhone
The first step is to make sure your iPhone is fully charged and that you are in a well-lit environment. It is important to have a stable battery level and consistent lighting conditions to get accurate results during the calibration process.
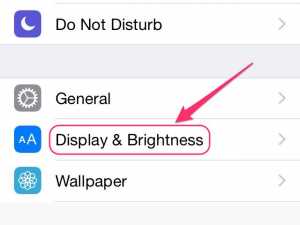
Step 2: Access the Display & Brightness settings
Next, go to the Settings app on your iPhone and tap on “Display & Brightness”. This is where you can adjust various display and brightness settings, including the calibration options.
Step 3: Adjust color temperature and tint
In the Display & Brightness settings, you will find the color temperature and tint options. These controls allow you to fine-tune the white balance and color accuracy of your iPhone screen. Experiment with different values until you achieve the desired color representation.
Step 4: Use a color calibration app
If you want more precise calibration results, you can use a color calibration app. There are several apps available on the App Store that can help you calibrate your iPhone screen by providing advanced tools and tests. Follow the instructions provided by the app to achieve the best results.
Step 5: Test and verify the calibration
After making adjustments, it is important to test and verify the calibration of your iPhone screen. Display a variety of images and videos with different color ranges to check if they appear accurately on your device. Use reference images or consult with a professional if necessary.
Conclusion:
Calibrating your iPhone screen can greatly improve the visual experience and ensure accurate color representation. By following the steps outlined in this guide, you can easily calibrate your iPhone screen and enjoy crisp, vibrant visuals on your device.
Note: It is recommended to periodically recalibrate your iPhone screen to account for any changes in lighting conditions or software updates that may affect the display performance.
Check for Updates
Before calibrating your iPhone screen, it’s important to ensure that you have the latest software updates installed. This is because software updates often include bug fixes and improvements that can affect screen calibration.
To check for updates on your iPhone, follow these steps:
- Open the Settings app on your iPhone.
- Scroll down and tap on “General”.
- Tap on “Software Update”.
- Your iPhone will then check for updates. If an update is available, you’ll see a message indicating this.
- If an update is available, tap on “Download and Install” to begin the update process. Make sure your iPhone is connected to Wi-Fi and has sufficient battery life.
- Once the update is downloaded and ready to install, tap on “Install Now”.
- Follow the on-screen instructions to complete the update. Your iPhone may restart during the process.
After updating your iPhone, it’s a good idea to restart it to ensure any changes take effect. To restart your iPhone, press and hold the power button until the “Slide to Power Off” option appears, then slide to power off. Wait a few seconds, then press and hold the power button again until the Apple logo appears.
By keeping your iPhone updated, you can ensure that you have the latest software improvements and bug fixes, which can help optimize screen calibration.
Adjust Screen Brightness
To calibrate your iPhone screen, one important aspect to consider is adjusting the screen brightness. The screen brightness affects the overall display quality and battery life of your iPhone. Here is a step-by-step guide to adjust the screen brightness on your iPhone:
- Unlock your iPhone and go to the home screen.
- Swipe up from the bottom of the screen to access the Control Center.
- In the Control Center, locate the brightness slider.
- Slide your finger up or down on the brightness slider to increase or decrease the screen brightness.
- Observe the changes in the screen brightness and adjust it to your preferred level.
You can also manually adjust the screen brightness by going into the Settings app:
- Unlock your iPhone and go to the home screen.
- Tap on the Settings app icon to open the Settings.
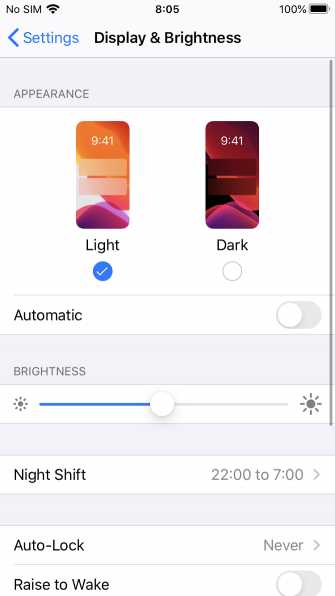
- Scroll down and tap on “Display & Brightness”.
- In the “Display & Brightness” settings, adjust the brightness slider by dragging it to the left or right.
- Observe the changes in the screen brightness and adjust it to your preferred level.
By adjusting the screen brightness on your iPhone, you can customize the display to suit your preferences and optimize battery life.
Enable True Tone
True Tone is a feature available on newer iPhone models that automatically adjusts the display’s color temperature based on the lighting conditions around you. This helps to provide a more natural and accurate viewing experience.
To enable True Tone on your iPhone, follow these steps:
- Open the “Settings” app on your iPhone.
- Scroll down and tap on “Display & Brightness”.
- Under the “DISPLAY” section, you’ll see the option for “True Tone”. Tap the switch next to it to enable it.
- A message will appear explaining that True Tone uses the iPhone’s ambient light sensor to detect and adjust the display based on the surrounding lighting conditions. Tap “Continue” to proceed.
Once True Tone is enabled, your iPhone’s screen will automatically adjust the color temperature to match the lighting conditions in your environment. This can help reduce eye strain and make the display more comfortable to look at, especially in different lighting situations.
Reset Display Settings
If your iPhone screen is still not functioning properly after calibrating it, you may need to reset the display settings. Resetting the display settings will revert all the changes you made and restore them to the default settings. Here’s how you can do it.
- Open the Settings app on your iPhone.
- Scroll down and tap on “Display & Brightness”.
- Tap on “Reset” at the bottom of the screen.
- Tap on “Reset Display Settings”.
- You will be prompted to enter your passcode or use Face ID/Touch ID authentication.
- Confirm the reset by tapping on “Reset Display Settings” again.
- Your iPhone screen will go black for a moment, and the display settings will be reset to the default settings.
After the reset, you can calibrate your iPhone screen again using the previous steps mentioned in this guide. Hopefully, resetting the display settings will fix any issues you were experiencing with the screen.
Use Built-in Calibration Tools
One of the easiest ways to calibrate the screen on your iPhone is by using the built-in calibration tools. These tools are designed to help you adjust the screen settings to match your preferences and improve the overall display quality.
Here’s how you can use the built-in calibration tools on your iPhone:
- Open the “Settings” app on your iPhone.
- Scroll down and tap on “Display & Brightness”.
- Under the “Display & Brightness” settings, you’ll find various options to adjust the screen settings.
- Tap on “Brightness” to adjust the overall brightness of the screen. You can slide the brightness slider to increase or decrease the brightness level.
- Tap on “Text Size” to adjust the size of the text displayed on your iPhone. You can slide the text size slider to make the text larger or smaller.
- Tap on “Display Zoom” to choose between the standard or zoomed display mode. The zoomed display mode makes everything on the screen appear larger.
- Tap on “Night Shift” to enable or disable the Night Shift mode. This mode reduces the amount of blue light emitted by the screen, which can help you sleep better at night.
By using these built-in calibration tools, you can easily adjust the screen settings on your iPhone to your liking. Experiment with different settings to find the optimal configuration that suits your preferences and enhances your viewing experience.
Use a Third-Party Calibration App
If the built-in accessibility options on your iPhone are not sufficient for your needs, you can also try using a third-party calibration app. These apps are specifically designed to help you adjust and fine-tune the colors, brightness, and contrast of your iPhone screen to your liking.
- There are several third-party calibration apps available on the App Store. Do some research and read reviews to find the best app that suits your needs.
- Once you have chosen an app, download and install it on your iPhone.
- Launch the calibration app and follow the on-screen instructions to calibrate your screen.
- Most calibration apps provide a variety of tools and options to adjust different aspects of your iPhone screen, such as color temperature, saturation, and gamma. Experiment with these settings until you achieve the desired calibration.
- After you have made the necessary adjustments, make sure to save the calibration settings so that they are applied every time you use your iPhone.
- Keep in mind that while third-party calibration apps can be useful, they may not be as accurate or reliable as the built-in accessibility options provided by Apple. It is always recommended to first try the built-in options before resorting to third-party apps.
Using a third-party calibration app can give you greater control over the appearance of your iPhone screen. It allows you to customize the settings according to your personal preferences and enhance your overall viewing experience.
Consider Professional Calibration
If you are not confident in calibrating your iPhone screen on your own, or if you require precise color accuracy for professional work, you may want to consider professional calibration services. These services are usually offered by certified technicians who have the expertise and tools to calibrate your screen accurately.
Here are a few reasons why you might want to consider professional calibration:
- Precision: Professional calibration ensures a high level of precision and accuracy in color reproduction. This is crucial for photographers, graphic designers, and anyone working with visual content.
- Consistency: Professional calibration ensures that your iPhone’s screen remains consistent over time, even after firmware updates. This means that your color settings will not change unexpectedly.
- Expertise: Certified technicians have the knowledge and experience to analyze and adjust color settings accurately. They can identify and correct any color imbalances or inconsistencies that may not be apparent to an untrained eye.
- Specialized Tools: Professionals have access to specialized hardware and software tools that are specifically designed for screen calibration. These tools provide more precise measurements and adjustments compared to manual calibration methods.
While professional calibration services may come at an additional cost, they can be worth it for individuals who require the highest level of color accuracy and consistency. Consider researching reputable calibration services in your area or online to find the best option for your needs.
Test the Calibration
After calibrating your iPhone screen, it’s important to test the calibration to ensure that it has been adjusted correctly. Here are some steps you can follow to test the calibration:
- Open any application or website that has a color gradient or a wide range of colors.
- Pay attention to the colors on the screen and observe if they appear more vibrant or natural compared to before calibrating the screen.
- Check if there are any noticeable color shifts or inconsistencies across different areas of the screen.
- Scroll through different apps and websites to see if the colors remain consistent and accurate.
- If you have access to a color calibration tool or chart, use it to compare the colors displayed on your iPhone screen with the accurate colors.
- Make adjustments to the calibration settings if necessary and repeat the testing process until you are satisfied with the results.
Remember that the calibration process may vary depending on your iPhone model and iOS version. It’s always a good idea to refer to the official Apple support documentation or consult with a professional if you encounter any issues or need further assistance.
FAQ:
Why is it important to calibrate your iPhone screen?
Calibrating your iPhone screen is important because it ensures that the colors and brightness on your screen are accurate. This can help improve your overall viewing experience and make sure that you see images and videos as they were intended to be seen.
How often should I calibrate my iPhone screen?
There is no set rule for how often you should calibrate your iPhone screen. However, if you notice that the colors or brightness on your screen are off, it may be a good time to calibrate it. You can also calibrate your screen whenever you feel like the colors are not accurate or the images are not displaying properly.
What tools do I need to calibrate my iPhone screen?
You don’t need any special tools to calibrate your iPhone screen. The calibration process can be done using the built-in settings on your iPhone. All you need is your iPhone and a few minutes of your time.
Can I calibrate my iPhone screen if it is cracked or damaged?
If your iPhone screen is cracked or damaged, it may be difficult to calibrate it properly. In some cases, calibrating a damaged screen may not make a noticeable difference in the display quality. It is recommended to get your screen repaired or replaced before attempting to calibrate it.