
If you’re concerned about your privacy while using a Mac computer, it’s important to know how to access the privacy settings. Hidden away within the system preferences, the Privacy tab allows you to control the information your Mac collects and the permissions you give to apps. In this step-by-step guide, we will walk you through the process of opening the Privacy tab on your Mac.
Step 1: Start by clicking on the Apple logo in the top left corner of your screen. This will open a drop-down menu. From the menu, select “System Preferences.”
Step 2: In the System Preferences window, you will see a grid of icons. Look for the icon labeled “Security & Privacy” and click on it. This will open the Security & Privacy preferences.
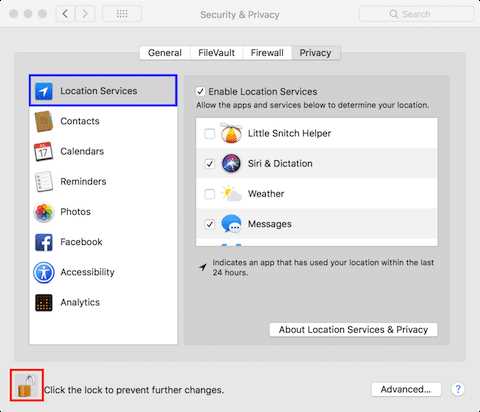
Step 3: In the Security & Privacy preferences, you will see several tabs at the top of the window. Click on the tab that says “Privacy.” This will open the Privacy settings for your Mac.
Once the Privacy tab is open, you will have the ability to adjust several important settings. You can control which apps have access to your location, contacts, calendar, and more. Additionally, you can manage permissions for system services such as microphone and camera access. By familiarizing yourself with these settings and regularly reviewing them, you can ensure that your Mac is protecting your privacy to the best of its ability.
Remember, your privacy is important. By taking the time to open the Privacy tab on your Mac and customize the settings to your liking, you can have greater peace of mind while using your computer.
Step 1: Launch System Preferences
To open the Privacy tab on your Mac, you will first need to access the System Preferences. Follow these steps to launch System Preferences:
- Click on the Apple menu icon, located in the top-left corner of the screen.
- A drop-down menu will appear. Click on “System Preferences” from the menu options.
- The System Preferences window will open, displaying various icons representing different settings.
- Scroll down or use the search bar at the top-right corner of the window to find and click on the “Security & Privacy” icon.
Alternatively, you can access System Preferences by clicking on the “Launchpad” icon in the Dock, searching for “System Preferences” using Spotlight (press Command + Spacebar), or locating it in the “Applications” folder in Finder.
Note: Depending on your Mac’s security settings, you may need to enter your administrator password or use Touch ID to access certain settings in System Preferences.
Step 2: Click on “Security & Privacy”
After opening the Apple menu, locate and click on the “System Preferences” option. This will open a window with various settings and options for your Mac.
Within the System Preferences window, you will see an icon labeled “Security & Privacy”. It features a lock symbol and is typically located in the top row of icons.
Click on the “Security & Privacy” icon to access the corresponding settings and privacy options for your Mac.
Step 3: Go to the “Privacy” Tab
After opening the Safari browser on your Mac, you need to navigate to the “Privacy” tab in order to access and adjust your privacy settings. Here’s what you need to do:
- Click on the “Safari” option in the top menu bar.
- A drop-down menu will appear. Scroll down and click on “Preferences”.
- A window will pop up with various options. Click on the “Privacy” tab at the top of the window.
Once you have reached the “Privacy” tab, you will be able to customize your privacy settings and control how Safari handles cookies, website data, location services, camera access, and more. This tab provides you with the necessary tools to protect your privacy while browsing the web on your Mac.
Note: It’s important to regularly review and update your privacy settings to ensure your personal information is secure and you have control over what data is being collected.
Step 4: Click on the Lock Icon
After opening the Safari browser and navigating to the Preferences menu, you will see a window with several tabs. Look for the tab labeled “Privacy” and click on it.
Within the Privacy tab, you will notice a lock icon located in the lower-left corner of the window. This lock icon represents the ability to make changes to your privacy settings. To access and modify these settings, click on the lock icon.
Upon clicking the lock icon, you may be prompted to enter your Mac username and password. This is a security measure put in place to ensure that only authorized users can make changes to the privacy settings.
Enter your username and password when prompted, and then click on the “Unlock” button. This will grant you access to the privacy settings and allow you to make changes as needed.
Once you have successfully clicked on the lock icon and entered your credentials, you are ready to proceed with configuring your privacy settings in Safari.
Step 5: Enter Your Administrator Password
To access the Privacy tab on your Mac, you may need to enter your administrator password. This password is required to make certain changes to the settings on your computer, ensuring the security and privacy of your data.
Follow these steps to enter your administrator password:
- Once you have reached the Privacy tab, locate the area where you need to enter your password. This is usually indicated by a text field or a password prompt.
- Click on the text field or password prompt to activate it.
- Type in your administrator password. Be cautious when entering your password to ensure it is typed correctly.
- After entering your password, press Enter or click on the “OK” button to submit it.
Note: If you are unsure of your administrator password or have forgotten it, you may need to contact your system administrator or follow the necessary steps to reset your password.
It is important to keep your administrator password secure and not share it with others. This helps prevent unauthorized access to important system settings and protects your privacy.
Step 6: Select “Full Disk Access” from the Sidebar

Once you have accessed the Privacy tab in System Preferences, you will see a sidebar on the left side of the window. This sidebar contains a list of categories that you can choose from.
To open the “Full Disk Access” category, simply scroll down the sidebar until you find it. Click on it to select it.
The “Full Disk Access” category allows certain applications or processes to have unrestricted access to your entire disk. This means that these selected apps or processes can read and write files, even ones located in protected areas.
It is important to be careful when granting “Full Disk Access” as it can potentially compromise your privacy and security. Only grant access to trusted applications that require this level of access to function properly.
Once you have selected the “Full Disk Access” category, you will see a list of applications and processes that are currently granted this privilege. You can add or remove apps from this list by clicking the plus (+) or minus (-) buttons below the list.
After making any changes, click the lock icon in the bottom left corner of the window to save the settings. You may be prompted to enter your admin password to confirm the changes.
Remember to be cautious when granting “Full Disk Access” and regularly review the list of apps that have been granted this privilege to ensure your privacy and security are not compromised.
Step 7: Click on the “+” Button
After accessing the Privacy tab on your Mac, you will see a list of privacy settings on the left side of the window. To add a new privacy setting, you will need to click on the “+” button located at the bottom of the list.
When you click on the “+” button, a new pop-up window will appear on your screen. This window allows you to add a new privacy rule to your Mac.
In the pop-up window, you can customize the following options:
- Application: Select the application for which you want to set a privacy rule.
- Privacy Type: Choose the type of privacy setting you want to enable or disable for the selected application. The options include camera, microphone, and automation.
- Access: Specify whether you want to allow or block the selected application from accessing the chosen privacy type.
Once you have customized the options in the pop-up window, click the “OK” button to save the new privacy rule.
Step 8: Choose the Application or Service to Add
Once you have accessed the Privacy tab on your Mac, you can proceed to add the specific applications or services for which you want to change the privacy settings. Follow the steps below:
- Scroll down the list of applications and services until you find the one you want to add.
- Select the checkbox next to the application or service to add it to the Privacy settings.
- If the application or service you want to add is not listed, you can click on the “+” button at the bottom of the list and manually select it from your Applications folder.
It’s important to note that by adding an application or service to the Privacy settings, you are either allowing or denying it access to specific data on your Mac. Make sure to carefully review the privacy settings and consider the implications before making any changes.
You can repeat this process to add multiple applications or services to the Privacy settings as needed. Once you have finished adding the desired applications or services, you can proceed to modify their respective privacy settings using the options provided.
FAQ:
Why can’t I see the Privacy tab in the Security & Privacy window?
If you can’t see the Privacy tab in the Security & Privacy window, it may be because you’re using an older version of macOS. The Privacy tab was introduced in macOS Mojave (10.14) and is not available in earlier versions. To access the Privacy settings on older versions, you may need to use a different method, such as the Terminal command line.
Is it possible to restrict app access to certain files or folders using the Privacy tab?
No, the Privacy tab on a Mac does not have the option to restrict app access to specific files or folders. It primarily focuses on managing permissions for features like location, contacts, microphone, camera, etc. However, you can manually control file and folder access by adjusting the permissions in your Mac’s Finder preferences or using the “Get Info” option for individual files and folders.
Are there any keyboard shortcuts to open the Privacy tab directly?
No, there are no specific keyboard shortcuts to open the Privacy tab directly. However, you can use the Spotlight search feature by pressing Command + Spacebar and then typing “Security & Privacy” or “System Preferences” to quickly access the settings. Additionally, you can create a custom keyboard shortcut using the “Keyboard” settings in System Preferences.