
Layers are an essential part of Adobe Photoshop CS3, allowing users to manipulate and edit different elements of an image separately. However, once you have finished working on a project and are satisfied with the results, it may be necessary to merge certain layers to reduce file size or simplify the editing process. In this tutorial, we will explore different methods to merge layers in Photoshop CS3.
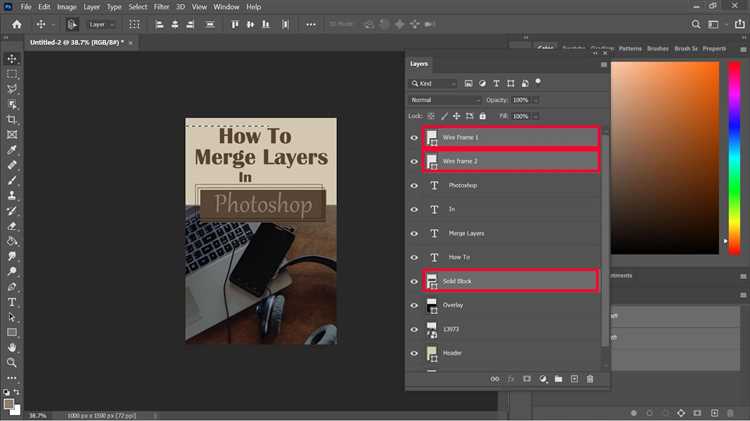
One common method to merge layers is by selecting them and using the “Merge Layers” option. To do this, first, open your file in Photoshop CS3 and make sure the Layers panel is visible. Select the layers you want to merge by holding down the Ctrl key (Command key on Mac) and clicking on the desired layer thumbnails. Once the layers are selected, right-click on any of the selected layers and choose “Merge Layers” from the context menu. This will merge the selected layers into a single layer.
If you want to merge multiple layers into a single layer without losing any information, you can use the “Flatten Image” option. To flatten an image, go to the “Layer” menu at the top of the screen and select “Flatten Image”. This will merge all visible layers into a single layer while preserving the transparency and blending effects of each layer.
Another method to merge layers is by dragging and dropping them onto a new layer. To do this, first, make sure you have the Layers panel open and visible. Then, select the layers you want to merge by holding down the Ctrl key (Command key on Mac) and clicking on the layer thumbnails. Once the layers are selected, click and drag them onto the “New Layer” button at the bottom of the Layers panel. This will create a new layer with the merged content of the selected layers.
Note: It is important to note that merging layers in Photoshop CS3 is a permanent action, meaning that once the layers are merged, you will not be able to undo the process and separate the layers again. Therefore, it is always recommended to save a copy of your project before merging layers, to preserve the original state of your image.
By following these methods, you can effectively merge different layers in Photoshop CS3. Whether you need to reduce file size or simplify the editing process, merging layers can be a useful technique to optimize your workflow and achieve the desired results in your Photoshop projects.
Importance of Merging Layers in Photoshop CS3
Merging layers in Photoshop CS3 is a crucial task, as it allows you to simplify your project’s layer structure and reduce file size. It can also help improve performance and organization by eliminating unnecessary layers.
Here are some key reasons why merging layers is important in Photoshop CS3:
- Easier editing: Merging layers can make it easier to edit and manipulate your images. When you merge multiple layers into one, you can apply adjustments and filters to the entire image without affecting individual layers separately.
- Reduced file size: Merging layers can significantly reduce the file size of your Photoshop document. This is especially beneficial when working with large, complex projects as it helps optimize the performance of Photoshop and saves storage space.
- Better organization: By merging layers, you can simplify the layer structure of your project, making it easier to manage and navigate. This is particularly useful when working collaboratively or sharing your files with others.
- Improved performance: Having fewer layers in your project can improve the overall performance of Photoshop. It reduces the processing time required for various operations, such as opening, saving, and applying adjustments to your images.
Understanding the importance of merging layers in Photoshop CS3 can greatly enhance your workflow and help you create more efficient and organized projects. Remember to save a backup of your original layers in case you need to make further adjustments or modifications in the future.
Step-by-Step Guide to Merge Layers in Photoshop CS3
Merging layers in Photoshop CS3 allows you to combine multiple layers into a single layer, which can help you organize and simplify your project. Here is a step-by-step guide on how to merge layers in Photoshop CS3:
- Launch Adobe Photoshop CS3 and open your project.
- Select the layers you want to merge. To select multiple layers, hold down the Ctrl key (Windows) or Command key (Mac) and click on each layer you want to merge. Alternatively, you can click and drag to select a range of layers.
- Right-click on one of the selected layers and choose “Merge Layers” from the context menu. You can also use the keyboard shortcut Ctrl+E (Windows) or Command+E (Mac) to merge the selected layers.
- Alternatively, you can merge layers by clicking on the “Layer” menu at the top of the screen, selecting “Merge Layers” from the dropdown menu.
- After merging the layers, you will notice that all the selected layers have combined into a single layer in the Layers panel.
- If you want to further modify the merged layer, you can double-click on its thumbnail in the Layers panel to enter into isolation mode. This allows you to make changes to the merged layer while still preserving the original layers in case you need to revert back.
- To undo the merge and restore the original layers, simply press Ctrl+Z (Windows) or Command+Z (Mac) on your keyboard.
Congratulations! You have successfully merged layers in Photoshop CS3. Remember to save your project regularly to avoid any unexpected loss of work.
Note: Merging layers is a non-destructive editing technique in Photoshop, as it keeps the original layers intact. However, it is always a good practice to make a backup of your project before making any major changes.
Preparing Layers for Merging in Photoshop CS3
Before merging layers in Photoshop CS3, it is important to prepare the layers properly. Taking the time to organize and arrange the layers can help ensure a smooth merging process and avoid any unexpected results.
1. Arrange Layers Properly
The first step in preparing layers for merging is to arrange them in the desired order. This can be done by clicking and dragging the layer thumbnails in the Layers panel. Layers can be moved up or down in the layer stack to change their position.
2. Group Related Layers
Grouping related layers can help keep the workspace organized and make it easier to locate specific layers later on. To create a layer group, select the layers you want to group by holding down the Ctrl key (Cmd key on Mac) and clicking on each layer thumbnail. Once the desired layers are selected, right-click and choose “Group Layers” from the context menu. This will group the selected layers into a new folder in the Layers panel.
3. Rename Layers
Renaming layers can also aid in organization and make it easier to identify specific layers. To rename a layer, double-click on the layer name in the Layers panel and enter the desired name. Try to use descriptive and concise names that reflect the content or purpose of each layer.
4. Check for Hidden Layers
Hidden layers can cause unexpected results when merging layers. To ensure that all layers are visible, click on the eye icon next to each layer in the Layers panel. This will toggle the visibility of the layer on or off. Make sure that all relevant layers are visible before proceeding with the merge.
5. Adjust Layer Opacity and Blending Modes
If necessary, adjust the opacity and blending modes of the layers before merging. This can help achieve the desired look and ensure that the merged layers blend together seamlessly. The opacity can be adjusted by using the Opacity slider in the Layers panel, and the blending mode can be changed by selecting a different option from the drop-down menu at the top of the Layers panel.
6. Flatten Image if Needed
In some cases, it may be necessary to flatten the image before merging layers. This can be done by selecting “Flatten Image” from the Layer menu at the top of the Photoshop window. Flattening the image combines all visible layers into a single background layer, which can then be merged with other layers as needed.
By following these steps and properly preparing the layers, merging in Photoshop CS3 can be a smooth and successful process, resulting in a well-organized and visually appealing composition.
Methods to Merge Layers in Photoshop CS3
In Adobe Photoshop CS3, there are various methods to merge layers. You can merge layers using the Merge Layers command, the Merge Visible command, or by manually dragging and dropping layers into one another. Here are the steps for each method:
Merge Layers Command:
- Select the layers you want to merge by holding down the Ctrl key (or Command key on Mac) and clicking on each layer’s thumbnail.
- Go to the Layers menu at the top of the screen and select Merge Layers.
- The selected layers will now be merged into one layer.
Merge Visible Command:
If you want to merge all visible layers in your document, you can use the Merge Visible command. Here’s how:
- Make sure all layers you want to merge are visible by clicking on the eye icon next to each layer.
- Go to the Layers menu at the top of the screen and select Merge Visible.
- All visible layers will now be merged into one layer.
Manually Drag and Drop:
If you prefer a more hands-on approach, you can manually merge layers by dragging and dropping them into one another. Here’s how:
- Select the layer you want to merge in the Layers panel.
- Click and hold on the layer, then drag it on top of the layer you want to merge it with.
- Release the mouse button to drop the layer onto the other layer.
Note: When manually merging layers, make sure the layer you want to merge is positioned directly above or below the layer you want to merge it with.
These are the three main methods to merge layers in Photoshop CS3. Choose the method that works best for your workflow and project requirements. Experiment with different methods to find the one that suits you best.
Understanding Blending Modes for Merging Layers in Photoshop CS3
When working with multiple layers in Photoshop CS3, merging them together can help simplify your project and make it easier to manage. One important aspect of merging layers is understanding blending modes, which determine how the contents of the layers interact and blend together. By selecting the appropriate blending mode, you can achieve different effects and enhance the overall appearance of your artwork.
Blending modes in Photoshop CS3 are located in the Layers palette, where you can find a drop-down menu labeled “Normal” by default. Clicking on this menu will display a list of blending modes that you can choose from for your selected layer.
Here are some commonly used blending modes:
- Normal: This is the default blending mode and it simply displays the layer as it is, without any blending or interaction with other layers.
- Multiply: This blending mode darkens the colors of the layer below, making the layer above appear more transparent.
- Screen: The screen blending mode lightens the colors of the layer below, creating a more transparent effect on the layer above.
- Overlay: This blending mode combines the Multiply and Screen modes, resulting in a high-contrast effect that enhances the underlying colors.
- Soft Light: The Soft Light blending mode applies a subtle lighting effect to the layer below, creating a soft and diffused look.
In addition to these blending modes, there are many others available in Photoshop CS3, each with its own unique properties and purposes. Experimenting with different blending modes can give you a better understanding of how they work and help you achieve the desired outcome for your artwork.
Once you have selected the desired blending mode for your layer, you can merge it with other layers by simply selecting the layers you want to merge and using the “Merge Layers” command in the Layer menu. This will combine the selected layers into a single layer, retaining the blending mode you have chosen.
Understanding blending modes in Photoshop CS3 is essential for effectively merging layers and creating impactful designs. By familiarizing yourself with the different blending modes and experimenting with their effects, you can take your artwork to the next level and achieve stunning results.
Using Group Layers for Efficiently Merging in Photoshop CS3
Merging layers in Photoshop CS3 can be a time-consuming process, especially if you have a large number of layers to merge. However, using group layers can help make this process more efficient. Group layers allow you to organize layers into hierarchical structures and apply effects or transformations to multiple layers at once.
To use group layers for merging in Photoshop CS3, follow these steps:
- Create a new group layer by clicking on the “New Group” button at the bottom of the Layers panel. Alternatively, you can select multiple layers and press Ctrl+G (or Command+G on a Mac) to create a group layer from the selected layers.
- Drag and drop the layers you want to merge into the group layer. You can rearrange the order of the layers within the group layer by dragging them up or down.
- Once you have all the layers you want to merge in the group layer, select the group layer in the Layers panel.
- Right-click on the group layer and choose “Merge Group” from the contextual menu. This will merge all the layers within the group into a single layer.
- If you want to preserve the original layers while merging, you can duplicate the group layer before merging. Simply right-click on the group layer and choose “Duplicate Group” from the contextual menu. You can then merge the duplicate group layer, keeping the original layers intact.
Using group layers for merging in Photoshop CS3 offers several advantages:
- Efficiency: Instead of merging individual layers one by one, you can merge entire group layers with just a few clicks.
- Flexibility: Group layers allow you to easily rearrange the order of the layers within the group, apply effects or transformations to multiple layers at once, and make adjustments to the merged result.
- Organization: Group layers help to keep your Layers panel clean and organized, as you can group related layers together.
In conclusion, using group layers in Photoshop CS3 can significantly improve your workflow when merging layers. By grouping layers together, you can merge them more efficiently and maintain flexibility in your editing process.
Tips and Tricks for Successful Layer Merging in Photoshop CS3
Merging layers in Photoshop CS3 can be a powerful tool to streamline your workflow and create stunning compositions. Here are some tips and tricks to help you merge layers successfully:
Merge Visible
The “Merge Visible” option allows you to merge all visible layers into a single layer without affecting hidden layers. This can be useful when you want to combine the visible elements of your design while keeping the non-visible elements separate.
Merge Layers
If you want to merge specific layers together, you can select the layers you want to merge and then use the “Merge Layers” option. This will combine the selected layers into a single layer.
Layer Order
The order of your layers can affect the outcome of the merge. Keep in mind that layers at the top of the layer stack will appear above layers below them. If you want certain elements to be merged together, make sure to reorder your layers accordingly.
Layer Styles
Before merging layers, consider the layer styles applied to each layer. Some layer styles, such as drop shadows or glows, may not merge as expected and could affect the final result. To preserve layer styles, make sure to rasterize the layer or apply the layer styles to a separate layer before merging.
Blending Modes and Opacity
When merging layers, keep in mind that blending modes and opacity settings can also affect the outcome. Experiment with different blending modes and opacity values to achieve the desired effect before merging.
Backup and Duplicate
Before merging layers, it’s always a good idea to create backups or duplicate your layers. This way, you can easily revert back to the original layers if needed.
Layer Masks
If you have layer masks applied to any of the layers you want to merge, make sure to apply the layer masks before merging. Layer masks can affect the visibility and transparency of merged layers.
Flatten Image
If you want to merge all layers in your Photoshop document into a single layer, you can use the “Flatten Image” option. This will merge all layers, including hidden layers, into a single background layer.
By considering these tips and tricks, you can successfully merge layers in Photoshop CS3 and create amazing compositions with ease.
Common Mistakes to Avoid when Merging Layers in Photoshop CS3
Merging layers in Photoshop CS3 can be a useful technique to combine multiple elements or adjustments into a single layer. However, it’s important to be aware of common mistakes that can occur when merging layers in order to avoid any potential problems or loss of work. Here are some common mistakes to avoid when merging layers in Photoshop CS3:
- Merging the wrong layers: One of the most common mistakes is merging the wrong layers. It’s important to double-check that you have selected the correct layers before merging. Review your layers panel and make sure you have selected the layers you want to merge.
- Not making a backup: Before merging layers, it’s always a good idea to make a backup of your original layers. This way, if you make a mistake or want to make changes later on, you can always go back to the original layers.
- Flattening the image too soon: Flattening the image can be a destructive action, so it’s important to consider whether you really need to flatten the image or if you can achieve the same effect using adjustment layers or layer masks.
- Merging adjustment layers: If you have adjustment layers in your project, be cautious when merging. Merging adjustment layers can permanently apply the adjustments to your image, which may not be what you want. It’s better to keep adjustment layers separate from other layers to preserve flexibility.
- Forgetting to rasterize: If you have vector or text layers that you want to merge with other layers, it’s important to rasterize them first. Failure to rasterize these layers can result in unexpected changes or loss of quality.
- Leaving unnecessary layers: When merging layers, it’s important to clean up any unnecessary layers to keep your project organized. Leaving unnecessary layers can make it harder to navigate and edit your project later on.
- Not considering layer order: The order of layers can affect the final result when merging. Be conscious of the layer order and consider rearranging layers if necessary to achieve the desired outcome.
By avoiding these common mistakes, you can ensure a smooth merging process in Photoshop CS3 and preserve the integrity of your work. Remember to double-check your actions, make backups, and be mindful of the potential consequences of merging layers before proceeding.
FAQ:
What is Photoshop CS3?
Photoshop CS3 is a version of Adobe Photoshop, a popular software used for image editing and manipulation. It was released in 2007 and introduced several new features and improvements compared to its previous versions.
Why should I merge layers in Photoshop CS3?
Merging layers in Photoshop CS3 can be useful for several reasons. It allows you to simplify your project by combining multiple layers into one, reducing the file size and making it easier to work with. Merging layers can also help in maintaining the integrity of your design and ensuring consistency across different elements.
How can I merge layers in Photoshop CS3?
To merge layers in Photoshop CS3, you can follow these steps:
Is it possible to merge layers with different blending modes in Photoshop CS3?
In Photoshop CS3, when you merge layers with different blending modes, the resulting merged layer will default to the blending mode of the topmost layer in the selection. If you want to merge layers while preserving the individual blending modes, you can use other techniques such as creating a new layer and applying the blending modes separately to the desired layers.
Can I undo the merging of layers in Photoshop CS3?
Yes, you can undo the merging of layers in Photoshop CS3. After merging the layers, you can simply use the keyboard shortcut Ctrl/Cmd + Z to undo the action. This will revert the layers back to their original state before they were merged.
Are there any limitations or considerations when merging layers in Photoshop CS3?
When merging layers in Photoshop CS3, it is important to keep in mind that certain layer effects, such as layer masks or blending modes, may be lost or altered after merging. It is recommended to duplicate your layers or save a backup of your file before merging, in case you need to make further adjustments or modifications later on.