
If you’re experiencing connection issues on your MacBook Pro, one possible solution is to clear the DNS cache. The DNS cache stores the IP addresses of websites you have previously visited, allowing your computer to quickly access them. However, if the cache becomes corrupted or outdated, it can cause problems with your internet connection. In this step-by-step guide, we will walk you through the process of clearing the DNS cache on your MacBook Pro.
Step 1: Open the Terminal
To begin the process, you’ll need to open the Terminal application. You can find it by navigating to Applications > Utilities > Terminal. Alternatively, you can use the Spotlight search feature by pressing Command + Space and typing “Terminal” in the search bar.
Step 2: Enter the Command
Once the Terminal is open, you’ll need to enter a command to clear the DNS cache. Type the following command into the Terminal:
sudo killall -HUP mDNSResponder
After entering the command, press Enter on your keyboard. You will be asked to enter your administrator password. Type it in and press Enter again.
Step 3: Restart your Mac
After successfully entering the command and your password, it’s recommended that you restart your Mac. This will ensure that any lingering DNS cache is cleared and your system reboots with a fresh cache.
Step 4: Test your Internet Connection
Once your Mac has restarted, you should test your internet connection to see if the DNS cache clearing process resolved your connection issues. Open a web browser and try visiting several websites. If the websites load properly and you have no further connection issues, then the DNS cache clearing was successful.
Note: Clearing the DNS cache may temporarily slow down your browsing experience, as your computer will need to reacquire the IP addresses of websites you visit frequently. However, this slowdown should only be temporary, and your browsing speed should return to normal after a short period of time.
By following these step-by-step instructions, you should be able to successfully clear the DNS cache on your MacBook Pro and resolve any connection issues you may be experiencing.
Section 1: Checking Current DNS Settings
Before you can clear the DNS cache on your Macbook Pro, you need to check your current DNS settings. Follow these steps:
- Click on the Apple menu located in the top-left corner of your screen.
- Select “System Preferences” from the dropdown menu.
- In the System Preferences window, click on the “Network” icon.
- On the left-hand side, select the network connection you are currently using (Wi-Fi, Ethernet, etc.).
- Click on the “Advanced” button in the lower-right corner.
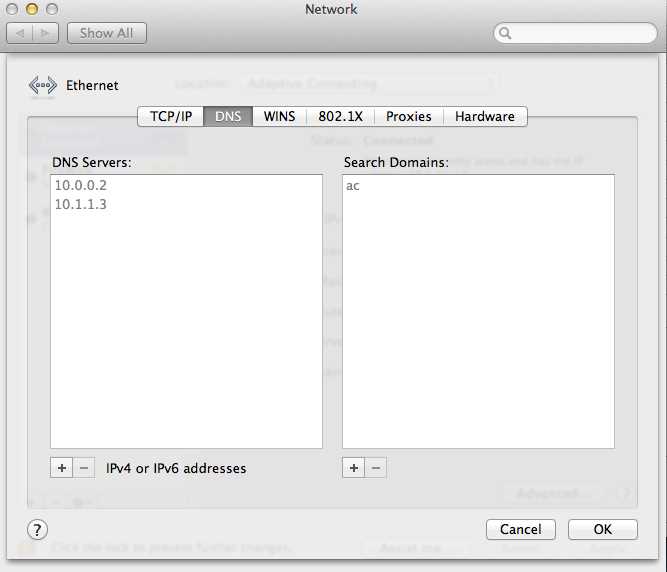
- In the Advanced window, go to the “DNS” tab.
After following these steps, you will see a list of DNS servers in the DNS tab. Take note of the IP addresses listed, as you may need them later for troubleshooting or setting a custom DNS server.
Section 2: Opening Terminal
To clear DNS cache on your Macbook Pro, you will need to use the Terminal application. Terminal is a command line interface that allows you to enter commands and execute them on your computer.
- Click on the “Finder” icon in your Dock to open a new Finder window.
- In the menu bar at the top of the screen, click on the “Go” option.
- A dropdown menu will appear. Click on the “Utilities” option.
- In the Utilities folder, scroll down and double-click on the “Terminal” application to open it.
Alternatively, you can use Spotlight to search for “Terminal” and click on the application in the search results to open it.
Once you have opened the Terminal application, you are ready to proceed to the next step.
Section 3: Flushing DNS Cache
Flushing the DNS cache on your Macbook Pro can help resolve issues related to DNS resolution. Follow the steps below to clear the DNS cache:
- Step 1: Launch the Terminal application on your Macbook Pro. You can do this by searching for “Terminal” in Spotlight or navigating to Applications > Utilities > Terminal.
- Step 2: In the Terminal window, type the following command and press Enter:
- Step 3: You will be prompted to enter your administrator password. Type your password and press Enter. Note that your password will not be visible as you type it.
- Step 4: After entering the password correctly, the DNS cache will be cleared. You can verify this by seeing the message “Cache cleared.” in the Terminal window.
sudo dscacheutil -flushcache
After flushing the DNS cache, you may need to restart your web browser and any applications that rely on DNS resolution to ensure they are using the updated DNS information.
If you are still experiencing DNS-related issues after clearing the cache, you may also consider restarting your Macbook Pro to further refresh the system.
Section 4: Restarting DNS Service
After clearing the DNS cache, it may be necessary to restart the DNS service on your Macbook Pro to ensure that the changes take effect. Here are the steps to restart the DNS service:
- Open the Terminal application on your Macbook Pro. You can do this by searching for “Terminal” in Spotlight or by navigating to “Applications” > “Utilities” > “Terminal”.
- In the Terminal window, type the following command and press Enter:
sudo killall -HUP mDNSResponder |
This command will send a hang up signal to the mDNSResponder process, which is responsible for DNS resolution on your Macbook Pro.
You may be prompted to enter your administrator password. If so, type your password and press Enter.
Once the command is executed, the DNS service will be restarted, and any changes made to the DNS cache will take effect.
It’s important to note that restarting the DNS service will temporarily interrupt internet connectivity. Any ongoing downloads or connections may be interrupted during this process. However, once the DNS service is restarted, your internet connection will be restored.
After restarting the DNS service, you can verify that the changes have taken effect by visiting websites or using other internet-based services. If you continue to experience issues with DNS resolution, you may need to troubleshoot further or contact your internet service provider for assistance.
Section 5: Verifying DNS Clearance
Once you have cleared your DNS cache on your Macbook Pro, it’s important to verify that the clearance was successful. Follow the steps below to ensure that your DNS has been cleared:
- Open your preferred web browser on your Macbook Pro.
- Enter a website URL into the address bar, such as “www.example.com”, and press Enter.
- If the website loads without any issues and you are able to access its content, this indicates that your DNS clearance was successful.
- Try accessing other websites to further confirm that your DNS cache has been cleared.
If you encounter any issues while accessing websites or if they fail to load, it may indicate that your DNS cache clearance was not successful. In such cases, it is recommended to repeat the steps outlined in Section 4 to clear your DNS cache again.
| Status Code | Meaning |
|---|---|
| 200 | The request was successful, and the website’s content is displayed. |
| 404 | The requested website could not be found. |
| 502 | There is a bad gateway or connection issue. |
| 503 | The server is currently unavailable. |
| 504 | There is a gateway timeout. |
| DNS_PROBE_FINISHED_NXDOMAIN | The DNS address could not be found. |
Understanding these status codes can help you troubleshoot any potential DNS clearance issues that you may encounter. If you continue to experience problems with DNS clearance, it is recommended to seek further assistance or consult with a technical expert.
Remember to regularly clear your DNS cache to ensure smooth browsing and efficient website access on your Macbook Pro.
Section 6: Updating DNS Settings
After clearing the DNS cache on your Macbook Pro, you may need to update the DNS settings in order to resolve any network issues or access specific websites. Here’s how you can update the DNS settings on your Macbook Pro:
- Open the Apple menu by clicking on the Apple logo in the top-left corner of the screen.
- Select “System Preferences” from the drop-down menu.
- In the System Preferences window, click on “Network”.
- Choose the network connection you want to update the DNS settings for from the list on the left side of the window.
- Click on the “Advanced” button located in the bottom-right corner of the window.
- In the Advanced settings, navigate to the “DNS” tab.
- In the DNS tab, you will see a list of DNS servers that your computer is currently using. To add a new DNS server, click on the “+” button at the bottom of the DNS server list.
- Type in the IP address of the DNS server you want to use.
- If you want to remove a DNS server from the list, select it and click on the “-” button.
- To change the order of the DNS servers, select a server and use the up and down arrow buttons to move it up or down.
- Once you have made the necessary changes to the DNS settings, click on “OK” to save the changes.
By updating the DNS settings on your Macbook Pro, you can ensure that your internet connection is optimized and that you can access the websites you need.
Section 7: Clearing DNS on Specific Applications
While clearing the DNS cache on your Macbook Pro can help resolve general DNS issues, you might also encounter DNS problems with specific applications. In such cases, clearing the DNS cache for those applications can be beneficial. Here’s how you can do it:
- Quit the application: First, close the application that is experiencing DNS issues. Make sure it is completely closed by checking the menu bar at the top of your screen for any running processes related to the application.
- Flush the application’s DNS cache: Different applications may store their DNS cache differently, so the method for clearing it can vary. Here are a few common applications and how to clear their DNS cache:
- Safari: Open Safari and go to the “History” tab in the menu bar. Then, click on “Clear History” and make sure to check the box for “Cache.” This will clear the DNS cache for Safari.
- Chrome: Launch Chrome and type “chrome://net-internals/#dns” in the address bar. This will take you to the Chrome DNS settings. Click on the “Clear host cache” button to clear the DNS cache for Chrome.
- Firefox: Open Firefox and type “about:config” in the address bar. Press Enter and accept the warning that appears. In the search bar, type “network.dns.cache” and set the value to “0” to disable caching. This will effectively clear the DNS cache for Firefox.
- Mail: To clear the DNS cache for the Mail application, you will need to remove the mail accounts and add them back after restarting the application. This will clear any cached DNS settings for Mail.
- Restart the application: After clearing the DNS cache for the specific application, close it completely and then relaunch it. This will ensure that the application starts with a fresh DNS cache.
By following these steps, you can clear the DNS cache for specific applications on your Macbook Pro, which can help resolve any DNS-related issues you may encounter while using those applications.
FAQ:
What does DNS stand for?
DNS stands for Domain Name System.
Why would I need to clear DNS on my Macbook Pro?
Clearing DNS on your Macbook Pro can help resolve various network issues such as slow internet access, website not loading, or incorrect DNS settings.
How can I clear DNS cache on my Macbook Pro?
To clear DNS cache on a Macbook Pro, you can open the Terminal application and type “sudo killall -HUP mDNSResponder” command, then press Enter.
What are the benefits of clearing DNS on my Macbook Pro?
Clearing DNS on your Macbook Pro can improve internet speed, fix website loading issues, and help ensure that your computer is using the correct IP addresses for websites.