
Activating your iPhone without a SIM card can be useful in a variety of situations. Whether you’re borrowing an iPhone temporarily, have a new iPhone without a SIM card yet, or simply want to use your iPhone without a cellular plan, this step-by-step guide will walk you through the process.
Before we begin, it’s important to note that while you can activate an iPhone without a SIM card, certain features like cellular data, phone calls, and SMS will not work without an active cellular plan. However, you will still be able to use most other functions of the iPhone, such as Wi-Fi, email, web browsing, and downloading and using apps.
To activate your iPhone without a SIM card, you’ll need access to a Wi-Fi network. Once you have a Wi-Fi connection, follow these steps:
- Turn on your iPhone by pressing and holding the power button until the Apple logo appears.
- Swipe up from the bottom of the screen to access the Control Center.
- Tap on the Wi-Fi icon to enable Wi-Fi.
- Select a Wi-Fi network from the list and enter the password, if required.
- Wait for your iPhone to connect to the Wi-Fi network.
- You will see a message saying “Activation Required”. Tap on the “Activate” button.
- Your iPhone will now attempt to activate. This process may take a few minutes.
- Once activation is complete, you will see a message saying “Your iPhone has been activated”. Tap on the “Get Started” button to proceed.
Now that your iPhone is activated, you can proceed with setting up your device, including signing in with your Apple ID, restoring from a backup, or setting up your iPhone as new.
Remember, activating your iPhone without a SIM card is only temporary and certain features will be limited. If you plan to use your iPhone as a primary device, it’s recommended to get a SIM card and activate it with a cellular plan.
Why Activate iPhone Without SIM Card?
Activating an iPhone without a SIM card can be a useful solution for various reasons:
- Testing: If you are a developer or a tester, you may need to activate an iPhone without a SIM card to test certain features or applications without a cellular connection. This allows you to simulate different scenarios and ensure that your app functions properly in various conditions.
- Unlocking: If you have purchased a second-hand iPhone that is locked to a specific carrier, activating it without a SIM card can help you unlock the device. By bypassing the SIM card activation process, you can use third-party tools or services to unlock the phone and use it with any carrier of your choice.
- Wi-Fi Only Usage: Some users prefer to use their iPhones solely on Wi-Fi networks, especially if they have limited or no access to a reliable cellular network. Activating the iPhone without a SIM card allows you to use the device as a media player, gaming device, or for other Wi-Fi-dependent activities without the need for a cellular connection.
- Data Recovery: In certain cases, if your iPhone is stuck in recovery mode or experiencing software issues, activating it without a SIM card can help you recover your data. By bypassing the SIM card activation process, you can access the device’s settings and perform a backup or restore operation using iTunes or iCloud.
Overall, activating an iPhone without a SIM card provides flexibility and convenience in various situations, enabling you to use the device for different purposes beyond traditional cellular communication.
Prerequisites for Activating iPhone Without SIM Card
Before you begin the process of activating your iPhone without a SIM card, there are a few prerequisites that you should keep in mind. These prerequisites include:
- iPhone Model: Make sure you have a compatible iPhone model that supports activation without a SIM card. Most modern iPhones have this capability, but it’s always good to double-check.
- iTunes: Install the latest version of iTunes on your computer. You will need iTunes to activate your iPhone. If you don’t have iTunes installed, you can download it from the Apple website.
- Computer: Ensure that you have a computer (Mac or Windows) with a stable internet connection. This is necessary for connecting your iPhone to iTunes and completing the activation process.
- USB Cable: Have a USB cable ready to connect your iPhone to your computer. This is how you will establish a connection between your iPhone and iTunes.
- Activation Lock: If your iPhone is currently locked with an Apple ID and you don’t have the login credentials, you won’t be able to activate it without a SIM card. Make sure you have the necessary login information to proceed.
By fulfilling these prerequisites, you will be ready to activate your iPhone without a SIM card and start using it with Wi-Fi connectivity and other features.
Method 1: Using iTunes
If you have access to a computer and iTunes, you can activate your iPhone without a SIM card using the following steps:
- First, make sure you have the latest version of iTunes installed on your computer. If not, download and install it from the official Apple website.
- Connect your iPhone to the computer using a USB cable.
- Open iTunes on your computer. If prompted, enter your Apple ID and password to sign in.
- Select your iPhone from the list of devices in iTunes.
- In the Summary tab, click on “Restore iPhone” or “Restore Backup,” depending on your situation.
- If you choose “Restore iPhone,” this will erase all the data on your iPhone and install the latest iOS version. If you have a backup available, you can restore it afterward to get your data back.
- If you choose “Restore Backup,” this will restore your iPhone from a previously created backup. Make sure you have a backup available on your computer or iCloud.
- During the restore process, you may be prompted to set up your iPhone. Follow the on-screen instructions to proceed.
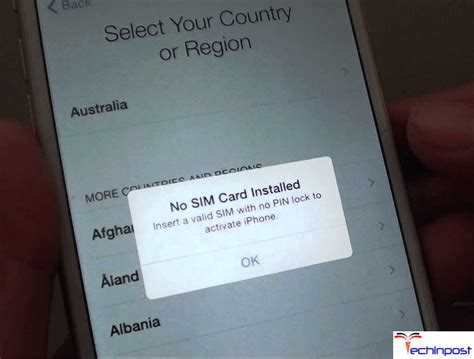
- If asked to insert a SIM card, ignore the prompt and continue with the setup process. You should see a message saying “Your iPhone could not be activated because the activation server is temporarily unavailable.” This is normal, as we are activating the iPhone without a SIM card.
- Continue following the on-screen instructions to complete the setup process. Eventually, you will reach the Home screen of your iPhone.
- Your iPhone is now activated and ready to use without a SIM card. However, keep in mind that certain features and services may require a SIM card to function properly.
By using iTunes, you can activate your iPhone without a SIM card and get access to most of the device’s features and functions. It’s a convenient method if you have a computer available. Just make sure to have a backup of your data before proceeding with the restore process.
Step 1: Install the Latest Version of iTunes
To activate your iPhone without a SIM card, the first step is to install the latest version of iTunes on your computer.
iTunes is a software developed by Apple that allows you to manage and synchronize your Apple devices. It is necessary to have iTunes installed in order to activate your iPhone and set it up.
You can download the latest version of iTunes from the official Apple website or update it through the App Store on your Mac.
Here are the steps to install the latest version of iTunes:
- Visit the Apple website at https://www.apple.com/itunes/download/.
- Click on the “Download now” button.
- Follow the on-screen instructions to download the installer file.
- Once the download is complete, open the installer file and follow the prompts to install iTunes.
- After the installation is complete, open iTunes on your computer.
- If prompted, sign in with your Apple ID. If you don’t have an Apple ID, you can create one by clicking on “Create New Apple ID”.
Once you have installed iTunes and signed in with your Apple ID, you are ready to proceed with activating your iPhone without a SIM card.
Step 2: Connect iPhone to Computer
To activate your iPhone without a SIM card, you will need to connect it to a computer. Follow these steps:
- Make sure you have the latest version of iTunes installed on your computer.
- Connect your iPhone to the computer using a USB cable.
- Launch iTunes if it doesn’t open automatically.
- Wait for iTunes to detect your iPhone. It will appear in the top left corner of the iTunes window.
- If prompted, enter your passcode on the iPhone to allow the computer to access its data.
- Click on the iPhone icon in iTunes to open the device summary page.
- In the “Summary” tab, click on the “Continue” button under the section titled “Set up as new iPhone.”
- Follow the on-screen instructions to complete the initial setup process. This includes signing in with your Apple ID, choosing your settings, and agreeing to the terms and conditions.
Once you have completed these steps, your iPhone will be activated and ready to use without a SIM card. You can now proceed to customize it and download apps from the App Store.
Step 3: Choose Your iPhone in iTunes
Once you have successfully launched iTunes on your computer, you will need to choose your iPhone from the list of devices displayed in the top left corner of the iTunes window. The list will show all the devices that are connected to your computer.
If you have multiple devices connected, make sure to select the correct iPhone that you want to activate without a SIM card. The iPhone’s name will usually be displayed along with its model number and storage capacity.
If you are unsure which device is your iPhone, you can check the serial number or IMEI number of your iPhone and match it with the information displayed in iTunes.
Once you have selected your iPhone, you will be taken to the device’s summary page in iTunes.

From here, you can proceed to the next step to activate your iPhone without a SIM card.
Step 4: Set Up Device
After turning on your iPhone, you will be prompted to choose a language and region. Select the language and region that you prefer.
Next, you will be asked to connect to a Wi-Fi network. Choose a Wi-Fi network from the list and enter the password, if required. If you don’t have access to Wi-Fi, you can skip this step and connect to a Wi-Fi network later.
Once connected to a Wi-Fi network, you will be taken to the “App & Data” screen. Here, you can choose to set up your iPhone as new, restore from an iCloud or iTunes backup, or transfer data from an Android device. Select the option that suits your needs.
If you choose to set up your iPhone as new, you will be asked to sign in with your Apple ID and password. If you don’t have an Apple ID, you can create one during this step.
After signing in or creating an Apple ID, you will be asked to set up Face ID or Touch ID, depending on the iPhone model you have. These features allow you to unlock your device, make purchases, and use Apple’s secure services. Follow the on-screen instructions to set up either Face ID or Touch ID.
Next, you will have the option to enable Siri, Apple’s virtual assistant. Siri can help you perform tasks and answer questions on your iPhone. Choose whether you want to enable Siri or not.
After setting up Siri, you will see the “Screen Time” feature. This allows you to monitor and manage your device usage, set app limits, and more. You can choose to set it up now or later.
Finally, you will be taken to the home screen of your iPhone, where you can start using your device. Explore the various apps and features available, and customize your iPhone to your liking.
That’s it! You have successfully set up your iPhone without a SIM card. Enjoy using your device!
Step 5: Complete Activation
Once you have connected your iPhone to a Wi-Fi network, you can proceed with the activation process.
- Select your language and region: On the activation screen, choose your preferred language and region. This setting will determine the language used on your iPhone and the regional format of dates, numbers, and other data.
- Connect to Wi-Fi: If you haven’t already done so, connect your iPhone to a Wi-Fi network by selecting a network from the list of available options. Make sure you have access to a stable and reliable Wi-Fi connection.
- Set up Touch ID or Face ID (optional): If your iPhone model supports Touch ID or Face ID, you will have the option to set it up during the activation process. This feature allows you to unlock your iPhone and authorize purchases using your fingerprint or facial recognition.
- Sign in with your Apple ID: If you already have an Apple ID, sign in with it to access your iCloud backup, App Store purchases, and other Apple services. If you don’t have an Apple ID, you can create one during the activation process.
- Restore from iCloud backup (optional): If you have previously backed up your data to iCloud, you can restore it during the activation process. This will transfer your apps, settings, photos, and other data from your iCloud backup to your iPhone.
- Agree to the terms and conditions: Review the terms and conditions presented on the screen and agree to them to proceed with the activation.
- Set up Siri (optional): If you want to use Siri, Apple’s virtual assistant, you can enable it during the activation process. Siri can help you perform various tasks, answer questions, and provide personalized recommendations.
- Choose whether to share analytics data: Apple gives you the option to share analytics data with them to help improve their products and services. You can choose whether or not to participate in this program.
- Wait for activation to complete: Once you have completed all the necessary steps, your iPhone will attempt to activate with Apple’s servers. This process may take a few minutes, so be patient and keep your iPhone connected to Wi-Fi.
- Set up as new or restore from backup: After activation is complete, you will have the option to set up your iPhone as new or restore from a previous backup. If you chose to restore from iCloud backup earlier, select the backup you want to restore from. Otherwise, choose the “Set up as new iPhone” option.
Once you have completed these steps, your iPhone will be fully activated and ready to use. You can start exploring the various features and settings, download apps from the App Store, and customize your iPhone to suit your preferences.
Method 2: Using Wi-Fi
If you don’t have a SIM card, you can still activate your iPhone using a Wi-Fi connection. Here’s how:
- Turn on your iPhone by pressing and holding the power button until the Apple logo appears.
- Follow the on-screen instructions until you reach the Wi-Fi screen.
- Select a Wi-Fi network from the list of available networks. If the network is password-protected, you’ll need to enter the password to connect.
- Once connected to Wi-Fi, your iPhone will automatically attempt to activate itself. This process may take a few minutes.
- If the activation is successful, you’ll see a message indicating that your iPhone has been activated.
- Continue following the on-screen instructions to set up your iPhone, such as signing in with your Apple ID, setting up Siri, and enabling location services.
If the activation fails, you may need to troubleshoot the issue. Here are a few things you can try:
- Make sure you’re connected to a stable Wi-Fi network with a strong signal.
- Restart your iPhone and try the activation process again.
- Reset network settings on your iPhone by going to Settings > General > Reset > Reset Network Settings. Note that this will remove all saved Wi-Fi network passwords.
- Contact your carrier or Apple support for further assistance if the activation still fails.
Once your iPhone is activated, you can enjoy all the features and functionalities of the device without a SIM card.
Step 1: Access the Emergency Call Screen
The first step to activate your iPhone without a SIM card is to access the Emergency Call Screen on your device. This screen will allow you to make emergency calls even without a SIM card.
To access the Emergency Call Screen, follow these steps:
- Turn on your iPhone by pressing the power button located on the side or top of your device.
- On the lock screen, you will see the “Emergency Call” option at the bottom left corner. Tap on it.
- This will take you to the Emergency Call screen, where you can dial emergency services like 911 or any other emergency number applicable to your country.
- Now, press the Home button on your iPhone. This will take you to the home screen.
By following these steps, you have successfully accessed the Emergency Call Screen on your iPhone without a SIM card. This will allow you to proceed with the activation process using other methods, such as connecting to Wi-Fi or using iTunes.
FAQ:
Can I activate my iPhone without a SIM card?
Yes, you can activate your iPhone without a SIM card by connecting it to a Wi-Fi network and following the activation process.
Is it possible to activate an iPhone without Wi-Fi?
No, it is not possible to activate an iPhone without Wi-Fi. Wi-Fi is required for the activation process as it allows the iPhone to connect to Apple’s servers and complete the setup process.
Can I use an iPhone without a SIM card?
Yes, you can use an iPhone without a SIM card. However, certain features such as calling and texting will not be available unless you have a SIM card or are connected to a Wi-Fi network for using internet-based calling and messaging apps.