
Restoring an iPod is a common troubleshooting step that can help resolve various issues such as software glitches, freezing, or a device that doesn’t work properly. However, many people hesitate to restore their iPod because they fear it will delete all their music, photos, and other data stored on the device. So, does restoring an iPod really delete everything?
The answer is yes, restoring an iPod will erase all content and settings on the device. When you restore an iPod to its factory settings, it reverts back to its original state as if it were just out of the box. This means that all your music, videos, photos, apps, and any other data will be deleted from the iPod.
Before you decide to restore your iPod, it’s essential to make sure you have a backup of all your important data. You can either sync your iPod with iTunes on your computer to back up your content or use iCloud if you have enabled the iCloud backup feature. This way, after restoring your iPod, you can easily restore your previous data from the backup.
Note: If you restore an iPod that is synced with iTunes Match or Apple Music, your music library will be restored after you sign in to your Apple ID. However, any locally stored music or playlists that are not in your iCloud Music Library will be permanently deleted.
In conclusion, restoring an iPod will delete all your data, so it’s crucial to have a backup before proceeding with the restore. By taking the necessary precautions and following the appropriate steps, you can safely restore your iPod without losing any valuable content.
Does Restoring an iPod Erase All Data?
Restoring an iPod is a process that removes all data from the device and returns it to its original factory settings. When you restore an iPod, all music, videos, photos, apps, and other data will be deleted from the device.
There are several reasons why you might want to restore your iPod. If your device is experiencing software issues, restoring it can often fix the problem. It can also be useful if you’re planning to sell or give away your iPod, as it ensures that all personal data is erased.
Before restoring your iPod, it’s important to back up any important data that you want to keep. You can do this by syncing your iPod with iTunes on your computer. This will create a backup file that you can restore to your iPod after the restoration process is complete.
To restore your iPod, you’ll need to connect it to your computer and open iTunes. Select your iPod from the list of devices and go to the “Summary” tab. Here, you’ll find the option to restore your iPod to its factory settings.
It’s worth noting that restoring an iPod will also update it to the latest version of the iPod software. This means that after the restoration, you may need to re-download any apps or media that you had previously installed on your device.
If you’re unsure about restoring your iPod or have any concerns about data loss, it’s always a good idea to reach out to Apple Support for guidance. They can provide further assistance and answer any questions you may have.
Understanding the Implications of Restoring an iPod
Restoring an iPod involves wiping its entire data and settings, which can have several implications:
- Loss of media files: Restoring an iPod will result in the deletion of all media files stored on the device, including music, videos, podcasts, and audiobooks. Therefore, it is crucial to ensure that you have a backup of your media files before proceeding with the restoration process.
- Resetting of settings: Restoring an iPod will reset all the device’s settings to their default values. This includes network settings, display preferences, accessibility options, and any customized settings you may have configured. You will need to reconfigure these settings after the restoration is complete.
- Removal of apps and data: Restoring an iPod will remove all installed apps and their associated data. This includes app settings, game progress, and any other data specific to the apps installed on your iPod. Make sure to back up any important app data before initiating the restoration process.
- Loss of contacts, calendars, and bookmarks: If you have stored contacts, calendars, or bookmarks on your iPod, restoring the device will erase this information. Ensure that you have synced these data with a computer or cloud service before restoring your iPod.
Overall, restoring an iPod should be approached with caution due to the potential loss of data. It is recommended to create a backup of all important files and settings before proceeding with the restoration process. This will help ensure that you can easily recover your data and settings after the restoration is complete.
What Happens During the Restoration Process?
When you restore an iPod, whether it’s a classic iPod, iPod nano, iPod shuffle, or iPod touch, it will erase all of the content and settings on the device. However, the specific steps and options during the restoration process may vary depending on the model and version of the iPod.
Typically, when you connect an iPod to a computer and initiate the restoration process, it will first check if there is a newer version of the iPod software available. If there is, it will download and install the latest software on the device.
After that, the restoration process will erase all of the data and settings on the iPod and return it to its factory default state. This means that all of your music, videos, apps, and any other content or settings will be deleted from the device.
During the restoration process, you may have the option to choose whether to back up the iPod’s data before erasing it. If you choose to back up the data, it will create a copy of the content on your computer, which you can later restore to the iPod. This can be useful if you want to keep a copy of your files and settings.
Once the restoration process is complete, you will need to set up your iPod again, just like when you first purchased it. This includes selecting the language, connecting to Wi-Fi, signing in to your Apple ID, and configuring other preferences and settings.
It’s important to note that restoring an iPod is a drastic step and should only be done if necessary. It’s recommended to backup your iPod’s data regularly to avoid losing important files. Also, keep in mind that restoring an iPod will not remove any activation lock or iCloud lock, if the device has been associated with an Apple ID.
Backing Up Your iPod Before Restoration
Restoring an iPod can cause all of the data on the device to be erased, including your music, photos, videos, and other files. Therefore, it is crucial to back up your iPod before proceeding with the restoration process. Creating a backup will allow you to easily restore your data after the restoration is complete, ensuring that you do not lose anything valuable. Here are the steps to back up your iPod:
- Connect your iPod to your computer using a USB cable.
- Launch iTunes on your computer, and make sure you have the latest version installed.
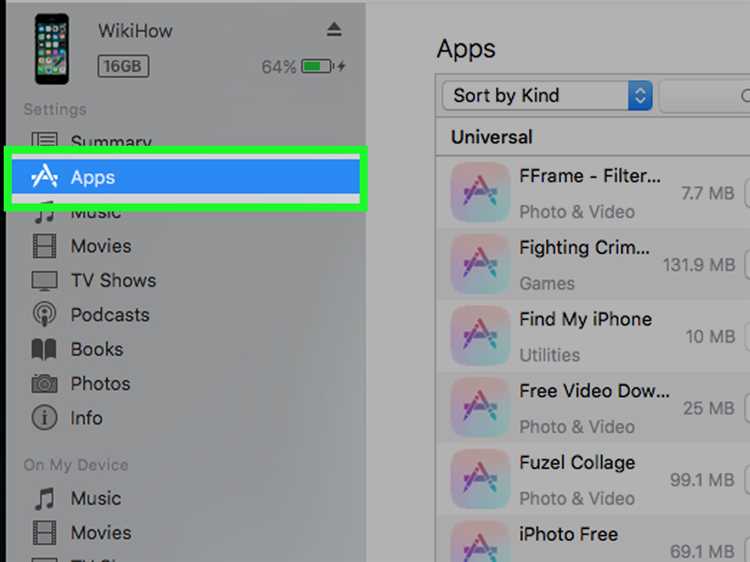
- Select your iPod when it appears in the iTunes interface.
- In the Summary tab, you will find a section called “Backups”.
- Choose the option that suits your preferences:
- Back up all of the data on your iPod to your computer: Select “This computer” under the “Automatically Back Up” section. This will create a full backup of your iPod’s data.
- Back up only specific content categories: Select “Encrypt [device] backup” and set a password if desired. This option allows you to choose which content categories you want to back up, such as music, photos, or apps.
- Back up to iCloud: If you have an active iCloud account and sufficient storage space, you can choose to back up your iPod to iCloud. This option requires an internet connection.
- Click the “Apply” or “Sync” button to initiate the backup process.
- Wait for the backup to complete. The time required for the backup depends on the amount of data on your iPod.
- Once the backup is finished, you can proceed with restoring your iPod to its factory settings without worrying about losing any files.
Remember to keep your iPod connected to your computer until the entire restoration process is complete. After the restoration, you can use the backup created to transfer your data back to your iPod. Having a backup is essential for preserving your important files and ensuring a smooth restoration process.
Restoring an iPod: Step-by-Step Guide
Restoring your iPod can be a useful troubleshooting step or a way to clear its memory before selling or giving it away. Before you proceed, it’s important to note that restoring an iPod will delete all its content and settings, including music, videos, photos, and apps. Make sure to back up any data you want to keep before starting the restoration process.
Step 1: Connect your iPod to your computer
Using the USB cable that came with your iPod, connect it to your computer. Ensure that the computer is on and that iTunes is installed.
Step 2: Launch iTunes
Open iTunes on your computer. If it doesn’t open automatically when you connect your iPod, you can manually open it by double-clicking the iTunes icon.
Step 3: Select your iPod
In the iTunes interface, you will see your connected iPod appear in the upper-left corner. Click on it to select it.
Step 4: Access the iPod Summary
In the main iTunes window, you will see a summary of your iPod’s information. This includes details like its storage capacity, software version, and serial number. Look for the “Restore iPod” button and click on it.
Step 5: Confirm the restoration
A pop-up window will appear asking if you want to restore your iPod to its factory settings. Read the message carefully and make sure you understand that this action will erase all content and settings on your iPod. If you are certain, click “Restore” to proceed.
Step 6: Wait for the restoration process
After you confirm the restoration, iTunes will begin the process. It may take several minutes to complete, depending on the model and storage capacity of your iPod. During this time, make sure not to disconnect your iPod from the computer.
Step 7: Set up your iPod
Once the restoration process is complete, your iPod will restart and display the Apple logo. Follow the on-screen instructions to set up your iPod as a new device. You can choose to sync your music, videos, and other content back to your iPod if you have a backup available.
That’s it! Your iPod has been successfully restored. Keep in mind that restoring should only be done if necessary, as it will erase all data from your iPod. Make sure to back up any important files or media before proceeding with the restoration process.
Common Misconceptions About iPod Restoration
When it comes to restoring an iPod, there are several misconceptions that people often have. These misconceptions can lead to confusion and unnecessary worry about the process. In order to clear up any misunderstandings, let’s address some of the most common misconceptions about iPod restoration.
-
Restoring an iPod will delete all my data:
One of the biggest misconceptions about restoring an iPod is that it will wipe out all the data on the device. While restoring does erase the contents of the iPod, it also reinstalls the latest version of the iPod software, which includes the basic system files. Your data can be easily restored from a backup or synced with your computer after the restoration process.
-
Restoring an iPod is irreversible:
Another common misconception is that once an iPod is restored, it cannot be undone. However, this is not true. If you decide that you want to revert back to a previous state, you can simply restore the iPod from a backup or sync it with your computer again. Restoring an iPod only erases the current contents and replaces them with the software and settings saved in the backup.
-
Restoring an iPod is complicated:
Some people believe that restoring an iPod is a complex and technical process that requires advanced knowledge. However, this is not the case. Restoring an iPod is actually quite simple and can be done with just a few clicks. The process is typically guided by on-screen instructions provided by iTunes, making it accessible to users of all skill levels.
-
Restoring an iPod will fix all problems:
While restoring an iPod can often resolve common issues, it is not a guaranteed fix for every problem. There may be certain hardware or software issues that cannot be resolved by a simple restoration. In such cases, it may be necessary to seek additional troubleshooting or repair options.
-
Restoring an iPod will remove jailbreak:
People who have jailbroken their iPods often worry that restoring the device will remove the jailbreak, rendering it useless. While restoring an iPod does remove the jailbreak, it is possible to reinstall it after the restoration process. However, it is important to note that jailbreaking may void the device’s warranty and can carry risks, so it should be done with caution.
In conclusion, restoring an iPod does not delete all your data permanently, and it is a reversible and straightforward process. It may not fix all problems, and it will remove a jailbreak, but it is still a useful troubleshooting option for many iPod issues.
Restoring an iPod vs. Resetting to Factory Settings
When it comes to troubleshooting an iPod, two common solutions are restoring it and resetting it to factory settings. While both options can help resolve various issues, they serve different purposes and have different outcomes.
Restoring an iPod:
- Restoring an iPod erases all content and settings on the device and reinstalls the operating system.
- This process is often used to fix software-related issues, such as frozen screens, software crashes, or slow performance.
- To restore an iPod, you will need to connect it to a computer with the latest version of iTunes and follow the instructions provided by the software.
- After the restoration process, you will need to set up the iPod as if it were brand new, including selecting language preferences, connecting to Wi-Fi, and signing in with an Apple ID.
Resetting to Factory Settings:
- Resetting an iPod to factory settings erases all content and settings, but does not reinstall the operating system.
- This option is typically used when you want to remove personal data and settings from your iPod before selling or giving it away.
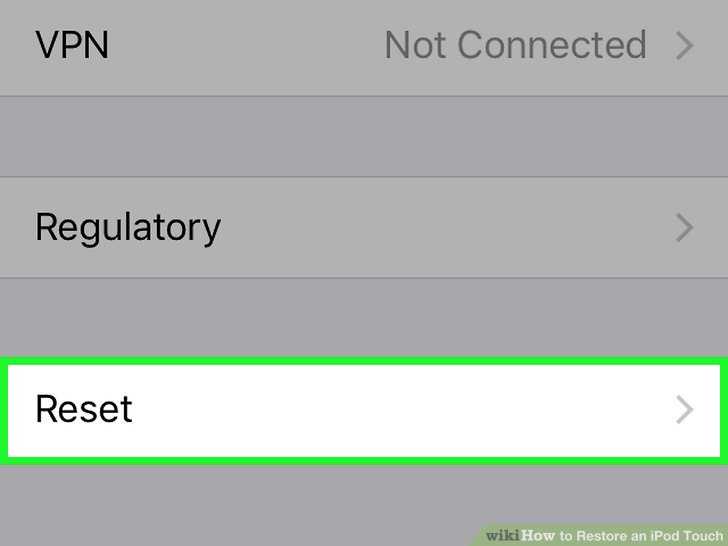
- To reset an iPod to factory settings, you can go to the settings menu on the device and choose the “Erase All Content and Settings” option.
- After the reset, you will be taken to the initial setup screen, where you can choose the language, Wi-Fi network, and other preferences.
It’s important to note that both restoring an iPod and resetting it to factory settings will erase all content, including music, videos, apps, and personal data. Therefore, it’s crucial to create a backup of your iPod’s data before proceeding with either option. Once the restoration or reset is complete, you can use your iPod again as usual, but with a clean slate.
In summary, restoring an iPod involves reinstalling the operating system, while resetting to factory settings only erases content and settings. Choose the option that best suits your needs, whether it’s troubleshooting software issues or preparing the device for a new owner.
Recovering Data After Restoring an iPod
Restoring an iPod is a process that erases all the data on the device and restores it to its original factory settings. While this can be useful in certain situations, such as when your iPod is not working properly or you want to sell or give it away, it can also result in the loss of all your data. However, there are ways to recover your data after restoring an iPod.
1. Backup and Sync: Before restoring your iPod, it is crucial to ensure that you have a recent backup of your data. You can do this through iTunes by connecting your iPod to your computer and selecting the option to back up and sync your device. This will create a copy of your data on your computer, which can be restored later.
2. Third-Party Data Recovery Software: If you did not have a backup before restoring your iPod, you can still attempt to recover your data using third-party data recovery software. These types of software are designed to scan your device and retrieve any deleted files. However, the success rate of data recovery depends on various factors, such as how long ago the data was deleted and the condition of the iPod’s storage.
3. Professional Data Recovery Services: If the previous methods do not work or you are not comfortable using third-party software, you can consider hiring professional data recovery services. These companies specialize in recovering data from various devices, including iPods. They have advanced tools and techniques to recover data even from severely damaged devices.
4. Other Potential Sources: If you use cloud storage or other backup methods, there might be a chance that your data is still accessible even after restoring your iPod. Check your cloud storage accounts or any other backup locations to see if your data is present.
It is important to note that even with these recovery methods, there is no guarantee that you will be able to recover all of your data. It is always recommended to regularly backup your iPod to prevent data loss and ensure that you can easily recover your files in case of any issues.
Final Thoughts on iPod Restoration and Data Loss
Restoring an iPod can be a useful troubleshooting technique when faced with software issues or performance problems. However, it is important to keep in mind that restoring an iPod will delete all data stored on it. Therefore, it is crucial to back up any important files before proceeding with the restoration process.
If you have already restored your iPod without backing up your data, there are some potential options for recovering lost files. You can try using data recovery software or consult with a professional data recovery service. However, these methods may not always be successful, and there is no guarantee that you will be able to retrieve all of your lost data.
Prevention is always better than cure when it comes to data loss. Regularly backing up your iPod’s data is the best way to ensure that you don’t lose any important files during the restoration process. You can back up your iPod either by using iTunes or by manually transferring files to your computer.
Remember that restoring an iPod should be a last-resort solution. Before attempting a restoration, try to troubleshoot any issues using other methods, such as restarting the device, updating the software, or resetting the settings.
In conclusion, while restoring an iPod can be an effective way to resolve software problems, it is essential to understand that it will result in the deletion of all data. Always back up your files before proceeding with a restoration, and consider other troubleshooting methods before resorting to a restoration. By taking these precautions, you can minimize the risk of data loss and ensure that your iPod remains functional and up-to-date.
FAQ:
Will restoring my iPod erase all of my music and apps?
Yes, restoring your iPod will erase all of your music, apps, and other data. It will return your iPod to its original factory settings.
If I restore my iPod, will I need to re-download all of my apps and music?
Yes, after restoring your iPod, you will need to re-download all of your apps and music. Make sure to back up your data before restoring to avoid any loss.
Is it possible to restore my iPod without losing all of my data?
No, restoring your iPod will erase all of your data. If you want to keep your data, make sure to back it up before restoring.
Can I restore my iPod without a computer?
No, in order to restore your iPod, you will need to connect it to a computer and use iTunes to perform the restoration process.