
Apple offers a wide variety of subscriptions for music, TV shows, and other services through its various platforms. While these subscriptions can be convenient, you might find yourself wanting to cancel a subscription or get a refund for a subscription that you no longer want or need. Thankfully, Apple provides a straightforward process for canceling and refunding unwanted subscriptions, allowing you to easily manage your subscriptions and avoid any unnecessary charges.
To cancel a subscription, start by opening the App Store on your iPhone or iPad and tapping on your profile picture in the top-right corner. From there, tap on Subscriptions to view all of your active subscriptions. Find the subscription you want to cancel and tap on it. On the subscription details page, tap on the “Cancel Subscription” option and then confirm your selection. After canceling a subscription, you will continue to have access to the content until the end of the current billing cycle.
If you find that you’ve been charged for a subscription that you canceled or don’t remember signing up for, you can request a refund from Apple. To do so, you’ll need to contact Apple Support within 14 days of the subscription being charged. You can reach out to Apple Support through the App Store, iTunes, or by visiting the Apple Support website. Provide the details of the unwanted subscription and your request for a refund, and Apple will review your case and determine if you are eligible for a refund.
It’s important to note that while Apple offers a straightforward process for canceling and refunding subscriptions, the exact steps may vary slightly depending on your device and the specific subscription in question. Additionally, some subscriptions may have specific cancellation policies or refund eligibility criteria that differ from the general process. Always review the terms and conditions of a subscription before signing up to understand the cancellation and refund policies.
Remember to regularly review your subscriptions and cancel any that you no longer want or need to avoid unnecessary charges. If you do encounter any issues with canceling or refunding an Apple subscription, don’t hesitate to reach out to Apple Support for assistance. By managing your subscriptions effectively, you can ensure that you are only paying for the services and content that you truly want and enjoy.
How to Cancel Apple Subscriptions
If you want to cancel an Apple subscription, you can do so easily through your Apple device or through the iTunes Store. Follow the steps below to cancel your subscription:
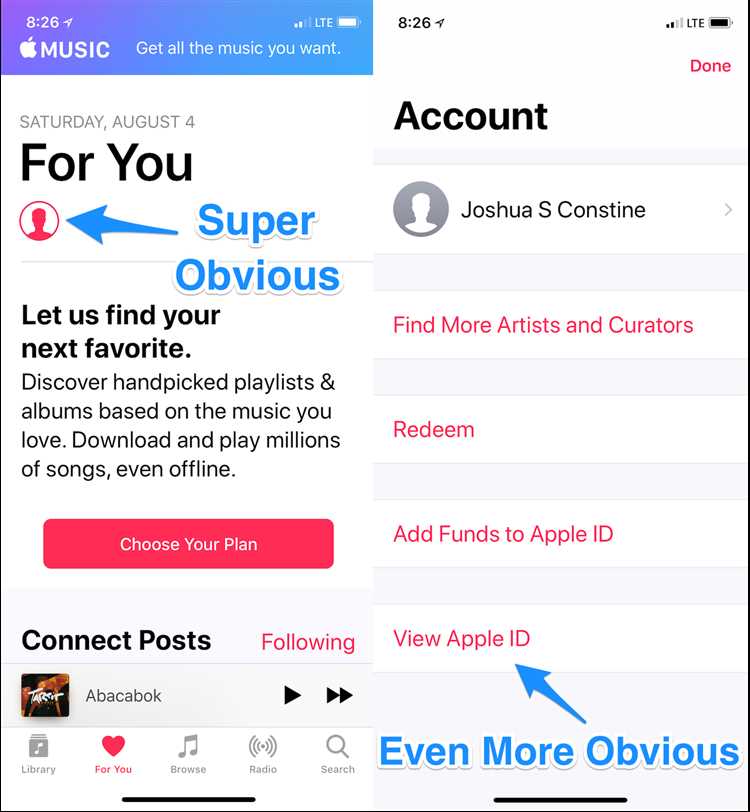
- Open the App Store on your iPhone or iPad.
- Tap on your profile picture or the “Profile” tab at the top right corner of the screen.
- Scroll down and tap on “Subscriptions.”
- Find the subscription that you want to cancel and tap on it.
- Tap on the “Cancel Subscription” option.
- Confirm the cancellation by tapping on “Confirm” when prompted.
If you prefer to cancel your Apple subscription through the iTunes Store, you can follow these steps:
- Open iTunes on your computer.
- Click on “Account” and then choose “View My Account.”
- Scroll down to the “Settings” section, and click on “Manage” next to “Subscriptions.”
- Find the subscription that you want to cancel and click on “Edit.”
- Click on “Cancel Subscription” and confirm the cancellation when prompted.
Please note that canceling a subscription does not automatically provide a refund. If you want to request a refund for an unwanted subscription, contact Apple Support and explain your situation. They will be able to assist you further.
Step-by-Step Guide to Cancel an Apple Subscription
If you no longer wish to continue with your Apple subscription and want to cancel it, follow the steps outlined below:
- Open the App Store on your device.
- Tap on your profile picture or initials located at the top right corner of the screen.
- Choose “Subscriptions” from the dropdown menu.
- You will see a list of your active subscriptions. Select the subscription you wish to cancel.
- Tap on “Cancel Subscription” at the bottom of the subscription details.
- A confirmation prompt will appear asking if you are sure you want to cancel. Tap on “Confirm” to proceed.
Once you have completed these steps, your Apple subscription will be cancelled. Keep in mind that you will retain access to the subscription until the end of the current billing period.
If you change your mind and decide to keep the subscription, you can re-enable it before the next billing cycle begins by following the same steps but selecting “Re-subscribe” instead of “Cancel Subscription”.
It is important to note that cancelling a subscription does not automatically entitle you to a refund. Refunds may be subject to Apple’s refund policy and the specific terms of the subscription you have cancelled. If you believe you are eligible for a refund, you can contact Apple Support for further assistance.
Alternative Ways to Cancel Apple Subscriptions
If you are unable to cancel your unwanted Apple subscriptions through the traditional method, there are alternative ways to help you achieve the desired outcome. Here are some options to consider:
- Contact Apple Support: Reach out to Apple Support directly and explain your situation. They may be able to assist you in canceling your subscription and obtaining a refund.
- Use the Apple Support App: Download and use the Apple Support app on your iPhone or iPad to get in touch with Apple Support. This will allow you to explain your issue and request assistance in canceling your subscription.
- Visit an Apple Store: If you prefer face-to-face communication, you can visit an Apple Store near you and speak with a representative. They should be able to guide you through the process of canceling your subscription and potentially obtaining a refund.
- Reach out to your Bank or Credit Card Company: If all else fails, you can contact your bank or credit card company and explain the situation. They may be able to help you dispute the charges and potentially refund the amount paid for the unwanted subscription.
Remember, it is important to act promptly when canceling unwanted Apple subscriptions to avoid further charges. Exploring these alternative methods should increase your chances of successfully canceling your subscription and obtaining a refund.
How to Get a Refund for Apple Subscriptions
If you have purchased an Apple subscription that you no longer want or need, you may be eligible for a refund. Here are the steps you can take to get a refund for your Apple subscription:
- Check the refund policy: Before proceeding with the refund process, it’s important to review Apple’s refund policy for subscriptions. This can be found on their website or in the terms and conditions of your subscription.
- Cancel the subscription: To initiate the refund process, you will first need to cancel the subscription. This can be done by going to your device’s Settings, selecting your Apple ID, and then choosing “Subscriptions”. Find the subscription you want to cancel and select “Cancel Subscription”.
- Contact Apple Support: After canceling the subscription, contact Apple Support to request a refund. You can reach them through the Apple website, the Apple Support app, or by calling their support hotline. Provide them with the details of your canceled subscription and explain why you are requesting a refund.
- Provide necessary information: Apple may require additional information to process your refund request. This could include the order number, your Apple ID, and any other relevant details. Make sure to provide all requested information promptly.
- Follow up: If you don’t receive a response or refund within a reasonable timeframe, don’t hesitate to follow up with Apple Support. They should be able to provide you with an update on the status of your refund.
Remember, getting a refund for an Apple subscription is not guaranteed, and eligibility may vary depending on the circumstances. It’s important to familiarize yourself with Apple’s refund policy and to act promptly to increase your chances of receiving a refund.
Note: These steps may vary slightly depending on your device and the version of iOS or macOS you are using. Consult Apple’s support documentation or contact Apple Support directly for specific instructions based on your situation.
Requirements for Getting a Refund for Apple Subscriptions
Before you can request a refund for your unwanted Apple subscriptions, there are a few requirements that you must meet. The following conditions need to be fulfilled:
- Timing: You can only request a refund for a subscription within 90 days of the purchase date. If the 90-day period has passed, you will not be eligible for a refund.
- Valid Reason: Apple requires a valid reason for refunding a subscription. Common valid reasons may include duplicate subscriptions, accidental purchases, or dissatisfaction with the service provided. Make sure to provide a clear and valid reason when requesting a refund.
- Proof of Purchase: You must have proof of purchase for the subscription you want to refund. This can be a receipt, email, or any other document that confirms your subscription purchase.
- Subscription Status: The subscription you want to refund must be active or within the grace period. If the subscription has already expired, you will not be eligible for a refund.
- Payment Method: The refund will be credited back to the payment method that was used to purchase the subscription. Make sure the payment method is still valid and active.
Meeting these requirements is essential for successfully obtaining a refund for your unwanted Apple subscriptions. Once you have fulfilled all the conditions, you can proceed with the refund request process outlined by Apple. Remember to provide accurate and valid information to improve the chances of a successful refund.
Steps to Get a Refund for Unwanted Apple Subscriptions
If you have purchased an unwanted Apple subscription and would like to get a refund, follow these steps:
- Open the App Store: Launch the App Store app on your Apple device.
- Tap on your profile: Look for your profile picture or initials in the top right corner of the App Store and tap on it.
- Select “Subscriptions”: Scroll down to find the “Subscriptions” option and tap on it.
- View your active subscriptions: You will see a list of your active subscriptions. Tap on the subscription that you want to cancel and get a refund for.
- Cancel the subscription: Tap on the “Cancel Subscription” button and confirm the cancellation when prompted.
- Contact Apple Support: If you don’t see the “Cancel Subscription” button or need further assistance, you can contact Apple Support by tapping on the “Need Help?” link.
- Explain the situation: Explain the situation to the Apple Support representative and request a refund for the unwanted subscription.
- Provide necessary information: Be prepared to provide any necessary information requested by the Apple Support representative, such as order number or Apple ID.
- Follow instructions: Follow any additional instructions provided by the Apple Support representative to complete the refund process.
- Check for refund: After completing the necessary steps, check your payment method for the refund. It may take a few days for the refund to appear.
By following these steps, you should be able to successfully cancel and get a refund for unwanted Apple subscriptions.
Common Challenges in Cancelling and Getting Refunds for Apple Subscriptions
While cancelling and getting refunds for Apple subscriptions is generally a straightforward process, there are some common challenges that users may encounter along the way:
- Limited refund window: Apple typically offers a limited refund window of 14 days for most app and service purchases. If you miss this window, it may become more difficult to obtain a refund.
- Automatic renewal: Many Apple subscriptions automatically renew at the end of each billing period, which means you need to remember to cancel in advance if you no longer want to use the service. Forgetting to cancel can result in unwanted charges.
- Complex cancellation process: The process of cancelling an Apple subscription can be confusing for some users, especially if they are not familiar with the steps involved. It may require navigating through different sections of the Settings app or contacting Apple Support for assistance.
- Lack of awareness: Some users may not be aware that they are subscribed to certain Apple services or forget to cancel after a free trial period ends. This can lead to unexpected charges and the need to request a refund.
- Language barriers: Apple’s support documentation and customer service channels are predominantly in English, which can create challenges for non-English speaking users who are trying to cancel or obtain a refund.
- In-app subscriptions: In some cases, users may have subscribed to an app or service directly through an app rather than through the App Store. Cancelling and obtaining refunds for these types of subscriptions may require different steps and contacting the app developer directly.
Despite these challenges, Apple offers various resources and support channels to assist users in cancelling and getting refunds for unwanted subscriptions. It’s important for users to stay vigilant, review their subscription settings regularly, and reach out to Apple or the app developer for help when needed.
Tips and Tricks to Avoid Unwanted Apple Subscriptions and Refund Issues
Unwanted Apple subscriptions can be a hassle to deal with, but by following a few simple tips and tricks, you can avoid these issues and ensure a smooth refund process.
1. Review Subscription Details
Before subscribing to any service or app on your Apple device, take the time to review the subscription details. Look for information about the duration of the trial period, the recurring billing cycle, and any cancellation policies. This will help you make an informed decision and avoid unexpected charges.
2. Disable Automatic Renewal
If you no longer want to continue a subscription, it’s important to disable automatic renewal before the renewal date. To do this, go to the App Store or iTunes Store on your device, tap on your Apple ID, select “Subscriptions,” and then choose the subscription you want to manage. From there, you can turn off the automatic renewal option.
3. Set Reminders
To avoid forgetting about a subscription and being charged for another billing cycle, set reminders for yourself. Use your device’s built-in reminder app or any third-party reminder app to alert you a few days before the renewal date. This way, you’ll have enough time to review the subscription and decide whether you want to continue or cancel.
4. Monitor Billing Statements
Regularly review your billing statements to ensure that you’re not being charged for unwanted subscriptions. If you notice any unauthorized charges or subscriptions you no longer need, contact Apple support immediately to request a refund.
5. Utilize Apple’s Refund Policy
If you accidentally purchased an unwanted subscription or subscribed to a service that doesn’t meet your expectations, Apple offers a refund policy. You can request a refund within a specific timeframe by contacting Apple support. Be prepared to provide any necessary details, such as your Apple ID and the reason for the refund request.
6. Keep Records
It’s always a good idea to keep a record of your subscription details, including confirmation emails, receipts, and any communication with Apple support. These records can be useful when resolving any disputes or issues related to unwanted subscriptions and refunds.
7. Research and Read Reviews
Before subscribing to any app or service, take the time to research and read reviews from other users. Look for feedback on the subscription process, cancellation policies, and refund experiences. This will give you insights into the reputation and reliability of the app or service.
By following these tips and tricks, you can minimize the risk of unwanted Apple subscriptions and ensure a smooth refund process if needed. Remember to stay vigilant, review your subscriptions regularly, and contact Apple support for any assistance or refund requests.
FAQ:
What is an Apple subscription?
An Apple subscription is a recurring payment made to Apple for access to a specific service or content on your Apple device.
How can I cancel my unwanted Apple subscription?
To cancel your unwanted Apple subscription, you can go to the settings on your Apple device, click on your Apple ID, select “Subscriptions,” and then choose the subscription you want to cancel.
Can I get a refund for my unwanted Apple subscription?
Yes, you can get a refund for your unwanted Apple subscription if you meet the requirements for a refund. You can contact Apple Support and explain your situation to request a refund.
What should I do if I accidentally subscribed to an Apple service?
If you accidentally subscribed to an Apple service, you can cancel the subscription and request a refund. Follow the steps mentioned earlier to cancel the subscription, and then contact Apple Support to explain the situation and request a refund.