
Are you a gaming enthusiast who loves to play games on Steam? If yes, then you must have come across the Steamui.dll error at some point. This error can prevent you from launching or updating your favorite games. But fret not! In this step-by-step guide, we will show you how to easily install Steamui.dll and get your games up and running again.
Steamui.dll is a Dynamic Link Library file that is an essential component of the Steam client. It contains important functions and data that are necessary for the proper functioning of Steam. When this file is missing or corrupted, Steam encounters errors, and you may not be able to access your games or the Steam client.
To install Steamui.dll, follow these simple steps:
- Step 1: Download the Steamui.dll file from a reliable source. You can find it on various websites that offer DLL files for download. Make sure to choose a trustworthy source to avoid downloading any malicious files.
- Step 2: Once you have downloaded the Steamui.dll file, locate the Steam installation folder on your computer. The default location is usually C:\Program Files (x86)\Steam.
- Step 3: Open the installation folder and navigate to the bin folder. This is where the Steamui.dll file needs to be placed. If you can’t find a bin folder, create one.
- Step 4: Copy the downloaded Steamui.dll file and paste it into the bin folder.
- Step 5: Once the file is successfully copied, relaunch the Steam client. The Steamui.dll error should now be resolved, and you should be able to access your games without any issues.
By following these steps, you can easily install Steamui.dll and get rid of the annoying error that might be hindering your gaming experience. Remember to always download the file from a trusted source to ensure its authenticity and security. Now, go ahead and enjoy your favorite games on Steam!
Note: Installing third-party DLL files can pose certain risks. Make sure to perform a full system scan using reliable antivirus software after installing Steamui.dll to ensure the security of your computer.
Step 1: Check System Requirements
Before installing Steamui dll, it’s important to check if your system meets the minimum requirements to ensure a successful installation. Here are the system requirements you should review:
- Operating System: Ensure that your computer is running a compatible operating system such as Windows 7, Windows 8, or Windows 10. Steamui dll may not work properly on older operating systems.
- Processor: Check if your processor meets the minimum requirements for Steamui dll. This information can usually be found in your computer’s system settings or by right-clicking on “My Computer” and selecting “Properties”.
- Memory (RAM): Make sure that your computer has enough memory to handle the installation and running of Steamui dll. The amount of RAM needed can vary depending on your system and the games you intend to play.
- Graphics Card: Verify that your graphics card meets the minimum requirements for Steamui dll. A compatible graphics card is crucial for running games smoothly.
- Storage Space: Check if you have enough free storage space on your computer’s hard drive to accommodate the installation of Steamui dll. This is important as games can require large amounts of storage space.
By ensuring that your system meets these requirements, you can ensure a smooth and successful installation of Steamui dll. It’s recommended to keep your system updated to the latest software and drivers for optimal performance.
Step 2: Download the Steamui.dll File
After completing the first step of the installation process, you now need to download the Steamui.dll file. This file is essential for running the Steam user interface and allows you to access all the features and functionalities of the gaming platform.
Follow these simple steps to download the Steamui.dll file:
- Open your preferred web browser and go to the official Steam website.
- On the Steam website, navigate to the “Downloads” section. You can usually find this section on the main page or in the top menu.
- In the “Downloads” section, look for the option to download the Steam client. Click on it to start the download.
- Once the download is complete, locate the downloaded file on your computer. The filename should be something like “SteamSetup.exe”.
- Run the SteamSetup.exe file to start the installation process. Follow the on-screen instructions to install the Steam client on your computer.
- Once the installation is complete, launch the Steam client. You will be prompted to log in or create a new account if you don’t have one already.
- After logging in, you will see the main Steam interface. From the top menu, click on “Library” to access your game library.
- In the Library section, locate the game for which you need the Steamui.dll file. Right-click on the game and select “Properties” from the drop-down menu.
- In the Properties window, go to the “Local Files” tab. Click on the “Browse Local Files” button to open the game’s installation folder.
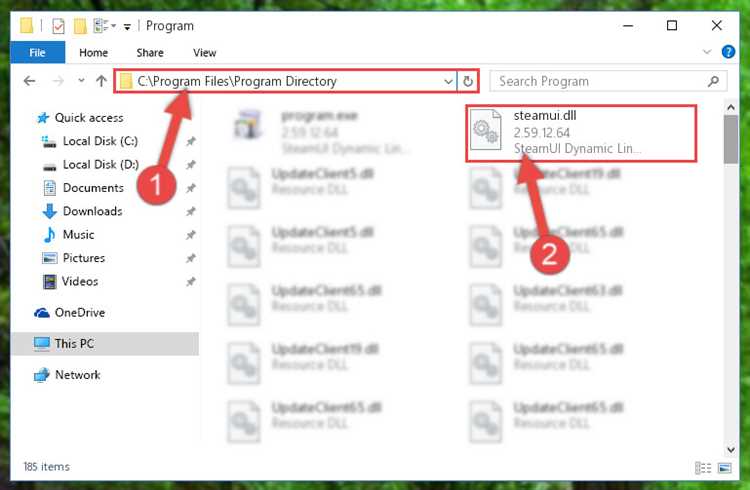
- In the game’s installation folder, locate the Steamui.dll file. It should be in the same folder as the game’s main executable file.
- Copy the Steamui.dll file and paste it into the folder where you installed the Steam client. This folder is usually located in the “C:\Program Files (x86)\Steam” directory.
Once you have successfully downloaded and placed the Steamui.dll file in the appropriate folder, you can proceed to the next step of the installation process.
Step 3: Locate the Steam Installation Folder
Locating the Steam installation folder is an important step in the process of installing SteamUI.dll.
Follow these steps to find the Steam installation folder:
- Open the File Explorer on your computer. You can do this by clicking on the folder icon on the taskbar or by pressing the Windows key and the letter “E” at the same time.
- In the File Explorer, navigate to the main drive where your operating system is installed. This is usually the “C:” drive.
- Open the “Program Files (x86)” folder. This folder is typically where 64-bit applications are installed on a 64-bit version of Windows.
- Look for the “Steam” folder within the “Program Files (x86)” directory. If you installed Steam in a different location, navigate to that folder instead.
- Once you have located the Steam folder, open it and look for the “steamapps” folder.
- Open the “steamapps” folder and then open the “common” folder.
- In the “common” folder, you will find the folders for all the games you have installed through Steam. Look for the folder of the game you want to install the SteamUI.dll for.
By following these steps, you should be able to locate the Steam installation folder and navigate to the specific game folder where you can install the SteamUI.dll file.
Step 4: Backup the Existing Steamui.dll
Before making any changes to the Steamui.dll file, it is important to create a backup of the original file. This will ensure that you have a copy of the original file in case anything goes wrong during the installation process.
To backup the existing Steamui.dll file, follow the steps below:
- Open the File Explorer by pressing Windows key + E on your keyboard.
- Navigate to the directory where Steam is installed. The default installation directory is usually C:\Program Files (x86)\Steam.
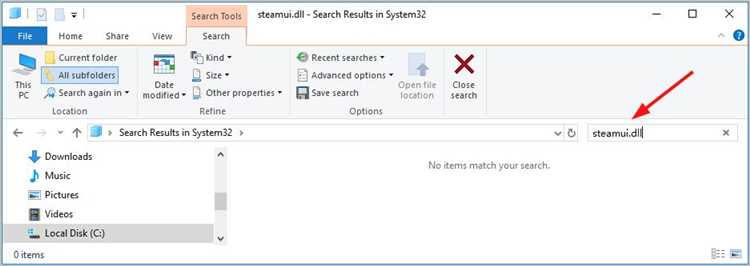
- Locate the steamui.dll file in the installation directory. It is usually located in the steamui subfolder.
- Right-click on the steamui.dll file and select Copy.
- Create a new folder in a location of your choice, for example, on your desktop or in your documents folder.
- Open the new folder and right-click inside it. Select Paste to save a copy of the original steamui.dll file.
By following these steps, you will have successfully created a backup of the original Steamui.dll file. In the event that any issues arise during the installation process, you can use this backup to restore the original file and revert any changes that were made.
Step 5: Replace Steamui.dll
After downloading the updated version of Steamui.dll, you will need to replace the existing file with the new one. Follow the steps below to successfully replace Steamui.dll:
- Close the Steam application if it is currently running.
- Navigate to the directory where Steam is installed on your computer. Usually, it is in the “C:\Program Files (x86)\Steam” folder.
- Locate the existing Steamui.dll file in the installation folder.
- Make a backup of the old Steamui.dll file. Right-click on the file and select “Copy”. Then, right-click on an empty space within the folder and select “Paste” to create a copy of the file.
- Delete the original Steamui.dll file. Right-click on the file and select “Delete”. Confirm the deletion when prompted.
- Copy the downloaded Steamui.dll file from your download folder or location.
- Paste the new Steamui.dll file into the Steam installation folder. Right-click on an empty space within the folder and select “Paste” to replace the old file with the new one.
- Launch Steam and check if the issue has been resolved. The new Steamui.dll file should now be in place, providing any necessary updates or fixes.
Following these steps should allow you to easily replace the old Steamui.dll file with the new one, ensuring that you have the latest version of the file for your Steam application.
Step 6: Run Steam
After successfully installing the SteamUI.dll file, you can now run Steam and enjoy your gaming experience. Follow these steps to run Steam on your computer:
- Locate the Steam application icon on your desktop or in your Start menu.
- Double-click on the Steam icon to launch the application.
- If prompted, enter your Steam account credentials (username and password) and click on “Login” to access your account.
- Once logged in, you will be able to explore the Steam platform, access your game library, and discover new games.
- Select a game from your library or browse the Steam store to find and purchase new games.
- Click on the “Play” button to begin playing the selected game.
Enjoy your gaming experience on Steam and have fun exploring the wide variety of games available!
Step 7: Troubleshooting
If you encounter any issues during the installation process or when using Steamui.dll, here are some troubleshooting steps you can follow to try and resolve them:
- Restart your computer: Sometimes a simple restart can resolve many software-related issues.
- Check system requirements: Make sure your computer meets the minimum system requirements for running Steam and its associated files.
- Update Steam: Ensure that you have the latest version of Steam installed. Steam updates often include bug fixes that may resolve the issue you are facing.
- Run Steam as an administrator: Right-click on the Steam shortcut or executable and select “Run as administrator” to give Steam the necessary privileges it may need.
- Verify game files: If you are experiencing issues with a specific game, you can try verifying the game files through the Steam client. Right-click on the game in your library, select “Properties,” go to the “Local Files” tab, and click on “Verify Integrity of Game Files.”
- Reinstall Steam: If all else fails, you can try reinstalling Steam entirely. Make sure to back up your game files and settings before doing so.
- Check for conflicting software: Some antivirus or firewall software may interfere with Steam or its components. Temporarily disable such software and see if the issue persists.
If none of the above troubleshooting steps resolve your issue, you may need to seek further assistance from the Steam support team or consult online forums for additional guidance.
Step 8: Enjoy Using Steamui.dll
Congratulations! You have successfully installed the Steamui.dll file on your computer. Now, you can enjoy using the Steam user interface (UI) for a seamless gaming experience. Here are a few tips and tricks to get you started:
- Launch Steam: Double-click on the Steam application to launch it.
- Login or Create an Account: If you already have a Steam account, simply enter your login credentials and sign in. If you are new to Steam, click on “Create Account” and follow the on-screen instructions to set up a new account.
- Explore the Store: Click on the “Store” tab in the Steam UI to browse and purchase games, software, and other digital content.
- Manage Your Library: The “Library” tab displays all the games you own. Click on a game to install, launch, or uninstall it.
- Connect with Friends: Use the “Friends” tab to add friends, chat, and join multiplayer games together.
- Customize Steam: Click on “Steam” in the top-left corner of the UI and select “Settings” to customize various aspects of Steam, such as downloads, notifications, and controller settings.
- Discover Community Content: Visit the “Community” tab to access forums, user guides, user-generated content, and more.
- Stay Updated: Steam frequently updates its features and adds new games. Keep an eye out for announcements and updates to enhance your gaming experience.
Remember to regularly update your Steam client to benefit from the latest features and security enhancements. Enjoy exploring the vast world of gaming through Steam!
FAQ:
What is Steamui dll and why do I need to install it?
Steamui dll is a dynamic link library file that is essential for running the Steam user interface. You need to install it to ensure that Steam functions properly and that you can access all of its features.
Is it possible to install Steamui dll on a Mac computer?
No, Steamui dll is a Windows-specific file and is not compatible with Mac computers. If you are using a Mac, you do not need to worry about installing Steamui dll as the necessary files are automatically included in the Mac version of Steam.
Are there any precautions I should take before installing Steamui dll?
Before installing Steamui dll, it is always a good idea to make sure that your computer meets the system requirements for running Steam. Additionally, it is recommended to have a stable internet connection to ensure a smooth installation process. It is also a good practice to back up any important files or data on your computer before installing any software.