
Facebook has become a popular platform for sharing photos and memories with friends and family. However, there may come a time when you want to delete an entire photo album on Facebook. Whether it’s because you’re clearing out old memories or simply want to start fresh, deleting a photo album can be a simple process.
To delete an entire photo album on Facebook, follow these easy steps:
- Login to your Facebook account and navigate to your profile page.
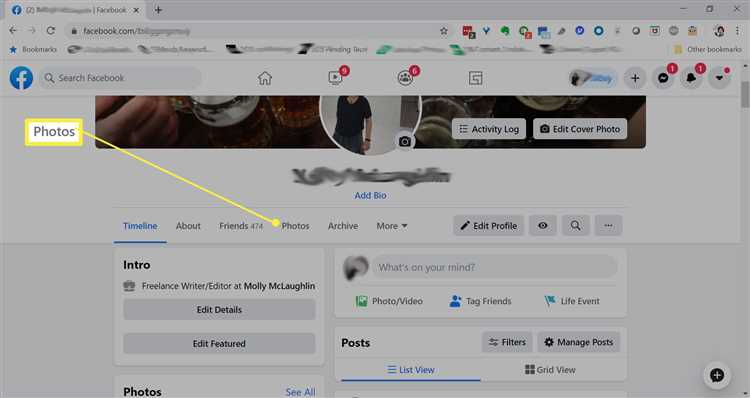
- Click on the “Photos” tab located below your cover photo.
- Scroll down to find the photo album you want to delete. Click on it to open it.
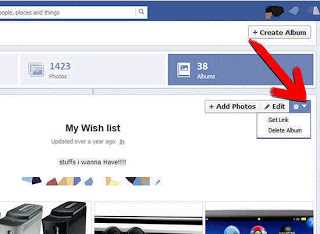
- In the top right corner of the album page, you will see a button with three dots. Click on it.
- A dropdown menu will appear. Click on the “Delete Album” option.
- A confirmation message will appear asking if you want to delete the album. Click “Delete” to confirm.
It’s important to note that deleting an entire photo album will permanently remove all the photos and videos within it. Make sure to double-check that you want to delete the album before confirming, as this action cannot be undone. Additionally, it’s a good idea to download any important photos from the album before deletion to ensure you have a backup.
By following these easy steps, you can quickly and easily delete an entire photo album on Facebook. Whether you’re looking to declutter your profile or simply move on from old memories, this process can help you achieve a clean and fresh start on the platform.
Step-by-Step Guide to Remove a Complete Photo Album from Your Facebook Account
If you have a photo album on Facebook that you no longer want to keep, you can easily delete it from your account. Follow these simple steps to remove a complete photo album:
- Open your Facebook account and navigate to your profile page.
- Click on the “Photos” tab located below your cover photo. This will take you to your photo albums.
- Find the album you want to delete and click on it to open it.
- At the top-right corner of the album page, click on the three-dot menu icon. A dropdown menu will appear.
- From the dropdown menu, select the “Delete Album” option. A confirmation pop-up will appear.
- Read the information provided in the pop-up carefully. It explains that deleting the album will permanently remove all the photos it contains.
- If you still want to proceed with the deletion, click on the “Delete” button.
- Facebook will ask you to confirm your action by entering your account password. Type your password in the provided field and click on the “Confirm” button.
- Wait for a moment while Facebook processes your request. Once deleted, the album and its photos will be permanently removed from your account.
It’s important to note that deleting a complete photo album is irreversible, so make sure you really want to remove it before proceeding. Also, keep in mind that deleting an album will not delete the individual photos from the accounts of other people who may have tagged themselves or been tagged in the photos. They will still have access to the photos even after the album is deleted from your account.
Ensure Your Privacy and Clean Up Your Profile by Deleting an Entire Photo Album on Facebook
Using Facebook to share moments and memories with friends and family is a common practice in today’s digital age. However, over time, you may accumulate a large number of photo albums on your Facebook profile. These albums might contain pictures that you no longer want to share or are concerned about keeping private. In such cases, it is important to know how to delete an entire photo album on Facebook to ensure your privacy and clean up your profile.
Step 1: Open Your Facebook Account
Start by opening your Facebook account on your preferred internet browser. Enter your login credentials to access your profile.
Step 2: Navigate to Your Photos
Once you are logged in, click on your profile picture located at the top left corner of the Facebook page. This will take you to your profile. Then, click on the “Photos” tab, which is located just below your cover photo.
Step 3: Access Your Albums
In the Photos section, you will find different tabs such as “Photos of You”, “Photos & Videos”, “Albums”, etc. Click on the “Albums” tab to access all your photo albums.
Step 4: Select the Album to Delete
In the Albums section, you will see all the photo albums you have created. Scroll through the list and choose the album you want to delete. Click on the album to open it.
Step 5: Delete the Album
Once you have opened the album, click on the three dots icon located in the top-right corner of the album. A dropdown menu will appear. From the menu, select “Delete Album”.
Step 6: Confirm the Deletion
A pop-up window will appear asking you to confirm the deletion of the album. Read the information carefully as this will permanently delete all the photos and videos in the album. If you are certain, click on the “Delete” button.
Step 7: Album Deleted
After confirming, the album will be permanently deleted from your Facebook profile, along with all the photos and videos it contained. Your profile will be cleaned up, ensuring your privacy and removing any unwanted or outdated images.
By following these easy steps, you can maintain your privacy and keep your Facebook profile tidy by deleting entire photo albums that are no longer relevant or you no longer wish to share. Remember to be cautious and double-check before deleting any albums, as this action cannot be undone.
Safely and Securely Delete Unwanted Photo Albums with These Simple Steps
If you have photo albums on Facebook that you no longer want or need, it’s important to know how to safely and securely delete them. Deleting unwanted photo albums can help declutter your profile and ensure that only the photos you want to share are visible to your friends and followers. Follow these easy steps to delete an entire photo album on Facebook:
- Login to your Facebook account using your username and password.
- Navigate to your profile page by clicking on your profile picture or name.
- Click on the “Photos” tab on your profile page to access your photo albums.
- Select the photo album you want to delete from the list of albums.
- Click on the three dots (…) icon located at the top-right corner of the album.
- Choose the “Delete Album” option from the dropdown menu.
- Confirm the deletion by clicking “Delete” in the pop-up window.
It’s important to note that deleting a photo album will permanently remove all the photos and videos in that album. Make sure to download any important or sentimental photos before deleting the album, as they will be lost forever. Additionally, deleting an album will also remove any likes, comments, and tags associated with the photos within that album.
To ensure the deletion process is secure, keep the following tips in mind:
- Review the album before deleting to double-check that you don’t want any of the photos or videos anymore.
- Consider setting the album to private before deleting it if you are concerned about privacy.
- Use a strong password and enable two-factor authentication on your Facebook account to protect your account from unauthorized access.
- Regularly review and delete any unwanted albums to keep your profile organized and reduce the risk of your photos being accessed without your permission.
By following these simple steps and tips, you can safely and securely delete unwanted photo albums on Facebook. Remember to think twice before deleting any albums, as the content within will be permanently removed from your profile. Keeping your profile clean and organized will ensure that the photos you want to showcase are the ones your friends and followers see.
Take Control of Your Online Image by Learning How to Delete Entire Photo Albums on Facebook
Photos play a significant role in our lives, as they capture and preserve our precious memories. However, there may come a time when you want to remove certain photo albums from your Facebook account to maintain your online image and protect your privacy. With Facebook’s easy-to-use interface, deleting entire photo albums has become a simple process. Follow the steps below and take control of your online image.
- Open your preferred web browser and navigate to the Facebook website.
- Log in to your Facebook account using your credentials.
- Once you are logged in, go to your Facebook profile by clicking on your profile picture in the top right corner of the screen.
- From your profile, click on the “Photos” tab below your cover photo.
- In the “Photos” section, you will find different photo albums organized by date, location, or custom categories. Locate the album you want to delete.
- Click on the album to open it.
- Once the album is opened, click on the three-dot menu icon in the top right corner of the screen.
- A dropdown menu will appear. From the menu, select the “Delete Album” option.
- A confirmation message will pop up asking if you want to delete the album. Review the message to ensure you are deleting the correct album.
- Click on the “Delete” button to confirm the deletion.
Note: Deleting a photo album will permanently remove all the photos within it as well. This action cannot be undone. Make sure you have backed up any photos you want to keep before proceeding.
| Advantages of Deleting Photo Albums on Facebook: |
|---|
|
With these easy steps, you can regain control over your online image by deleting entire photo albums on Facebook. Remember to carefully review the albums before deletion and consider backing up any important photos. By taking control of your Facebook profile, you can shape how others perceive you and maintain a positive online presence.
Protect Your Digital Footprint and Remove Unwanted Memories with This Easy-to-Follow Tutorial
Managing your digital presence is important, and one way to do that is by removing any unwanted memories or outdated photos from your Facebook account. In this tutorial, we will guide you through the easy steps to delete an entire photo album on Facebook.
Step 1: Log in to your Facebook account
Open Facebook on your preferred web browser and log in to your account using your username and password.
Step 2: Go to your profile
Once logged in, navigate to your profile page by clicking on your profile picture or name located on the top menu.
Step 3: Access your photo albums
On your profile page, locate the “Photos” tab below your cover photo and click on it. This will take you to your photo albums section.
Step 4: Select the album to delete
In the photo albums section, browse through your albums and select the one you want to delete. Click on the album to open it.
Step 5: Open the options menu
Once the album is open, you will see a menu with different options at the top right corner. Click on the three-dot icon to open the options menu.
Step 6: Choose “Delete Album”
From the options menu, select “Delete Album” to remove the entire photo album from your Facebook account. A confirmation prompt will appear.
Step 7: Confirm deletion
Read the confirmation prompt carefully and make sure you want to delete the album permanently. If you’re sure, click “Delete” to confirm the deletion.
Step 8: Success!
Your photo album has now been successfully deleted from your Facebook account. The photos within the album will no longer be visible to you or anyone else.
Remember, it’s always a good idea to protect your digital footprint and manage your online presence. Removing unwanted memories and outdated photos from your Facebook account is one way to do that. Follow this tutorial and take control of your digital persona today!
Say Goodbye to Unwanted Photos on Facebook by Deleting an Entire Album in Just a Few Clicks
If you have been using Facebook for a while, chances are you have accumulated a lot of photos over time. While some photos may hold sentimental value, others may simply be unwanted or no longer relevant to your life. If you find yourself in a situation where you want to get rid of an entire photo album on Facebook, you’ll be happy to know that the process is quite simple.
Step 1: Access Your Facebook Account
In order to delete a photo album on Facebook, you need to first log in to your Facebook account. Go to the Facebook website and enter your login credentials.
Step 2: Navigate to Your Photos
Once you are logged in, go to your profile by clicking on your name or profile picture in the top right corner of the screen. On your profile, click on the “Photos” tab to navigate to your photo albums.
Step 3: Select the Album You Want to Delete
In the “Photos” section, you will see all of your photo albums. Scroll through the list and select the album you want to delete.
Step 4: Open the Album Settings
Once you have selected the album, open the album and click on the three-dot menu icon in the top right corner of the screen. A dropdown menu will appear.
Step 5: Choose “Delete Album” Option
In the dropdown menu, click on the “Delete Album” option. A confirmation message will appear, asking if you are sure you want to delete the album. Read the message carefully and make sure you want to permanently delete the album.
Step 6: Confirm Deletion
If you are sure you want to delete the album, click on the “Delete” button in the confirmation message. The album and all of its contents will be permanently deleted from your Facebook account.
Step 7: Repeat for Other Unwanted Albums
If you have other unwanted photo albums on Facebook, repeat the above steps to delete them as well. Make sure to double-check your decision before confirming the deletion.
Conclusion
By following these easy steps, you can quickly say goodbye to unwanted photo albums on Facebook. Whether you are trying to declutter your account or remove old memories, deleting an entire album is a straightforward process. Just remember to think carefully before deleting any photos or albums, as the deletion is permanent.
Keep Your Facebook Profile Organized and Fresh by Deleting Unwanted Photo Albums
If you have been using Facebook for a while, you might have accumulated a large number of photo albums on your profile. While some of these albums may hold precious memories, others might be cluttering your profile and making it difficult for you to find the photos you really want to showcase. Deleting unwanted photo albums is a simple and effective way to keep your Facebook profile organized and fresh.
Here are some easy steps you can follow to delete an entire photo album on Facebook:
- First, log in to your Facebook account using your credentials.
- Navigate to your profile by clicking on your profile picture in the top right corner of the screen.
- Once you are on your profile, locate the “Photos” tab below your cover photo and click on it.
- In the “Photos” section, you will see all the photo albums you have created or been tagged in. Click on the album you want to delete.
- On the album page, click on the three-dot menu located at the top right corner of the page.
- A dropdown menu will appear. From the menu, select the “Delete Album” option.
- A pop-up window will appear, asking for confirmation. Review the information in the pop-up and click on the “Delete Album” button to confirm the deletion.
Once you have confirmed the deletion, the photo album will be permanently deleted from your Facebook profile. Any photos or videos in the album will also be deleted, so make sure to back up any important content before proceeding with the deletion.
By regularly deleting unwanted photo albums, you can declutter your Facebook profile and keep it organized. This will not only make it easier for you to navigate and find the photos you want to showcase, but it will also create a fresh and appealing impression for visitors to your profile.
So, take the time to review your Facebook photo albums and delete any that are no longer relevant or meaningful. Your profile will thank you for it!
Discover the Quick and Efficient Way to Permanently Delete Multiple Photo Albums on Facebook
If you have multiple photo albums on Facebook that you no longer want to keep or share, deleting them individually can be time-consuming. Fortunately, Facebook offers a streamlined process that allows you to permanently delete multiple photo albums at once. Follow these steps to efficiently clean up your Facebook photo albums:
- Login to your Facebook account using your credentials.
- Navigate to your profile by clicking on your name or profile picture.
- Click on the “Photos” tab located below your cover photo.
- In the “Photos” section, click on the “Albums” tab.
- You will see a list of all your photo albums. Scroll through the list and locate the albums you want to delete.
- For each album you want to delete, click on the three horizontal dots icon located at the top right corner of the album cover photo.
- A drop-down menu will appear. Select “Delete Album” from the menu.
- A confirmation pop-up window will appear, asking if you are sure you want to delete the album. Click on the “Delete” button to proceed.
- Repeat steps 6 to 8 for each album you want to delete.
- Once you have deleted all the albums you wanted to remove, close the “Albums” tab.
It’s important to note that deleting a photo album is a permanent action and cannot be undone. Make sure to double-check your selection before proceeding with the deletion process.
By following these quick and efficient steps, you can easily clean up your Facebook photo albums and declutter your profile. Enjoy a more organized and personalized Facebook experience without the hassle of managing unwanted albums.
FAQ:
How do I delete an entire photo album on Facebook?
To delete an entire photo album on Facebook, you need to go to your profile and click on the “Photos” section. From there, locate the album you want to delete and open it. Next, click on the settings cog icon in the top-right corner of the album and select the “Delete Album” option. Confirm your decision and the album will be permanently deleted.
Can I recover a deleted photo album on Facebook?
No, once you delete a photo album on Facebook, it cannot be recovered. It is important to double-check your decision before confirming the deletion to avoid losing any valuable photos.
Is it possible to delete multiple photo albums at once on Facebook?
No, currently there is no option to delete multiple photo albums at once on Facebook. You will need to delete each album individually following the steps mentioned earlier.
What happens to the photos inside a deleted album on Facebook?
When you delete an album on Facebook, all the photos inside it are permanently removed from your profile. Make sure to backup any important photos before deleting an album to avoid losing them.