
Have you ever wondered if you can use the dodge and burn techniques in GIMP? Well, the answer is yes! GIMP, which stands for GNU Image Manipulation Program, is a powerful and free software that allows you to edit and enhance your photos. One of the techniques that you can use in GIMP is dodge and burn, which can help you add depth and dimension to your images.
Dodging and burning are techniques that have been used in traditional darkroom photography for many years. Dodging involves making certain areas of the image lighter, while burning involves making certain areas darker. These techniques can be very useful when you want to bring out details in shadows or highlights, or when you want to create a more dramatic effect in your photos.
In GIMP, you can use the dodge and burn tools to achieve similar effects. The dodge tool allows you to selectively lighten areas of your image, while the burn tool allows you to selectively darken areas. You can adjust the size, strength, and exposure of these tools to achieve the desired effect. You can also use layers and masks to further refine and control the dodging and burning process.
Using dodge and burn in GIMP can be a great way to enhance your photos and make them more visually appealing. Whether you want to bring out details in shadows, create a more dramatic effect, or simply experiment with different editing techniques, GIMP provides you with the tools you need to achieve your desired results. So go ahead, give dodge and burn a try in GIMP and take your photo editing skills to the next level!
The Basics of Dodge and Burn in GIMP
Dodge and burn are powerful techniques in photo editing that allow you to selectively lighten or darken specific areas of an image. These techniques can be used to enhance the highlights and shadows in your photos, create depth and dimension, and bring out details or correct exposure issues. GIMP, a free and open-source image editing software, offers dodge and burn tools that you can use to apply these techniques to your images.
Dodge Tool:
The dodge tool is used to lighten specific areas of an image. It mimics the effect of dodging a photographic print, where you would expose the paper to light for a shorter amount of time to lighten specific areas. In GIMP, you can control the size, hardness, and strength of the dodge tool to achieve the desired effect. To use the dodge tool:
- Select the dodge tool from the toolbox.
- Choose a brush size and hardness that suits your needs.
- Adjust the dodge tool’s strength to control how much lightening is applied.
- Click and drag over the areas you want to lighten.
Burn Tool:
The burn tool is used to darken specific areas of an image. It mimics the effect of burning a photographic print, where you would expose the paper to light for a longer amount of time to darken specific areas. In GIMP, you can control the size, hardness, and strength of the burn tool to achieve the desired effect. To use the burn tool:
- Select the burn tool from the toolbox.
- Choose a brush size and hardness that suits your needs.
- Adjust the burn tool’s strength to control how much darkening is applied.
- Click and drag over the areas you want to darken.
Using Dodge and Burn Together:
When used together, dodge and burn can help you create more contrast and depth in your images. You can use dodge to lighten areas that need more attention, and burn to darken areas that need to recede into the background. This can be particularly useful for portrait photography, where you may want to emphasize certain facial features or add drama to the overall image.
Non-Destructive Editing:
It’s important to note that dodge and burn tools in GIMP work non-destructively. This means that you can make adjustments to the dodge and burn effects at any time without permanently altering the original image. GIMP achieves this by creating separate dodge and burn layers, allowing you to modify their opacity, blending modes, or even disable them entirely.
Conclusion:
Dodge and burn are essential techniques in photo editing, and GIMP provides powerful tools to apply these techniques to your images. By using dodge to lighten and burn to darken specific areas, you can enhance the highlights and shadows, create depth, and bring out details in your photos. Remember to experiment with different brush sizes, hardness, strengths, and blending modes to achieve the desired effect. Have fun exploring dodge and burn in GIMP!
Understanding Dodge and Burn
Dodge and Burn are two essential tools in photo editing that can help enhance the highlights and shadows in an image. These techniques are commonly used in GIMP, a popular open-source image editing software.
Dodge refers to the process of lightening specific areas of an image. It can be used to brighten up shadows and add more details to darker areas. The Dodge tool allows you to selectively lighten areas by painting over them with a brush. This technique is useful for creating a sense of depth and dimension in your photos.
Burn, on the other hand, is the process of darkening specific areas of an image. It can be used to deepen shadows and add richness to the highlights. Similar to the Dodge tool, the Burn tool allows you to selectively darken areas by painting over them with a brush. This technique is commonly used to add drama and intensity to photos.
Both Dodge and Burn can be useful for a variety of editing tasks such as portrait retouching, landscape enhancement, and creating artistic effects. The key to using these tools effectively is to use them subtly and in moderation, as too much Dodge or Burn can result in unnatural-looking images.
When working with Dodge and Burn in GIMP, it is recommended to use separate layers for each technique. This allows you to make adjustments later on and maintain the flexibility of your editing process. You can also experiment with different blending modes and opacity settings to achieve the desired effect.
In conclusion, Dodge and Burn are essential techniques in photo editing that can help you enhance the highlights and shadows in your images. Understanding how to use these tools effectively can greatly improve your editing skills and add depth and dimension to your photos.
Using Dodge and Burn in GIMP
When working on an image in GIMP, you may come across the need to adjust certain areas to enhance the highlights or shadows. This is where the Dodge and Burn tools come in handy. The Dodge tool allows you to lighten specific areas, while the Burn tool darkens them.
To use the Dodge and Burn tools in GIMP, follow these steps:
- Open GIMP and load the image you want to work on.
- Make sure the Layers panel is visible by going to Windows > Dockable Dialogs > Layers.
- In the Layers panel, right-click on the image layer and choose Duplicate Layer. This will create a new layer above the original image.
- Ensure that the new layer is selected in the Layers panel.
- Now, go to the Tools menu and select either the Dodge or Burn tool. They are both under the “Paint Tools” category.
- In the options bar at the top of the window, you can adjust the size, hardness, and opacity of the tool according to your needs.
- To dodge (lighten) an area, simply click and drag the Dodge tool over the desired part of the image. The more you repeat the process, the lighter the area becomes.
- To burn (darken) an area, use the Burn tool similarly. Click and drag over the area you want to darken, and repeat as needed.
- If you need to make further adjustments, you can change the tool’s settings or go back to the original layer and duplicate it again for additional editing.
- Once you’re satisfied with the dodge and burn adjustments, you can save the image.
Remember to practice using the Dodge and Burn tools in GIMP as they can significantly enhance your images by selectively adjusting the highlights and shadows. They provide an easy and effective way to bring attention to specific areas and create stunning effects.
The Dodge Tool in GIMP
The Dodge tool in GIMP is a powerful tool that allows you to selectively lighten areas of your image. It is useful for adding highlights and brightening shadows, creating a more dynamic and visually appealing photo.
How to Use the Dodge Tool
To access the Dodge tool in GIMP, follow these steps:
- Open your image in GIMP.
- Click on the “Tools” menu in the top menu bar.
- In the dropdown menu, select “Paint Tools”.
- From the sub-menu, select “Dodge/Burn”.
- The Dodge tool options will appear in the tool options dock.
Once you have activated the Dodge tool, you can adjust the size, hardness, and opacity of the brush using the options in the tool options dock. This allows you to have more control over the areas you want to lighten.
Using the Dodge Tool
To use the Dodge tool:
- Select the Dodge tool from the tool options dock.
- Choose a brush size that suits your needs.
- Adjust the brush hardness and opacity as desired.
- Ensure that the foreground color is set to white.
- Click and drag the Dodge tool over the areas you want to lighten.
As you use the Dodge tool, you will see the areas you are painting become lighter. You can apply multiple passes with the Dodge tool to achieve the desired effect.
Tips for Using the Dodge Tool
- Start with a lower opacity and gradually build up the effect to avoid overdoing it.
- Use a soft-edged brush for a more natural look.
- Experiment with different brush sizes and opacities to achieve the desired result.
- Remember to save your work frequently to avoid losing any changes you make.
The Dodge tool in GIMP is a valuable tool for enhancing your images and adding a touch of brightness to areas that need it. With a little practice and experimentation, you can use the Dodge tool to bring out the best in your photos.
The Burn Tool in GIMP
The Burn Tool in GIMP is a powerful tool that allows you to darken areas of an image. It is often used in photo editing to enhance shadows and create dramatic effects. The Burn Tool works by selectively darkening pixels in the image based on the settings you choose.
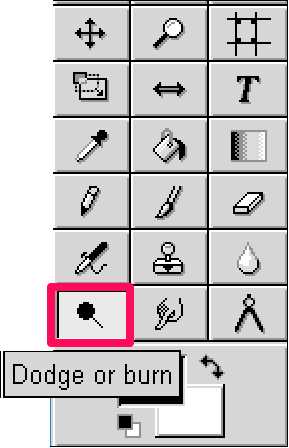
To access the Burn Tool in GIMP, you can either select it from the Toolbox or use the keyboard shortcut B. Once selected, you can adjust the size, hardness, and opacity of the brush in the Tool Options dialog. These settings will affect the size and intensity of the areas you darken.
When using the Burn Tool, it is important to work on a separate layer or make a duplicate of the original image. This allows you to make non-destructive edits and easily undo any changes if needed.
To use the Burn Tool, simply brush over the areas you want to darken. The areas you brush over will become progressively darker with each stroke. You can also change the brush mode to Shadows, Midtones, or Highlights in the Tool Options dialog to target specific tonal ranges.
It’s important to note that the Burn Tool works by darkening pixels, so it may not be suitable for all images. It is best used on images with well-defined shadows and highlights. It can be particularly effective in enhancing the contrast and depth in black and white images.
The Burn Tool is just one of the many powerful tools available in GIMP for photo editing. Experimenting with different tools and techniques can help you achieve the desired effects in your images.
Important Considerations
Before using the Dodge and Burn tools in GIMP, there are a few important considerations to keep in mind:
- Image Quality: Dodge and Burn tools can significantly alter the contrast and tones in your image. It is essential to work with high-quality images to avoid introducing noise or pixelation.
- Non-Destructive Editing: GIMP provides non-destructive editing options such as layers, masks, and adjustment layers. It is recommended to use these features when utilizing the Dodge and Burn tools to maintain the flexibility of making changes later on.
- Subtle Adjustments: Dodge and Burn tools can produce dramatic effects, but it is often best to apply subtle adjustments to avoid an unnatural appearance. Careful control of the opacity and brush settings is crucial for achieving the desired outcome.
- Practice and Experimentation: Dodge and Burn tools require practice and experimentation to master effectively. Experiment with different brush sizes, opacity levels, and blending modes to understand the impact on your image.
- Backup and Undo: It is always recommended to make a backup of your original image before applying any edits. Additionally, GIMP provides an Undo feature, allowing you to revert changes if necessary.
By considering these important points, you can effectively utilize the Dodge and Burn tools in GIMP to enhance your images while maintaining their integrity and quality.
Dodge and Burn Techniques
The Dodge and Burn tools in GIMP are powerful image editing tools that allow you to selectively lighten or darken specific areas of an image. These techniques can be particularly useful for enhancing details, adding depth, and creating dramatic effects.
1. Dodge Tool:
The Dodge tool is used to lighten areas of an image. It works by increasing the exposure in the selected area, making it appear brighter. This technique can be used to enhance highlights, correct underexposed areas, and add a sense of glow to specific elements.
2. Burn Tool:
The Burn tool, on the other hand, is used to darken areas of an image. It works by decreasing the exposure in the selected area, making it appear darker. This technique can be used to deepen shadows, add contrast, and create a moody or dramatic atmosphere.
3. Selective Dodge and Burn:
Instead of using the Dodge and Burn tools directly on the image, you can create separate layers and apply the tools to those layers. This allows for greater flexibility and control over the editing process. By using layer masks and adjusting the opacity of the Dodge and Burn layers, you can selectively apply the effects to specific areas of the image, enhancing details or correcting exposure issues without affecting the entire image.
4. Dodge and Burn Brushes:
GIMP offers a variety of brush presets for the Dodge and Burn tools. These brushes can be customized to suit your specific needs. For example, you can adjust the brush size, hardness, opacity, and flow to achieve different effects. Experiment with different brush settings to find the ones that work best for your desired outcome.
5. Dodge and Burn History:
It’s important to keep in mind that dodge and burn techniques have been used by photographers and artists long before digital editing tools like GIMP existed. These techniques were originally performed in the darkroom using light exposure and chemical processes. Understanding the history of these techniques can help you better understand their purpose and how to use them effectively in your digital editing workflow.
In conclusion, the Dodge and Burn tools in GIMP offer powerful techniques for selectively lightening or darkening areas of an image. By understanding how to use these tools effectively and creatively, you can enhance your images and create stunning visual effects.
Advanced Dodge and Burn in GIMP
While the basic Dodge and Burn tools in GIMP can be useful for simple edits, there are advanced techniques you can use to achieve more precise and professional results. Here are some tips and tricks for advanced Dodge and Burn in GIMP:
- Layer Masking: Instead of directly applying the Dodge and Burn tools on the image, create layer masks for more control. This allows you to selectively apply the edits on specific areas of the image without affecting the entire layer.
- Use Curves Adjustment: To add more depth and enhance the Dodge and Burn effect, use the Curves adjustment tool. With Curves, you can adjust the brightness and contrast of specific tonal ranges, giving you more control over the Dodge and Burn process.
- Soft Light Blend Mode: Instead of using the default blend mode for the Dodge and Burn tools, try using the Soft Light blend mode. This blend mode adds subtle contrast and enhances the details without making the edits look too harsh.
- Non-Destructive Editing: To ensure you can easily make changes later on, use non-destructive editing techniques. Create adjustment layers for Dodge and Burn effects, rather than applying them directly to the image. This way, you can always go back and modify the edits without affecting the original image.
- Work in Small Increments: When using Dodge and Burn tools, it’s better to work in small increments and build up the effect gradually. This way, you have better control over the edits and can avoid making the image look over-edited.
- Use Selections: Utilize selection tools to isolate specific areas for Dodge and Burn edits. By making selections, you can apply the adjustments to the desired areas, preventing unwanted changes to the rest of the image.
- Add Adjustment Layers: Combine your Dodge and Burn layers with other adjustment layers, such as Curves or Levels, to further refine the overall look of the image. This allows you to fine-tune the tonal values and overall appearance.
By using these advanced Dodge and Burn techniques in GIMP, you can achieve more precise and professional-looking edits on your images. Experiment with different settings and combinations to find the best approach for your specific needs.
FAQ:
Is it possible to use Dodge and Burn in GIMP?
Yes, it is possible to use Dodge and Burn in GIMP. Dodge and Burn are simple yet powerful techniques used in photo editing to selectively lighten or darken certain areas of an image, respectively. GIMP offers several tools that can be used to achieve these effects, such as the Dodge/Burn tool, the Levels tool, or the Curves tool.
How can I use Dodge and Burn in GIMP?
There are multiple ways to use Dodge and Burn in GIMP. One way is to use the Dodge/Burn tool, which can be found in the Toolbox. This tool allows you to paint over areas of the image to either lighten or darken them, depending on the mode you select. Another way is to use the Levels tool or the Curves tool to adjust the tonal range of specific areas in the image. By manipulating the curves or levels, you can selectively lighten or darken areas as desired.
What are some alternative methods to achieve Dodge and Burn effects in GIMP?
In addition to the Dodge/Burn tool, GIMP offers alternative methods to achieve Dodge and Burn effects. One alternative method is to use the Burn mode or Dodge mode in the Brush tool. By selecting either of these modes and adjusting the opacity and flow settings, you can achieve similar results to traditional Dodge and Burn techniques. Another alternative method is to use layer masks in combination with adjustment layers. By creating a layer mask and painting on it, you can selectively reveal or hide areas of the image to achieve the desired Dodge and Burn effects.
Can Dodge and Burn be used to improve the contrast in a photo?
Yes, Dodge and Burn can be used to improve the contrast in a photo. By selectively lightening or darkening specific areas of the image, you can create a greater tonal range and enhance the contrast. For example, you can use Dodge to lighten highlights and Burn to darken shadows, which can result in a more visually striking and balanced photo. It is important to use these techniques subtly and with care to avoid overdoing the effect and making the image look unnatural.