
With the increasing use of Gmail for both personal and professional communication, it’s important to keep track of your call history within the platform. Whether you’re trying to recall a contact you spoke with recently or want to check the duration of a call, accessing your call history on Gmail is a straightforward process that can be done in just a few steps.
In this step-by-step guide, we’ll walk you through the process of viewing your call history on Gmail so you can easily access and review your past calls. Whether you’re using Gmail on your computer or mobile device, we’ve got you covered. So let’s get started!
To begin, it’s important to note that call history on Gmail is only available if you have enabled the calling feature and made calls through Google Voice or Google Hangouts. If you haven’t done this yet, you’ll need to set up Google Voice or Google Hangouts on your Gmail account before you can view your call history. Once you’ve done that, follow the steps below to access your call history.
How to Access Your Call History on Gmail
If you use Gmail for both your email and phone calls, you might be wondering how to access your call history in your Gmail account. Fortunately, Gmail has a user-friendly interface that allows you to easily view and manage your call history. Follow these simple steps to access your call history on Gmail:
- Open your Gmail account by signing in with your username and password.
- Once you are logged in, look for the “Calls” tab on the left side of your inbox. It should be located below the “Meet” and “Chat” tabs.
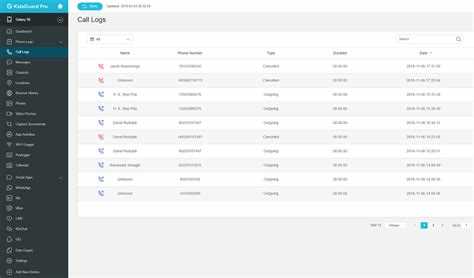
- Click on the “Calls” tab to access your call history. You will see a list of your recent calls, including the date, time, and duration of each call.
- To view more detailed information about a specific call, click on the call entry in the list. This will open a new window or tab with additional details, such as the phone number or contact name associated with the call.
- If you want to search for a specific call or filter your call history based on certain criteria, use the search bar at the top of the call history page. You can enter keywords, names, or phone numbers to find the call you are looking for.
That’s it! Now you know how to access and view your call history on Gmail. Whether you need to review a recent call or search for a specific conversation, Gmail’s call history feature has got you covered. Keep in mind that your call history will only be available if you have made or received calls using Gmail’s voice calling feature.
Step 1: Sign in to Your Gmail Account
To view your call history on Gmail, the first step is to sign in to your Gmail account. Here’s how you can do it:
- Open your preferred web browser.
- Type www.gmail.com in the address bar and press Enter.
- Enter your Gmail email address in the provided field.
- Click on the “Next” button.
- Enter your Gmail password in the provided field.
- Click on the “Sign In” button.
If you have entered the correct email address and password, you will be successfully signed in to your Gmail account.
Step 2: Navigate to the Hangouts Section
Once you have logged into your Gmail account, follow these steps to view your call history:
- Click on the “Hangouts” tab located on the left side panel of your Gmail inbox. The Hangouts icon looks like a speech bubble.
- If you don’t see the Hangouts tab, click on the “More” option at the bottom of the left side panel to expand the menu.
- Scroll down the expanded menu to locate the “Hangouts” option and click on it.
By clicking on the Hangouts tab, you will be redirected to the Hangouts section where you can access your call history and other Hangouts-related features.
Step 3: Open the Chat Window
After opening your Gmail account and accessing the main inbox, follow these steps to open the chat window:
- Look for the chat icon located at the bottom-left corner of your Gmail inbox. The chat icon appears as a speech bubble with a quotation mark inside.
- Click on the chat icon to open the chat window. This action will display a list of your recent chats and contacts.
- If you want to start a new chat or search for a specific contact, click on the “Chat” tab at the top of the chat window. This tab will allow you to initiate a conversation with a specific contact by entering their email address.
- Alternatively, you can also click on any existing chat from the list to open the chat window for that specific conversation. This will display the chat history for that particular contact or group chat in the main chat window.
By following these steps, you will be able to successfully open the chat window in Gmail and access your chat history.
Step 4: Find the Call History Tab

After accessing your Gmail account, locate the left sidebar on your screen. The left sidebar contains various options and categories.
Scroll down the left sidebar until you find the section titled “Meet”. The “Meet” section contains options related to video calls and meetings.
Within the “Meet” section, you will see the option for “Call History”. Click on the “Call History” tab to view your call history.
Once you click on the “Call History” tab, a new page will open, displaying all the calls you have made or received through Gmail.
From here, you can further explore and manage your call history by using the available filters and search options.
Step 5: Click on the Call History Tab
Once you have accessed your Gmail account, you can proceed to view your call history by following these simple steps:
- Look for the “Call” tab located on the left-hand side of your Gmail dashboard.
- Click on the “Call” tab to access your call history.
By clicking on the “Call” tab, a new page will open displaying your call history, including details such as the date and time of the call, the contact’s name or phone number, and the duration of the call.
You can also choose to filter your call history by selecting specific dates or searching for a particular contact using the search bar provided.
Now that you have successfully clicked on the “Call History” tab, you can proceed to view and manage your call records directly from your Gmail account.
Step 6: Review Your Call History
Once you have successfully accessed your call history on Gmail, you can now review all the calls that have been made or received from your account. This step allows you to gather information about the duration, date, and time of each call, giving you a detailed overview of your call activity.
To review your call history, follow these steps:
- Scroll through the list of calls to see the most recent ones at the top.
- Look for the caller or recipient’s name or phone number to identify the calls.
- Note the duration of each call listed.
- Pay attention to the date and time of each call to track the chronology of your call history.
- If necessary, you can click on a specific call to view more details, such as the call type (incoming or outgoing) and any notes or attachments associated with the call.
By thoroughly reviewing your call history, you can better understand your calling patterns, keep track of important conversations, and identify any discrepancies or irregularities in your call activity. This knowledge can be helpful for both personal and professional use.
It is worth noting that, based on your account settings and privacy preferences, the level of detail available in your call history may vary. Some calls may be displayed as anonymous or unknown if the caller’s information is not saved in your contacts.
If needed, you can also export your call history data to a CSV file for further analysis or record-keeping purposes. This feature can be especially beneficial for businesses or individuals who need to maintain comprehensive records of their call activity.
With the ability to review your call history easily accessible on Gmail, you can efficiently manage your communication records and stay organized in your digital interactions.
Step 7: Filter or Search Your Call History
After viewing your call history, you may want to filter or search for specific calls or information. Gmail offers several options to help you find exactly what you’re looking for.
Filtering Call History:
You can filter your call history based on various parameters such as the caller’s name or number, call duration, call type, or date. Here’s how you can filter your call history:
- Click on the “Filter” button located at the top right corner of the call history table. This will open a drop-down menu with filtering options.
- Select the desired filtering criteria from the options provided.
- Click on the “Apply” or “Filter” button to apply the filter.
Searching Call History:
If you’re looking for a specific call or information, you can use the search functionality in Gmail to find it quickly. Here’s how you can search your call history:
- Click on the search bar located at the top of the Gmail interface.
- Type in the keywords or information you want to search for, such as a caller’s name or number.
- Press Enter or click on the magnifying glass icon to initiate the search.
Once you apply a filter or perform a search, Gmail will display only the relevant calls that match your criteria. This makes it easier to navigate and find specific information within your call history.
Step 8: Export or Delete Call History Entries
If you want to export or delete specific call history entries, follow the steps below:
- Open your Gmail account and navigate to the “Call History” section.
- Locate the call history entry you want to export or delete.
- For exporting a call history entry, click on the entry to view the details.
- Within the call details, click on the “Export” button to export the entry as a CSV file.
- Choose the desired location to save the CSV file on your computer.
- For deleting a call history entry, click on the entry to view the details.
- Within the call details, click on the “Delete” button to remove the entry from your call history.
- Confirm the deletion by clicking on “Delete” in the confirmation pop-up window.
By exporting call history entries, you can keep a backup or analyze the data using other software. Deleting call history entries can help you declutter and maintain privacy.
Note that exporting or deleting call history entries will only affect the entries you choose, and not the entire call history.
FAQ:
Can I view my call history on Gmail?
Yes, you can view your call history on Gmail by following a step-by-step guide.
How do I access my call history on Gmail?
To access your call history on Gmail, you need to open the Google Voice webpage and sign in with your Google account.
What is Google Voice?
Google Voice is a service that allows users to make and receive calls, as well as send and receive text messages using a virtual phone number.
Can I view my call history for a specific time period?
Yes, you can view your call history for a specific time period by selecting the desired time range in the call history section of Google Voice.
Can I delete my call history on Gmail?
Yes, you can delete your call history on Gmail by clicking on the “More” button next to the call you want to delete and selecting “Delete” from the dropdown menu.
Is it possible to export my call history from Gmail?
Yes, you can export your call history from Gmail by clicking on the “More” button and selecting “Download” from the dropdown menu.
Can I view my call history on the Gmail mobile app?
Yes, you can view your call history on the Gmail mobile app by selecting the “Voice” tab at the bottom of the app and then tapping on “Calls” to access your call history.