
The eyedropper tool is a useful feature found in many graphic design and photo editing software. It allows users to easily select and sample colors from any part of an image or document. This tool is particularly helpful for designers and artists who need to match colors or create color palettes.
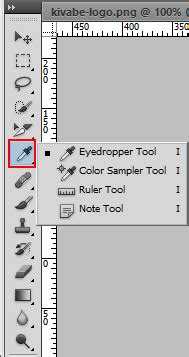
To access the eyedropper tool, open your preferred graphic design or photo editing software. Look for a toolbar or menu at the top of the screen that contains various tools and functions. In most applications, the eyedropper tool is represented by an icon that looks like an eyedropper or pipette.
Once you have located the eyedropper tool, click on it to activate it. Your cursor will change to a small pipette or crosshair symbol, indicating that the tool is active. You can now click on any part of your image or document to sample the color at that point. The color will be selected and displayed in a color picker or swatch panel, allowing you to use it in your design or project.
Many graphic design and photo editing software also provide additional functionality with the eyedropper tool. For example, you may be able to sample colors from outside of your application, such as from other windows or web browsers. Some applications also allow you to sample colors with more precision, such as by selecting a specific point or area.
In conclusion, the eyedropper tool is a powerful and convenient feature for designers and artists. By following these simple steps, you can easily access and use the eyedropper tool in your favorite graphic design or photo editing software. Remember to experiment and explore the different features and options available with the eyedropper tool to make the most of its capabilities.
Why Use the Eyedropper Tool in Graphic Design
The Eyedropper tool is an essential tool in graphic design as it helps designers accurately match colors, ensuring consistency and harmony in their designs. Here are some reasons why the Eyedropper tool is widely used in graphic design:
- Color Sampling: The Eyedropper tool allows designers to easily sample colors from any part of an image or design. This is especially useful when trying to replicate or match colors from existing elements.
- Color Matching: With the Eyedropper tool, designers can match colors precisely. By sampling a color from one element, they can easily apply the same color to another element, ensuring visual consistency.
- Creating Color Schemes: Graphic designers often need to create color schemes that work well together. The Eyedropper tool enables designers to sample colors from different sources, such as images or nature, and create harmonious color schemes.
- Accessibility: By using the Eyedropper tool, designers can ensure their designs meet accessibility standards. They can sample colors from both web and print materials and verify their color contrast against accessibility guidelines.
- Efficiency: The Eyedropper tool saves time and effort by eliminating the need to manually search for color values. Designers can quickly sample colors and apply them to their designs without any guesswork.
In conclusion, the Eyedropper tool is a valuable asset in graphic design, allowing designers to accurately sample, match, and create color schemes. Its efficiency and accessibility make it an indispensable tool for any graphic designer.
Understanding the Importance of the Eyedropper Tool
The Eyedropper Tool is a powerful feature found in various design and image editing software. It allows users to precisely select colors from an existing image or design, making it an essential tool for designers, artists, and anyone working with digital visuals.
The main function of the Eyedropper Tool is to sample and capture the color of a specific pixel in an image. This tool helps users identify the exact color values used in a design or image, ensuring color consistency and accuracy throughout various projects.
Here are some key reasons why the Eyedropper Tool is important:
- Color Matching: With the Eyedropper Tool, you can easily match colors from one image or design to another. This is useful when trying to maintain a consistent color palette or when replicating a specific color from an existing image.
- Color Analysis: By analyzing the colors used in successful designs or images, you can gain insights and inspiration for your own projects. The Eyedropper Tool enables you to understand the specific color schemes and harmonies used by professionals.
- Accessibility Compliance: The Eyedropper Tool aids in achieving accessibility compliance by helping designers identify the contrast between text and background colors. This ensures that web content can be easily read by individuals with visual impairments.
- Color Correction: If an image or design needs color correction, the Eyedropper Tool can assist in identifying the colors that require adjustment. By comparing the current colors with the desired colors, you can make precise modifications to achieve the desired effect.
Using the Eyedropper Tool is typically straightforward. Once selected, you click on the desired pixel in the image or design, and the tool captures the color value. This value can be used to fill shapes, create gradients, or simply match and analyze colors. The Eyedropper Tool empowers users to make informed color choices and ensures visual consistency across projects.
Customizing Your Eyedropper Tool Settings
Customizing the settings of your Eyedropper tool can enhance your workflow and make color selection more efficient. The Eyedropper tool allows you to sample and select colors from any part of your image or document easily.
Here are some ways to customize your Eyedropper tool settings:
- Sample Size: You can adjust the sample size to determine the area from which the Eyedropper tool samples colors. A larger sample size will average the colors within a larger area, while a smaller sample size will give you a more specific color sample.
- Color Space: The Eyedropper tool can be set to sample colors in different color spaces, such as RGB or CMYK. Depending on your project’s requirements, you can choose the appropriate color space for accurate color selection.
- Display Mode: You can choose to display the sampled color in different formats, such as hexadecimal values or RGB values. This allows you to view the color in a format that is most convenient for your workflow.
- Shortcut Key: You can assign a custom shortcut key to the Eyedropper tool for quick access. This can save you time and effort when you need to sample colors frequently.
By customizing these settings, you can tailor the Eyedropper tool to suit your specific needs and preferences. This will help you work more efficiently and accurately when selecting colors in your projects.
Note: The exact method of customizing Eyedropper tool settings may vary depending on the software or application you are using. Consult the software’s documentation or preferences/settings menu for more information.
Tips and Tricks for Using the Eyedropper Tool
The Eyedropper Tool is a powerful feature that allows you to quickly and easily sample colors from an image or a design. Whether you are working on web design, graphic design, or digital art, the Eyedropper Tool can help you achieve the perfect color match. Here are some tips and tricks to make the most out of this handy tool:
- Keyboard Shortcut: Instead of manually selecting the Eyedropper Tool from the toolbar, you can use the keyboard shortcut “I” to activate it. This will save you a lot of time and make your workflow more efficient.
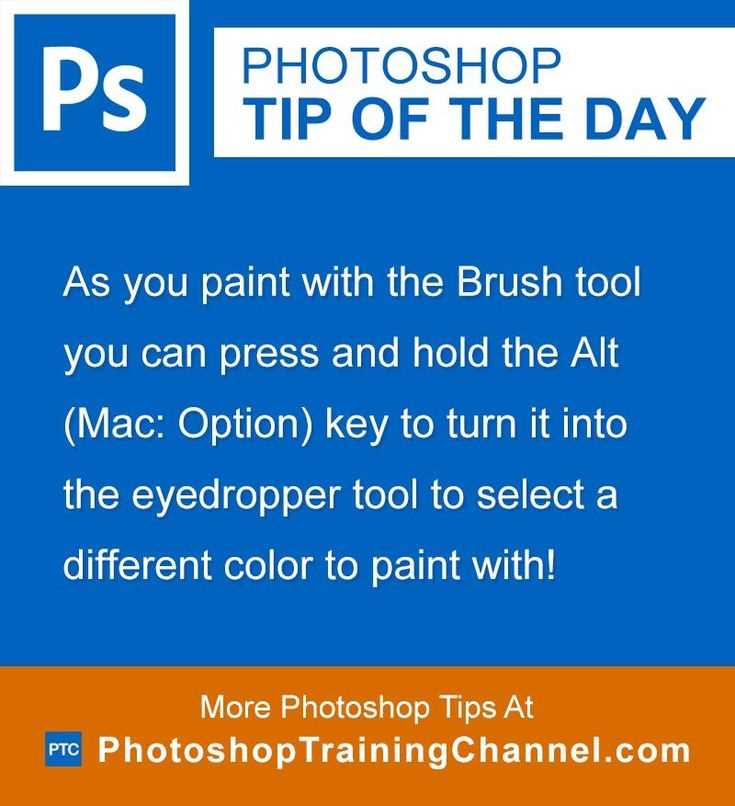
- Color Sampling: By default, the Eyedropper Tool samples the color from a single pixel. However, you can change the sampling area by holding down the Alt key (on Windows) or the Option key (on Mac) while clicking. This will allow you to sample an average color from a larger area, which can be helpful when dealing with gradients or textures.
- Sampling Multiple Colors: If you want to sample multiple colors from different areas of an image or design, you can simply click on the desired areas while holding down the Shift key. This will add the sampled colors to the Swatches panel, making them easily accessible.
- Copying and Pasting Colors: Once you have sampled a color with the Eyedropper Tool, you can easily copy and paste it onto other elements within your design. Simply select the object or layer you want to apply the color to, activate the Fill or Stroke color picker, and press Ctrl+C (on Windows) or Command+C (on Mac) to copy the color. Then, select the target element and press Ctrl+V (on Windows) or Command+V (on Mac) to paste the color.
- Using the Color Picker: In addition to sampling colors, the Eyedropper Tool can also be used as a color picker. Simply activate the tool and move the cursor over any area of your screen to preview and select colors. This can be particularly useful when you want to match colors from different applications or websites.
By mastering the Eyedropper Tool and leveraging its capabilities, you can streamline your design process and ensure color accuracy in your projects. Experiment with these tips and tricks to discover the full potential of this versatile tool!
Enhance Your Design with the Eyedropper Tool
The eyedropper tool is a versatile and powerful tool that can greatly enhance your design projects. Whether you are a graphic designer, web developer, or just someone looking to improve the visual appeal of your digital content, the eyedropper tool can be a valuable asset in your creative arsenal.
So, how do you access the eyedropper tool?
- Open your preferred design software, such as Adobe Photoshop or Illustrator.
- Select the desired project or create a new one.
- Locate the toolbar or menu that contains the eyedropper tool. In Photoshop, for example, it is typically found in the left-hand toolbar, represented by an icon that resembles an eyedropper.
- Click on the eyedropper tool to activate it.
Now that you have accessed the eyedropper tool, let’s explore how you can use it to enhance your design:
- Color Selection: One of the primary functions of the eyedropper tool is to select colors from an image or design. By clicking on a specific color within an image, the eyedropper tool will capture the exact color code or value, allowing you to use it in your design. This feature is particularly useful when you want to create a harmonious color scheme or match specific colors.
- Color Customization: Once you have selected a color using the eyedropper tool, you can then customize it further to suit your needs. You can adjust the hue, saturation, brightness, or opacity of the color to achieve the desired effect. This level of customization allows for greater creative control and ensures that your design aligns with your vision.
- Accessibility Testing: Another valuable use of the eyedropper tool is in accessibility testing. By selecting various colors within your design, you can determine if the color combinations meet accessibility standards. This is especially important for web design, where contrast and readability are essential for an inclusive user experience.
- Consistency and Coherence: By using the eyedropper tool to sample colors from existing elements within your design, you can create a consistent and coherent visual identity. This ensures that all elements within your project align with the same color palette and style, creating a unified and professional look.
Overall, the eyedropper tool is a valuable asset that can greatly enhance your design projects. Its ability to capture and customize colors, facilitate accessibility testing, and create consistency and coherence makes it an indispensable tool for any designer or creative professional. So, next time you’re working on a design project, don’t overlook the power of the eyedropper tool!
Unlocking Hidden Features of the Eyedropper Tool
While the Eyedropper tool in various graphic design software is often used to select colors from images or designs, there are hidden features that can enhance your workflow and design process. These features can help you save time and create more visually appealing designs.
1. Sampling Color from Outside the Software Window
Did you know that you can sample colors from outside the software window? This is especially useful when you want to match a color from a different application or even your computer’s desktop background. Simply click and hold the Eyedropper tool icon, then drag it outside the window to sample colors from anywhere on your screen!
2. Sampling Multiple Colors at Once
Instead of sampling colors one by one, you can sample multiple colors at once using the Eyedropper tool. Hold down the Shift key while clicking to add colors to your swatches simultaneously. This is great for creating color palettes or matching multiple shades in a design.
3. Sampling Color with Keyboard Shortcut
If you frequently use the Eyedropper tool, you can save time by utilizing the keyboard shortcut. In most graphic design software, the shortcut is typically the letter “I”. With this shortcut, you can quickly switch to the Eyedropper tool and sample colors with a single key press.
4. Collecting Colors in a Swatch Library
Instead of manually saving colors in your design, you can collect them in a swatch library for easy access and consistency. Many graphic design software allows you to create and manage swatch libraries. By saving colors from the Eyedropper tool in a swatch library, you can easily apply them to other elements of your design with a click.
5. Adjusting Color Sampling Area
The Eyedropper tool usually samples colors from a single pixel. However, in some software, you can adjust the sampling area to capture a broader range of colors. This is useful when working with gradients or complex illustrations. Check your software’s settings or preferences to see if there is an option to adjust the Eyedropper tool’s sampling area.
6. Sampling Colors with Different Color Models
By default, the Eyedropper tool samples colors in the RGB color model. However, you can often switch to different color models like CMYK, HSL, or HEX. This can be helpful when working with specific color spaces or for exporting designs in different formats. Look for options or settings that allow you to choose the color model for the Eyedropper tool.
Conclusion
Unlocking these hidden features of the Eyedropper tool can greatly improve your design process. From sampling colors from outside the software window to adjusting the sampling area, these tools give you more control and flexibility when working with colors. Experiment with these features in your graphic design software to streamline your workflow and enhance your designs.
Advanced Techniques with the Eyedropper Tool
The Eyedropper Tool is a powerful feature in graphic design and image editing software that allows you to sample colors from an image or design. While it is commonly used to select colors for use in creating new elements or matching existing ones, the Eyedropper Tool can be used in a variety of advanced techniques to enhance your design process.
- Selecting Colors from an Image: The primary function of the Eyedropper Tool is to sample colors from an image or design. To do this, simply select the Eyedropper Tool and click on the desired area of the image to capture the color. This technique is useful for creating color palettes or matching colors within a design.
- Adjusting Color Balance: In addition to selecting colors, the Eyedropper Tool can be used to adjust the color balance of an image. By sampling a color and applying it to another area of the image, you can create a more balanced and visually pleasing composition. This technique is especially useful when editing photographs or working with images that have varied lighting conditions.
- Checking Color Contrast: The Eyedropper Tool can also be used to check color contrast and accessibility in your designs. By sampling the foreground and background colors of an element, you can ensure that they meet appropriate contrast ratios for readability. This is particularly important when designing for individuals with visual impairments or creating content for the web.
- Extracting Color Swatches: Another advanced technique with the Eyedropper Tool is extracting color swatches from an image. By sampling multiple colors from an image and creating a color swatch palette, you can easily replicate the color scheme in your design. This technique is useful for creating cohesive and harmonious designs.
- Creating Gradients: The Eyedropper Tool can also be used to create gradients by sampling and blending multiple colors. By selecting different colors from an image and applying them to a gradient tool, you can create a custom gradient that matches the colors of your design. This technique is ideal for adding depth and visual interest to your compositions.
As you can see, the Eyedropper Tool is not just a basic color picker but a versatile tool for enhancing your design process. By utilizing these advanced techniques, you can take your designs to the next level and achieve professional results.
Take Your Design to the Next Level with the Eyedropper Tool
When it comes to design, color is a crucial element that can greatly impact the overall aesthetic and effectiveness of your visuals. Choosing the right colors can help evoke certain emotions, create contrast, and improve readability. But how do you ensure that you’re picking the perfect colors to achieve your desired outcome?
That’s where the Eyedropper tool comes in. This handy feature allows you to easily sample and pick colors from any part of your screen, whether it’s an image, a website, or even a video. By using the Eyedropper tool, you can take your design to the next level and create a cohesive and visually appealing composition.
How Does the Eyedropper Tool Work?
The Eyedropper tool is typically found in design software such as Adobe Photoshop or Illustrator, but it may also be available in other creative applications. Here’s how it works:
- Select the Eyedropper tool from the toolbar.
- Hover over the color you want to sample.
- Click to capture the color.
- The selected color will now be saved and ready to use in your design.
Additionally, some software allows you to sample colors from multiple points in an image or even create a palette of colors based on the colors you’ve sampled.
How to Use the Eyedropper Tool Effectively
To make the most out of the Eyedropper tool, consider the following tips:
- Observe different parts of your design: Instead of relying on preset color options or guesswork, use the Eyedropper tool to analyze different areas of your design. This will help you identify the exact colors being used and create a harmonious color scheme.
- Create a color palette: Once you’ve sampled different colors using the Eyedropper tool, consider creating a color palette to ensure consistency throughout your design. This will help you maintain a cohesive look and feel.
- Experiment with contrast: By using the Eyedropper tool, you can easily determine the contrast between different elements in your design. This will allow you to make adjustments and ensure that your text and graphics are legible.
- Inspiration from existing designs: The Eyedropper tool can also be used to gain inspiration from other designs. By analyzing the color choices of successful designs, you can apply similar principles to your own work.
Conclusion
The Eyedropper tool is a powerful resource that every designer should have in their toolkit. By sampling and selecting colors from any part of your screen, you can elevate your design and create visually stunning compositions. Don’t limit yourself to basic color options – use the Eyedropper tool to explore the endless possibilities of color and take your design to the next level.
FAQ:
What is the Eyedropper tool used for?
The Eyedropper tool is used to sample and select colors from an image or design.
How do I access the Eyedropper tool in Photoshop?
To access the Eyedropper tool in Photoshop, you can either press the “I” key on your keyboard or select it from the Tools panel.
Can I use the Eyedropper tool in other Adobe software?
Yes, the Eyedropper tool is available in other Adobe software such as Illustrator and InDesign.
Is there a shortcut to activate the Eyedropper tool in Illustrator?
Yes, you can activate the Eyedropper tool in Illustrator by pressing the “I” key on your keyboard.