
Removing a wired Nest smoke detector can be a straightforward task if done carefully and following the proper steps. Whether you’re replacing the detector with a new one or simply relocating it to a different area of your home, it’s important to ensure the removal process is done safely to avoid any damage or electrical hazards.
Step 1: Turn off the Power
Before starting the removal process, it’s crucial to turn off the power to the smoke detector. Locate the circuit breaker that controls the detector and switch it off to cut off the electrical supply. This step will help prevent any potential accidents while removing the detector.
Step 2: Detach the Detector
Next, carefully detach the Nest smoke detector from its mounting bracket. Depending on your model, it may be a twist-off or a slide-off mechanism. Refer to the detector’s user manual for specific instructions on how to release it from the bracket without causing any damage.
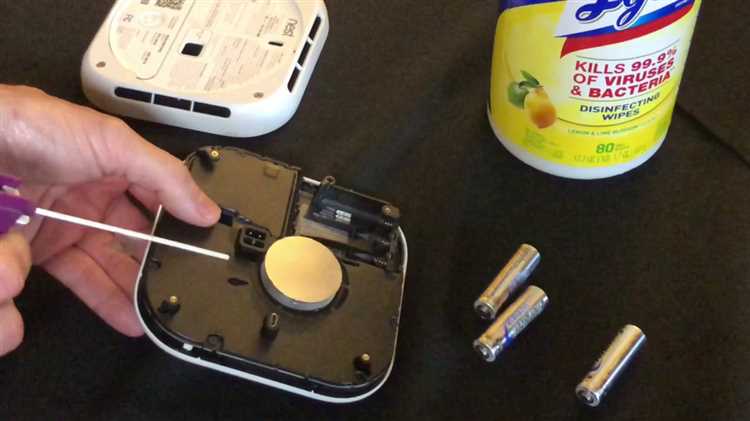
Step 3: Disconnect the Wires
Once the detector is detached from the bracket, you’ll need to disconnect the wires. Take note of the wire color coding before doing so, as it will be essential when connecting the new smoke detector. Use a screwdriver to loosen the wire connectors and gently pull the wires out. Be cautious not to tug too hard, as it could lead to wire damage.
Step 4: Cap the Wires
After the wires are disconnected, it’s important to cap them to ensure they don’t touch and create an electrical hazard. Use wire nuts or electrical tape to cover the exposed ends of the wires. Make sure the caps are secure to prevent the wires from coming into contact with each other or any other electrical components.
Step 5: Clean and Store
Lastly, before installing a new smoke detector or before storing the removed one, take the time to clean the mounting bracket and the detector itself. Use a dry cloth to remove any dust or debris and ensure the area is clean. If you’re storing the detector, make sure to keep it in a safe place where it won’t be damaged.
By following these steps, you can safely remove a wired Nest smoke detector without any issues. Remember to always prioritize your safety and take necessary precautions when dealing with electrical devices.
Step 1: Turn off the Power
To safely remove a wired Nest smoke detector, the first step is to turn off the power to the device. By doing this, you can prevent any electrical accidents or shocks.
Follow the steps below to turn off the power:
- Locate the circuit breaker or fuse box in your home.
- Identify the circuit that powers the wired Nest smoke detector.
- Switch off the circuit breaker or remove the fuse that corresponds to the smoke detector.
- Double-check that the power is indeed off by pressing the test button on the smoke detector. If there is no alarm or sound, it means the power is successfully turned off.
Note: Turning off the power will not affect the other electrical devices in your home, as long as you only switch off the circuit that supplies power to the smoke detector.
Once the power is turned off, you can proceed with safely removing the wired Nest smoke detector.
Step 2: Remove the Cover
Once you have turned off the power to the smoke detector, you can proceed to remove the cover. Follow the steps below:
- Locate the small groove or notch on the side of the smoke detector cover. This is usually located near the bottom of the device.
- Insert a flathead screwdriver into the groove or notch and gently pry the cover open. Be careful not to apply too much force to avoid damaging the device.
- As you pry open the cover, you may hear a clicking sound. This is normal and indicates that the cover is releasing from the main body of the smoke detector.
- Continue prying the cover until it is completely detached from the smoke detector body.
Note: Some smoke detectors may have a latch or a locking mechanism instead of a groove or notch. In such cases, refer to the user manual or manufacturer’s instructions to properly unlock and remove the cover.
Removing the cover may expose sensitive components of the smoke detector, so handle it with care to avoid any damage or accidental triggering of the alarm.
Step 3: Disconnect the Wires
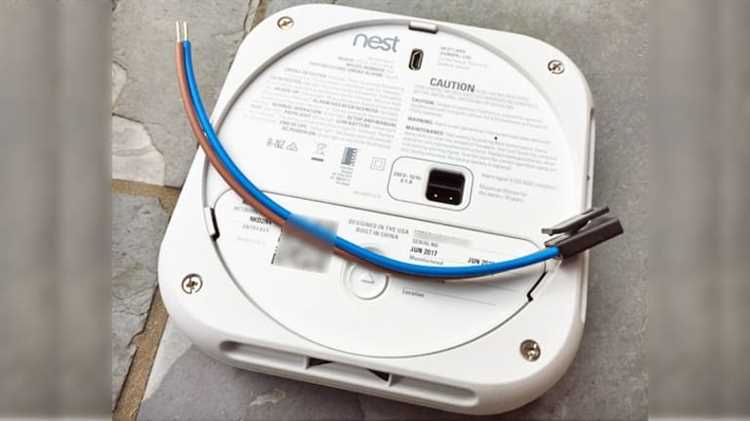
Before removing the wired Nest smoke detector, you need to disconnect the wires that are connected to it. Follow these steps to safely disconnect the wires:
- Locate the junction box or electrical panel where the wires are connected.
- Turn off the power supply to the smoke detector by flipping the corresponding circuit breaker.
- Use a screwdriver to remove the screws that secure the cover of the junction box or electrical panel.
- Once the cover is removed, you will see the wires connected to the smoke detector.
- Take note of the wire colors and their corresponding terminals. This will help you reconnect the wires correctly when installing a new smoke detector.
- Use a pair of wire cutters or wire strippers to carefully remove the wire nuts or twist-off connectors that hold the wires together.
- After removing the connectors, gently pull apart the wires to disconnect them from the smoke detector.
- Ensure that the wires do not touch any other live wires or metal surfaces to prevent electrical shocks.
Once the wires are disconnected, you can proceed to remove the wired Nest smoke detector from its mounting bracket. Refer to the manufacturer’s instructions for the specific steps on how to remove the detector from the bracket.
Step 4: Remove the Mounting Bracket
After disconnecting the wires, you can remove the mounting bracket from the wall or ceiling.
First, remove any screws or fasteners that are holding the mounting bracket in place. You may need to use a screwdriver or drill to remove them.
Once the screws are removed, gently pull the mounting bracket away from the wall or ceiling. Be careful not to damage the surrounding area.
If the mounting bracket is stuck or difficult to remove, you can use a flathead screwdriver or a small pry tool to gently pry it away from the surface. Be cautious not to apply too much force, as this can cause damage.
Once the mounting bracket is removed, you can proceed with the installation of your new smoke detector or make any necessary repairs to the existing bracket.
Step 5: Install a New Mounting Bracket
After removing the old wired Nest smoke detector and disconnecting it from the mounting bracket, it’s time to install a new mounting bracket for your replacement smoke detector. Here’s how:
- Take the new mounting bracket that came with your replacement smoke detector.
- Hold the mounting bracket against the wall or ceiling where you want to install the smoke detector.
- Make sure the mounting bracket is level and aligns with the pre-existing holes or marks from the previous bracket.
- Using a screwdriver or drill, insert the appropriate screws or anchors through the holes in the mounting bracket and into the wall or ceiling. Tighten them securely, but be careful not to overtighten and damage the surface.
- Once the mounting bracket is securely installed, you’re ready to proceed with the next steps of installing the new wired Nest smoke detector.
Installing a new mounting bracket is an important step as it provides a secure and stable base for your smoke detector. Ensuring the bracket is properly aligned and securely attached will help ensure the effective operation of your replacement smoke detector.
Step 6: Connect the Wires
Once you have removed the old Nest smoke detector from the mounting plate, you will need to connect the wires for the new one. Follow these steps:
- Turn off the power: Before connecting any wires, make sure to turn off the power supply to the smoke detector. Locate the circuit breaker that controls the smoke detectors in your home and turn it off.
- Identify the wires: Take a close look at the wires coming out of the wall or ceiling. You will typically find two or three wires: black (hot), white (neutral), and sometimes green or bare copper (ground).
- Prepare the wires: Use wire strippers to remove approximately 1/2 inch of insulation from the ends of each wire.
- Connect the wires: Connect the black wire to the black wire terminal on the new smoke detector and tighten the screw to secure it. Connect the white wire to the white wire terminal and tighten the screw. If there is a green or bare copper wire, connect it to the ground terminal, if available.
- Double-check the connections: Make sure that the wires are securely connected and there are no loose or exposed wires.
Once you have successfully connected the wires, you can proceed to the next step of installing the new Nest smoke detector.
Step 7: Secure the Cover
After removing the smoke detector from its mounting base, you will need to secure the cover of the detector. This is an important step to ensure the proper functioning of the smoke detector and to prevent any accidents.
Follow these steps to secure the cover:
- Align the cover with the base of the smoke detector. Make sure that the alignment is correct to ensure a proper fit.
- Gently press the cover onto the base until you feel it snap into place. Ensure that all sides are secure.
- Once the cover is securely in place, use a screwdriver to tighten the screws on the cover. This will help to ensure that the cover does not come loose over time.
- Verify that the cover is firmly attached by gently tugging on it. If it does not move or come loose, it is properly secured.
Securing the cover properly is crucial to ensure the smoke detector functions correctly. It helps to prevent any dust or debris from entering the detector, which can interfere with its operation. Additionally, a secure cover helps to prevent any false alarms that may occur due to a loose or improperly attached cover.
FAQ:
Why would I need to remove a wired Nest smoke detector?
There could be various reasons why you might need to remove a wired Nest smoke detector. It could be due to a malfunctioning unit that needs to be replaced, or you might be moving to a new home and want to take the detector with you. Additionally, you might want to remove the detector temporarily for maintenance or cleaning purposes.
What tools do I need to safely remove a wired Nest smoke detector?
To safely remove a wired Nest smoke detector, you will typically need a flathead screwdriver and a ladder or step stool to reach the detector. In some cases, you might also need a voltage tester to ensure that the power to the detector is turned off before removing it.
How do I turn off the power to the wired Nest smoke detector before removing it?
To turn off the power to the wired Nest smoke detector, first, locate the circuit breaker that controls the power supply to the detector. Flip the switch to the “off” position to disconnect the power. You can also use a voltage tester to verify that there is no electricity running to the detector before proceeding with the removal.
Can I remove a wired Nest smoke detector without turning off the power?
No, it is not recommended to remove a wired Nest smoke detector without turning off the power first. The detector is connected to your home’s electrical wiring, and removing it while the power is still on can pose a risk of electric shock. It is always best to turn off the power at the circuit breaker before removing the detector.
How do I remove the wired Nest smoke detector from the mounting bracket?
To remove the wired Nest smoke detector from the mounting bracket, first, locate the release tab or button on the side or bottom of the detector. Press or slide the release mechanism to detach the detector from the bracket. Once the detector is released, carefully disconnect the wires from the back of the unit.
Are there any precautions I should take while removing the wired Nest smoke detector?
Yes, there are a few precautions you should take while removing the wired Nest smoke detector. First, make sure to turn off the power at the circuit breaker to avoid electric shock. Use a ladder or step stool to safely reach the detector, and be cautious when disconnecting the wires to avoid damaging them. It is also a good idea to wear gloves to protect your hands.
What should I do with the old wired Nest smoke detector after removing it?
After removing the old wired Nest smoke detector, it is important to properly dispose of it. Check with your local waste management or recycling facility for specific instructions on how to dispose of electronic waste. Many areas have designated drop-off locations or recycling programs for electronic devices to ensure they are disposed of in an environmentally friendly manner.