
Are you tired of juggling multiple devices to stay connected? With an iPad, you can now make phone calls just like you would on your iPhone. Whether you’re at home, in the office, or on the go, this step-by-step guide will show you how to use your iPad as a phone.
First, make sure you have an iPad with a cellular data plan and the latest iOS software installed. This will allow you to make calls over a cellular network without relying on Wi-Fi. Next, go to the “Settings” app on your iPad and tap on “FaceTime” to make sure it is enabled. FaceTime is the native video and audio calling app on iOS devices, and it will be the key to making phone calls on your iPad.
Once FaceTime is enabled, you can start making phone calls by opening the “FaceTime” app on your iPad. Tap on the “+” button at the top right corner of the screen to bring up the dialer. From here, you can enter the phone number you want to call or choose a contact from your iPad’s address book. Make sure to include the country and area code if necessary.
After entering the phone number or selecting a contact, simply tap on the green call button to initiate the call. Your iPad will use its cellular connection to place the call, just like a regular phone. You can even switch to speakerphone or use a Bluetooth headset for hands-free calling. And if you miss a call, don’t worry – your iPad will display a notification on the lock screen and in the Notification Center.
So why carry around an iPad and an iPhone when you can use your iPad as a phone? With this step-by-step guide, you’ll be making phone calls on your iPad in no time. Stay connected and streamline your devices with this convenient feature.
Set up your iPad to make phone calls
If you have an iPad with cellular capabilities, you can set it up to make phone calls. This can be especially useful if you don’t have access to your iPhone or if you prefer using your iPad for calls. Here’s how to set it up:
- Make sure you have a compatible iPad model. Only certain iPad models support phone calls, so check to see if your device is compatible.
- Insert a SIM card or set up an eSIM. To make phone calls, your iPad needs a cellular connection. You can either insert a SIM card provided by your cellular carrier or set up an eSIM if your iPad supports it.
- Go to the Settings app on your iPad.
- Tap on “Cellular Data” or “Mobile Data,” depending on your device’s language settings.
- Toggle on “Cellular Data” or “Mobile Data” if it’s not already turned on.
- Tap on “Cellular Plans” or “Mobile Data Plans.”
- Follow the on-screen instructions to set up your cellular plan or eSIM. This usually involves entering your carrier’s information and activating the service.
- Once your cellular plan is set up, you should be able to make phone calls using your iPad.
Keep in mind that making phone calls on your iPad requires a cellular data or Wi-Fi connection. Without a connection, you won’t be able to place or receive calls.
Additionally, you can use the built-in FaceTime app on your iPad to make video and audio calls to other Apple devices. This is a separate feature from making traditional phone calls and requires an internet connection.
Now that your iPad is set up to make phone calls, you can easily stay connected even without your iPhone. Whether you’re traveling, working, or simply prefer using your iPad for calls, this feature offers flexibility and convenience.
Check for compatibility with your carrier
Before you start making phone calls with your iPad, it is important to check if your carrier supports the feature. Not all carriers offer the ability to make calls on an iPad.
To check for compatibility, follow these steps:
- Go to the Settings app on your iPad.
- Select the “Cellular” option from the left-hand menu.
- If you see the option “Cellular Data”, it means that your carrier supports data connection on your iPad. However, it does not guarantee that your carrier supports phone calls on your iPad.
- If you see the option “Cellular Plans”, it means that your carrier supports both data connection and phone calls on your iPad.
- If you don’t see any of these options, it means that your carrier does not support making phone calls on your iPad.
If your carrier does not support phone calls on your iPad, you may need to consider other alternatives such as using a third-party app or using your iPhone to make and receive phone calls.
Note: Making phone calls on your iPad using cellular data may incur additional charges from your carrier. It is important to check with your carrier about any potential charges before using this feature.
Take advantage of FaceTime audio calls
FaceTime audio calls provide a seamless and high-quality way to communicate with friends, family, and colleagues. Whether you’re using an iPad or any other Apple device, you can take advantage of the following benefits of FaceTime audio calls:
- Excellent sound quality: FaceTime audio calls use a combination of advanced audio codecs and noise cancellation technology to ensure crystal-clear sound.
- Free calls: FaceTime audio calls are completely free, allowing you to make long-distance or international calls without incurring any additional costs.
- Integration with your contacts: FaceTime audio calls are seamlessly integrated with your iPad’s Contacts app, making it easy to initiate calls with your saved contacts.
- Multi-device support: You can make FaceTime audio calls from your iPad, iPhone, Mac, or any other Apple device, allowing you to stay connected wherever you are.
- Group audio calls: FaceTime audio calls also support group calling, allowing you to have conference calls with multiple participants at once.
To make a FaceTime audio call on your iPad, follow these steps:
- Open the FaceTime app on your iPad.
- Tap the “+” button to start a new call.
- Enter the name, phone number, or email address of the person you want to call.
- Tap the audio icon to initiate a FaceTime audio call.
- Wait for the person to answer, and start your conversation!
During a FaceTime audio call, you can use the following features:
- Mute: Tap the microphone icon to mute your audio.
- Speaker: Tap the speaker icon to switch between the earpiece and the speakerphone.
- End call: Tap the “End” button to end the call.
Whether you want to have a quick catch-up with a friend or have a business meeting while on the go, FaceTime audio calls are a convenient and reliable option that you can take advantage of with your iPad.
Download a third-party calling app
If you want to make phone calls on your iPad, you will need to download a third-party calling app. These apps allow you to make phone calls over Wi-Fi or cellular data, using your iPad as a phone.
Here are some popular third-party calling apps that you can download from the App Store:
- Skype: Skype is a well-known calling app that allows you to make voice and video calls to other Skype users for free, and call landline or mobile numbers for a small fee.
- WhatsApp: WhatsApp is a popular messaging app, but it also allows you to make voice and video calls to other WhatsApp users for free.
- Google Voice: Google Voice is a communication service that gives you a free phone number, and allows you to make calls within the United States and Canada for free, and international calls at a low cost.
- Viber: Viber is another messaging app that also offers free voice and video calls to other Viber users.
To download a third-party calling app, follow these steps:
- Open the App Store on your iPad.
- Tap on the “Search” tab at the bottom of the screen.
- Type the name of the calling app you want to download in the search bar, e.g. “Skype”.
- Tap on the app’s name when it appears in the search results.
- Tap on the “Get” or the price button to download the app.
- Enter your Apple ID password or scan your face/Touch ID to confirm the download.
- Wait for the app to download and install on your iPad.
- Once the app is installed, you can open it and follow the on-screen instructions to set up your account and start making phone calls.
Remember, you will need an active internet connection, either through Wi-Fi or cellular data, to use these calling apps on your iPad.
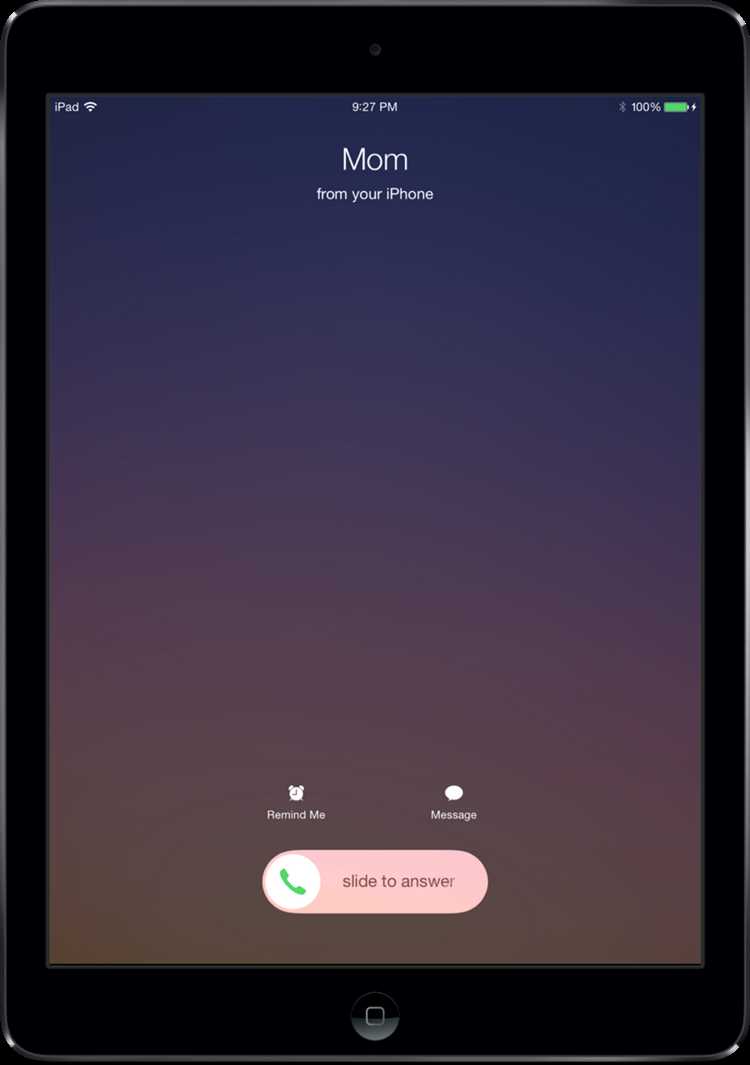
Link your iPhone to your iPad for call forwarding
With the Continuity feature, you can link your iPhone to your iPad and easily forward calls and messages from your iPhone to your iPad. This allows you to make and receive phone calls on your iPad using your iPhone’s network connection. Follow the steps below to set up call forwarding on your iPad:
- Make sure both your iPhone and your iPad are connected to the same Wi-Fi network.
- On your iPhone, go to “Settings” and tap on your Apple ID at the top of the screen.
- Select “iCloud” and make sure “Contacts” and “Calls” are enabled.
- On your iPad, go to “Settings” and tap on “FaceTime”.
- Toggle on the option for “Calls from iPhone”.
- You’ll receive a verification code on your iPad. Enter this code on your iPhone to link both devices.
Once your iPhone and iPad are connected, you can start making and receiving calls on your iPad. When a call comes in on your iPhone, you’ll see a notification on your iPad’s lock screen or in the top-right corner of the screen. You can answer the call on your iPad, use the on-screen dialer to make a call, or access your contacts to make calls.
Additionally, you can also use your iPad to make calls using your iPhone’s cellular network even if your iPad is not connected to Wi-Fi. This can be useful if you’re in an area with a poor Wi-Fi connection but still need to make phone calls.
By linking your iPhone to your iPad for call forwarding, you can easily stay connected and make calls from your iPad using your iPhone’s network connection. This can be especially useful if you prefer the larger screen of your iPad for making and receiving calls.
Enable Wi-Fi calling on your iPad
Wi-Fi calling is a feature that allows you to make and receive phone calls over a Wi-Fi network rather than using a cellular connection. This can be useful if you have a weak cellular signal or if you’re traveling abroad and want to avoid roaming charges.
To enable Wi-Fi calling on your iPad, follow these steps:
- Make sure your iPad is connected to a Wi-Fi network.
- Open the “Settings” app on your iPad.
- Tap on “Phone” in the left sidebar.
- Toggle on the “Wi-Fi Calling” switch.
- You may be prompted to enter your mobile phone number and verify it with a code. Follow the on-screen instructions to complete the setup process.
Once Wi-Fi calling is enabled, you can make and receive phone calls on your iPad using your regular phone number. The call quality will depend on the strength and stability of your Wi-Fi connection.
Note that Wi-Fi calling may not be available on all iPad models and cellular carriers. Make sure to check with your carrier to see if this feature is supported.
Use Bluetooth headphones or speakers for calls
If you prefer to have a hands-free calling experience or just want to listen to your calls through high-quality audio devices, you can easily connect Bluetooth headphones or speakers to your iPad.
- Make sure your Bluetooth headphones or speakers are turned on and in pairing mode.
- On your iPad, go to Settings by tapping on the gear icon on the home screen.
- In the Settings menu, tap on “Bluetooth”.
- Toggle the Bluetooth switch to the “On” position.
- Your iPad will then start scanning for available Bluetooth devices.
- Once your Bluetooth headphones or speakers appear in the list of devices, tap on them to connect.
- If prompted, enter the passcode or PIN provided with your Bluetooth headphones or speakers.
- Wait for your iPad to successfully connect to the Bluetooth device.
- Once connected, you can now use your Bluetooth headphones or speakers for making and receiving phone calls on your iPad.
Note that some Bluetooth headphones or speakers may have additional features or controls for answering calls, adjusting volume, or muting the microphone. Refer to the user manual of your specific device for more information on these features.
Using Bluetooth headphones or speakers for calls provides you with the flexibility to move around while talking, eliminates the need to hold your iPad, and enhances the audio quality for a better communication experience.
Troubleshoot common issues with iPad phone calls
If you are experiencing difficulties with making phone calls on your iPad, there could be a few common issues that you can troubleshoot. Here are some troubleshooting steps to help you resolve these issues:
- Check your internet connection: Ensure that you have a stable internet connection, as iPad phone calls rely on internet connectivity. Wi-Fi or cellular data must be enabled for calls to work properly. You can try toggling Wi-Fi or cellular data on and off to see if that resolves the issue.
- Update iOS: Make sure that your iPad is running the latest version of iOS. Apple frequently releases updates that include bug fixes and performance improvements, which may address any issues you are experiencing with phone calls.
- Restart your iPad: Sometimes a simple restart can resolve minor software glitches that may be affecting phone calls. Press and hold the power button until the “slide to power off” option appears. Slide to power off and then turn your iPad back on after a few seconds.
- Check call settings: Verify that you have enabled call forwarding, call waiting, and other necessary settings. Open the “Settings” app and navigate to the “Phone” section to adjust these settings if needed.
- Reset network settings: Resetting your network settings can help resolve connectivity issues that may be affecting phone calls. Go to “Settings” > “General” > “Reset” > “Reset Network Settings”. Keep in mind that this will remove saved Wi-Fi networks and passwords, so make sure to have them handy.
- Disable Do Not Disturb: Ensure that you have not enabled the Do Not Disturb mode, as this feature can restrict incoming call notifications. You can check if it is enabled by swiping down from the top right corner of the iPad’s screen and checking for the crescent moon icon.
- Contact your carrier: If none of the above steps resolve your issue, it is recommended to reach out to your carrier’s customer support. They may be able to provide assistance specific to your network and account settings.
By following these troubleshooting steps, you should be able to resolve common issues with making phone calls on your iPad. If the problem persists, it may be necessary to seek further technical support.
FAQ:
Can I make phone calls with my iPad?
Yes, you can make phone calls with your iPad using certain models that have cellular capabilities.
What models of iPad allow making phone calls?
Only iPad models with cellular capabilities, such as the iPad Air, iPad Mini, and iPad Pro, allow making phone calls.
Do I need a SIM card to make phone calls on my iPad?
Yes, you will need a SIM card with an active cellular plan to make phone calls on your iPad.
Can I use my iPad to receive phone calls?
Yes, you can use your iPad to receive phone calls as long as it has a cellular connection and an active SIM card.
Are there any additional apps required to make phone calls on an iPad?
No additional apps are required to make phone calls on an iPad. The built-in FaceTime and Phone apps can be used for this purpose.
Can I make international phone calls with my iPad?
Yes, you can make international phone calls with your iPad, but additional charges may apply depending on your cellular plan.
How do I set up and make phone calls on my iPad?
To set up and make phone calls on your iPad, you need to ensure it has a cellular connection, insert a SIM card, configure your phone settings, and use the built-in Phone app or FaceTime app to make calls.