
If you’ve ever been on a conference call or recording audio on your computer and heard an annoying echo, you know how frustrating it can be. Echoes can make it difficult for others to understand what you’re saying and can detract from the overall audio quality. Luckily, there are several troubleshooting tips you can try to eliminate echo on your computer mic and improve your audio experience.
One of the first things you should check is the physical setup of your microphone. Ensure that the mic is properly connected to your computer and that there are no loose connections. If you’re using an external microphone, make sure it’s positioned correctly and not too close to any walls or surfaces that could cause sound reflections. Adjusting the mic’s position can sometimes help reduce echo.
Another common cause of echo is audio feedback. This occurs when sound from your speakers or headphones is picked up by your microphone and replayed, creating a loop. To avoid this, try using headphones or earbuds instead of speakers. Additionally, make sure that your microphone’s volume is set at an appropriate level to prevent audio feedback.
If you’re still experiencing echo, you may need to adjust your computer’s audio settings. Check your computer’s sound settings to ensure that your microphone is set as the default recording device and that its levels are properly adjusted. You may also want to consider updating your sound card drivers, as outdated drivers can sometimes cause audio issues, including echo.
In some cases, software conflicts or compatibility issues can contribute to echo problems. If you’ve recently installed any new software or made changes to your computer’s configuration, try uninstalling or reverting those changes to see if it resolves the issue. If you’re using voice communication software, such as Discord or Skype, check for any updates or settings within the software that may help eliminate echo.
By following these troubleshooting tips, you should be able to effectively eliminate echo on your computer mic and improve your overall audio quality. Remember to check your physical setup, avoid audio feedback, adjust your computer’s audio settings, and address any software conflicts. With a little patience and experimentation, you’ll be able to enjoy clear and echo-free audio on your computer.
Adjusting Microphone Settings
If you are experiencing echo during your microphone usage, adjusting the microphone settings can potentially solve the issue. Here are some steps you can take to adjust the microphone settings:
- Volume Control: Check the volume level of your microphone. Make sure it is not set too high, as it can cause feedback and echo. Adjust the volume control to an optimal level.
- Microphone Sensitivity: Some microphones have a sensitivity adjustment setting. Lowering the sensitivity can help reduce background noise and potential echo. Check your microphone’s manual or settings to see if this option is available.
- Microphone Placement: The placement of your microphone can also contribute to echo. Make sure the microphone is positioned correctly and not too close to any speakers or reflective surfaces that can cause sound waves to bounce back and create echo.
- Background Noise Suppression: Enable any background noise suppression features or settings on your computer or microphone. This can help reduce unwanted noise and echo.
- Microphone Enhancements: Some sound cards or audio software have microphone enhancement settings. Explore these settings and experiment with options like noise cancellation or echo reduction to see if they can help improve the microphone’s performance.
By adjusting the microphone settings as mentioned above, you can potentially eliminate or minimize echo during your microphone usage. However, if the issue persists, it may be worth considering other troubleshooting steps or seeking professional assistance.
Placing the Microphone Correctly
One of the key factors in eliminating echo on your computer microphone is to ensure that the microphone is positioned correctly. Here are some tips for placing your microphone correctly:
- Close to your mouth: Position the microphone close to your mouth but not touching it. This will help capture your voice clearly while minimizing echo.
- Avoid obstacles: Make sure there are no objects blocking the path between your mouth and the microphone. Obstacles can cause reflections and contribute to echo.
- Directional microphones: Consider using a directional microphone that focuses on capturing sound from a specific direction. This can help reduce background noise and echo.
Additionally, you may want to experiment with different microphone positions and angles to find the best placement for your specific setup. Keep in mind that the ideal microphone placement may vary depending on the type of microphone you are using and the acoustics of your environment.
By placing your microphone correctly, you can significantly reduce echo and improve the overall sound quality of your recordings or voice chats on your computer.
Using a Pop Filter
A pop filter is a useful tool for reducing unwanted popping and plosive sounds that can cause echo and distortion on your computer mic. It is particularly effective at minimizing the harsh “p” and “b” sounds that can be problematic when recording audio.
- What is a pop filter?
- Why should you use a pop filter?
- How to use a pop filter?
- Attach the pop filter to a microphone stand or boom arm, positioning it about 2-6 inches away from the mic.
- Make sure the pop filter’s screen or foam layer is facing towards you.
- Position the pop filter between your mouth and the microphone, keeping a consistent distance while speaking.
- Speak or sing directly into the pop filter, ensuring that the air from your voice goes through it before reaching the microphone.
- Choosing the right pop filter
- Type: There are two common types of pop filters: mesh screens and foam filters. Mesh screens are more durable and provide better protection against plosive sounds, while foam filters are more affordable and can also reduce high-frequency noise.
- Size: Pop filters come in various sizes, so choose one that appropriately covers the area between your mouth and the microphone.
- Compatibility: Ensure that the pop filter you choose is compatible with your microphone stand or boom arm.
A pop filter is a device that is placed between your mouth and the microphone to act as a barrier, allowing air to pass through while preventing the bursts of air that cause unwanted sound distortion. It usually consists of a fine mesh screen or a layer of foam that catches the air from your voice before it reaches the mic.
Using a pop filter can help improve the sound quality of your recordings by eliminating or reducing the plosive sounds that cause echo. This can be particularly important if you are recording vocals, voice-overs, or podcasts. Pop filters are commonly used in professional recording studios and can make a noticeable difference in the clarity of your audio.
Using a pop filter is simple:
When selecting a pop filter, consider the following:
By using a pop filter, you can significantly reduce echo and achieve clearer audio recordings on your computer mic. Experiment with different techniques and filters to find the setup that works best for you.
Checking for Software Compatibility
When troubleshooting echo issues on your computer mic, one important step is to check for software compatibility. In some cases, the software you are using may not be fully compatible with your microphone, leading to echo problems. Here are a few tips to check for software compatibility:
- Update your drivers: Make sure that you have the latest drivers installed for your microphone. Outdated drivers can cause compatibility issues and result in echo. Check the manufacturer’s website for any driver updates.
- Check the software requirements: Ensure that the software you are using is compatible with your operating system. Some programs may only work properly on specific versions of Windows or Mac. Review the software specifications to verify compatibility.
- Try different software: If you are experiencing echo with a particular program, try using a different software to see if the issue persists. Sometimes, certain programs may have inherent compatibility problems with certain microphones.
If you have checked for software compatibility and are still experiencing echo on your computer mic, it may be worth considering hardware-related factors or seeking further assistance.
Updating Audio Drivers
If you are experiencing echo on your computer mic, it may be due to outdated audio drivers. Audio drivers are the software that allow your computer’s operating system to communicate with and control the audio hardware. Outdated drivers can cause compatibility issues and affect the performance of your microphone.
To update your audio drivers, follow these steps:
- Identify the audio device: Open the Device Manager on your computer. You can access it by right-clicking on the Start button and selecting “Device Manager” from the menu. Look for the “Sound, video and game controllers” section and expand it. You should see the audio device listed there.
- Check for driver updates: Right-click on the audio device and select “Update driver” from the context menu. Choose the option that allows Windows to search automatically for updated driver software. If there is an available update, Windows will download and install it automatically. If not, you can proceed to the next step.
- Download the latest drivers: Visit the manufacturer’s website for your audio device and look for the “Support” or “Downloads” section. Search for the latest audio drivers compatible with your operating system. Download the drivers and save them to a location on your computer.
- Install the updated drivers: Once the drivers are downloaded, go back to the Device Manager, right-click on the audio device, and select “Update driver” again. This time, choose the option to browse your computer for driver software. Locate the downloaded driver file and follow the on-screen instructions to install it.
- Restart your computer: After installing the updated drivers, it is recommended to restart your computer to apply the changes. This will ensure that the new drivers are properly configured and functioning.
By updating your audio drivers, you can improve the performance of your computer microphone and potentially eliminate any echo issues you are experiencing. Remember to regularly check for driver updates to keep your audio devices functioning optimally.
Adjusting Sound Card Settings
If you are experiencing echo on your computer mic, adjusting the sound card settings can help eliminate this issue. Here are some steps you can take to adjust your sound card settings:
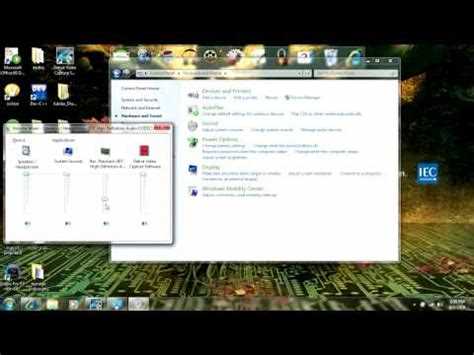
- Open the sound settings: Go to the Control Panel on your computer and open the Sound settings. You can usually find this option under the “Hardware and Sound” category.
- Select the recording tab: In the Sound settings window, switch to the Recording tab. This tab will display all the available recording devices on your computer.
- Choose the correct microphone: Locate your microphone from the list of recording devices and select it as the default recording device. You can identify your microphone by its name or icon.
- Adjust microphone properties: Right-click on your microphone and choose Properties. In the Properties window, navigate to the “Levels” or “Enhancements” tab.
- Decrease microphone volume: If the volume level is too high, it may cause echo. Adjust the microphone volume slider to a lower level and try recording or speaking into the mic to see if the echo is reduced.
- Disable microphone enhancements: Some sound cards offer enhancements that can interfere with microphone performance. In the Enhancements tab, uncheck any enabled enhancements and click Apply to disable them.
- Check for driver updates: Ensure that you have the latest drivers installed for your sound card. Visit the manufacturer’s website to download and install any available updates.
By following these steps and adjusting your sound card settings, you can minimize or eliminate echo on your computer mic. If the issue persists, you may need to consider other troubleshooting methods or consult technical support.
Using Acoustic Panels or Soundproofing
If you are still experiencing echo or unwanted background noise on your computer microphone, you may want to consider using acoustic panels or implementing soundproofing techniques in your workspace. These can help absorb sound reflections and reduce echo.
Here are some steps you can take to use acoustic panels or soundproofing:
- Identify problem areas: Take note of the areas in your workspace where the echo or background noise is most prominent. This could be near bare walls, hard floors, or windows.
- Install acoustic panels: Acoustic panels are designed to absorb sound waves and reduce echo. Place these panels strategically on the walls or ceiling of your workspace to help mitigate echo. You can purchase acoustic panels online or at a local store.
- Use soundproofing materials: Consider using soundproofing materials such as foam or cork to cover bare walls or floors. These materials can help reduce sound reflections and improve audio quality.
- Seal gaps and cracks: Inspect your workspace for any gaps, cracks, or openings where sound can escape or enter. Use weatherstripping or caulk to seal these openings and minimize sound leakage.
- Minimize external noises: Ensure that any sources of external noise, such as fans or air conditioners, are turned off or placed in a separate room to reduce background noise during audio recordings.
- Consider a microphone isolation shield: If you are still experiencing echo after implementing acoustic panels and soundproofing techniques, you may want to consider using a microphone isolation shield. These shields are placed around your microphone to help block out unwanted noise and reduce echo.
Remember that the effectiveness of acoustic panels and soundproofing techniques may vary depending on the size and layout of your workspace. It may be helpful to experiment with different placement and materials to find the best solution for your specific setup.
Consulting Technical Support
If you have followed the troubleshooting tips mentioned above and are still experiencing echo on your computer mic, it may be necessary to consult technical support for further assistance. Technical support professionals are trained to help troubleshoot and resolve issues related to audio equipment and settings.
Here are some steps you can take when consulting technical support:
- Identify the issue: Clearly explain the problem you are facing with your computer mic. Provide as much detail as possible, such as the type of mic you are using, the software you are using it with, and any error messages you are receiving.
- Follow their instructions: Technical support may ask you to perform certain actions or change settings on your computer. Cooperate with them and follow their instructions carefully. They may ask you to adjust the microphone settings, update drivers, or test the mic with different applications.
- Provide feedback: If the instructions provided by technical support do not resolve the issue, let them know. They may ask for additional information or suggest alternative solutions. Giving feedback helps them understand the problem better and provide more accurate support.
- Document the support process: Keep a record of the troubleshooting steps provided by technical support. This can be helpful if the issue persists or if you need to reference the information later. Include any error codes, software versions, or steps performed during the support process.
Remember to be patient and polite when dealing with technical support. They are there to help you and guide you through the troubleshooting process. By working together, you can increase the chances of resolving the echo issue on your computer mic.
FAQ:
What causes echo on my computer mic?
Echo on your computer mic can be caused by a variety of factors, such as the microphone picking up sound from the speakers, improper audio settings, or the room acoustics.
How can I determine the cause of the echo on my computer mic?
To determine the cause of the echo on your computer mic, you can try various troubleshooting steps. These may include adjusting the microphone’s placement, checking audio settings, using headphones, or testing the microphone in a different location.
What are some tips for eliminating echo on my computer mic?
There are several tips you can follow to eliminate echo on your computer mic. These include using a noise-cancelling microphone, adjusting the microphone’s sensitivity, reducing background noise, using headphones, and adjusting the room acoustics.
Can using headphones help to eliminate echo on my computer mic?
Yes, using headphones can help to eliminate echo on your computer mic. By using headphones, you can prevent the sound from the speakers reaching the microphone and creating an echo effect.
What should I do if adjusting the audio settings doesn’t eliminate the echo on my computer mic?
If adjusting the audio settings doesn’t eliminate the echo on your computer mic, you can try other troubleshooting steps such as using a different microphone, checking the room acoustics, or contacting technical support for further assistance.
Are there any software solutions that can help eliminate echo on my computer mic?
Yes, there are software solutions available that can help eliminate echo on your computer mic. These include noise-cancelling software, echo cancellation software, and audio enhancement plugins. You can explore these options to find the best solution for your specific needs.