
If you are concerned about your privacy and want to disable the microphone for the Host Process for Windows Services, this article will guide you through the process. The Host Process for Windows Services is a generic process that runs multiple services in the background of your Windows computer. It is responsible for running essential system services, including the microphone service. However, if you do not use any applications or services that require microphone access, it is recommended to disable it to protect your privacy.
Disabling the microphone for the Host Process for Windows Services is a simple process that involves accessing the Windows settings. Follow the steps below to disable the microphone:
- Open the “Settings” app on your Windows computer.
- Click on the “Privacy” option.
- In the left sidebar, click on “Microphone.”
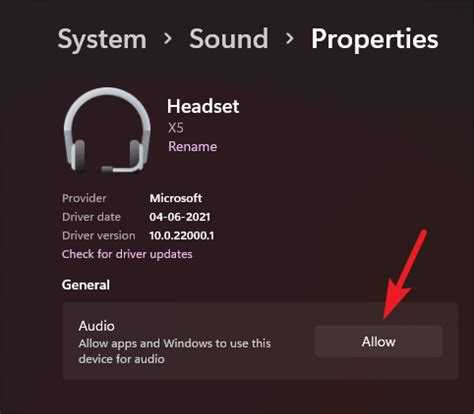
- Under the “Allow apps to access your microphone” section, toggle the switch to “Off.”
By following these steps, you have successfully disabled the microphone for the Host Process for Windows Services. This means that no applications or services will have access to your microphone, ensuring your privacy and preventing any potential unauthorized audio recording. However, please note that this will also disable microphone access for other applications and services that you may use in the future. If you need to enable it again, simply follow the same steps and toggle the switch to “On.”
Why Should You Disable Microphone for Host Process for Windows Services?
The Host Process for Windows Services is a system process in Windows operating systems that runs multiple services. One of the services it can run is the microphone service, which allows applications to access and use the microphone on your computer. While this service can be useful for various applications, there are certain cases where you might want to disable the microphone for the Host Process for Windows Services.
- Privacy concerns: Disabling the microphone for the Host Process for Windows Services can help protect your privacy. By disabling the microphone service, you can prevent unauthorized access to your microphone and ensure that no malicious software or applications are recording your conversations or audio without your consent.
- Battery life: If you are using a laptop or a device with limited battery life, disabling the microphone for the Host Process for Windows Services can help extend your battery life. Running the microphone service requires power, so disabling it can reduce power consumption and improve battery efficiency.
- Background noise: If you are not actively using any applications that require the microphone, disabling the microphone service can help reduce background noise. This can be especially useful if you’re working in a noisy environment and want to minimize distractions.
- Performance optimization: Disabling the microphone service can also help optimize system performance, particularly if you have limited system resources. By disabling unnecessary services, you can free up system resources, such as CPU and memory, for other critical tasks, resulting in improved overall performance.
To disable the microphone for the Host Process for Windows Services, you can follow specific steps depending on your operating system version. It is recommended to consult official documentation or reliable sources to ensure you disable the microphone service correctly without causing any unintended consequences or system malfunctions.
Security Concerns
Disabling the microphone for the Host Process for Windows Services can have security implications. Here are some potential concerns:
- Unauthorized Access to Sensitive Information: If you disable the microphone for the Host Process for Windows Services, it may prevent legitimate services from accessing the microphone. This can lead to unauthorized access to sensitive information, as some applications and services may rely on the microphone for functionality and security.
- Inability to Detect Malicious Activities: Disabling the microphone for the Host Process for Windows Services can hinder the detection of malicious activities that may be using the microphone. Some malware or unauthorized software may attempt to access the microphone for malicious purposes, and disabling it can make it difficult to detect and prevent such activities.
- Reduced Functionality: Disabling the microphone for the Host Process for Windows Services may result in reduced functionality for certain applications or services that rely on the microphone. This can impact productivity and the overall user experience.
- Compatibility Issues: Disabling the microphone for the Host Process for Windows Services may cause compatibility issues with certain hardware or software that depend on the microphone. This can lead to system instability or incompatibility with other applications or devices.
- Limited Troubleshooting Options: Disabling the microphone for the Host Process for Windows Services can make it more challenging to troubleshoot microphone-related issues. If problems arise in the future, identifying the root cause and finding a solution may become more time-consuming and complex.
When considering disabling the microphone for the Host Process for Windows Services, it is essential to weigh the potential security concerns against the benefits and requirements of your specific situation. It is recommended to consult with a knowledgeable IT professional or research the implications thoroughly before making any changes to system settings.
Privacy Issues
Privacy is a major concern for many individuals in today’s digital age. With the increasing use of technology and internet-connected devices, it is more important than ever to protect our personal information and ensure our privacy is not compromised. One area where privacy issues can arise is with the use of microphones in host processes for Windows services.
Microphones are vulnerable to misuse and can be exploited by malicious actors to violate our privacy. There have been instances where attackers were able to remotely activate microphones to eavesdrop on conversations and collect sensitive information without the knowledge or consent of the users.
Host processes for Windows services, which include various system processes and background services, also have access to the microphone. While these processes are necessary for the proper functioning of the operating system, they can potentially be abused or exploited to compromise privacy.
Disabling the microphone for host processes for Windows services can help mitigate the risk of privacy breaches. By disabling the microphone, users can have more control over when and how their microphone is accessed, reducing the chances of unauthorized recording or surveillance.
It is important to note that disabling the microphone for host processes may affect the functionality of certain applications or services that rely on microphone input. Users should carefully consider the potential impact before proceeding with disabling the microphone.
In addition to disabling the microphone, there are other steps that can be taken to enhance privacy and protect personal information. These include:
- Regularly updating the operating system and applications to ensure they have the latest security patches.
- Being cautious about granting microphone permissions to applications and services, and reviewing and revoking these permissions when needed.
- Using strong, unique passwords for all devices and online accounts.
- Enabling two-factor authentication for added security.
- Avoiding clicking on suspicious links or downloading files from unknown sources.
- Using reliable security software and keeping it up to date.
- Being mindful of the information shared online and on social media platforms.
By following these best practices and taking proactive steps to protect privacy, individuals can reduce the risks associated with microphone usage in host processes for Windows services and safeguard their personal information.
Reduce Background Noise
Background noise can be a nuisance and can make it difficult to effectively use your microphone. Here are some tips to reduce background noise:
- Use a quality microphone: Investing in a good quality microphone can greatly reduce background noise. Look for microphones that have noise-cancelling features or that are specifically designed for reducing background noise.
- Adjust microphone settings: Check your microphone settings and adjust the volume and gain levels. Lowering the microphone sensitivity can help to reduce background noise.
- Use a pop filter: A pop filter is a screen or foam cover that can be placed in front of the microphone to reduce plosive sounds, such as “p” and “b” sounds. This can help to minimize background noise caused by these sounds.
- Select a quiet location: Find a quiet place to use your microphone. Avoid areas with loud background noises, such as traffic or crowded places.
- Close windows and doors: If you are recording or using your microphone in a room, make sure to close windows and doors to block out any external noises.
- Use headphones: Using headphones can help to block out background noise and improve the clarity of your microphone audio.
- Position yourself closer to the microphone: By positioning yourself closer to the microphone, you can increase the volume of your voice and reduce the impact of background noise.
- Use noise reduction software: There are various software applications available that can help to reduce background noise during audio recordings or live streaming. Explore options and find a software that suits your needs.
By following these tips, you can reduce background noise and improve the quality of your microphone audio for a better user experience.
Improve Performance
Disabling the microphone for the Host Process for Windows Services can help improve performance on your system. Here are some tips to optimize performance:
1. Close unnecessary background processes:
- Open the Task Manager by pressing Ctrl + Shift + Esc.
- Go to the Processes or Details tab.
- Identify any processes that are using a high amount of CPU or memory.
- Right-click on the process and select End Task or End Process.
2. Disable startup programs:
- Open the Task Manager by pressing Ctrl + Shift + Esc.
- Go to the Startup tab.
- Identify any programs that you don’t need to start automatically with Windows.
- Right-click on the program and select Disable.
3. Remove unnecessary files and programs:
- Open the Control Panel and go to Programs and Features.
- Uninstall any programs that you no longer use.
- Use a disk cleanup tool to remove temporary files and other unnecessary data.
4. Update device drivers:
- Go to the manufacturer’s website for your device (e.g., motherboard, graphics card) and download the latest drivers.
- Install the updated drivers to ensure compatibility and performance improvements.
5. Adjust power settings:
| Option | Description |
|---|---|
| High Performance | This mode prioritizes performance over energy efficiency. It may consume more power. |
| Power Saver | This mode reduces power consumption by minimizing system performance. |
| Balanced | This mode balances performance and energy efficiency. |
6. Upgrade hardware:
- If your computer is still sluggish after trying the above steps, you may consider upgrading your hardware.
- Add more RAM, replace the hard drive with a solid-state drive (SSD), or upgrade to a newer processor.
Note: These steps are general recommendations to improve performance on your system. The effects may vary depending on your specific hardware and software configuration.
Prevent Unwanted Recording
With the increasing prevalence of microphones in devices and applications, it is important to ensure your privacy is protected. Unwanted recording can lead to the leakage of personal information and sensitive conversations. To prevent this, you can take a few steps to disable or limit access to your microphone.
1. Disable Microphone Access
- Go to “Settings” on your device.
- Find and click on “Privacy.”
- Select “Microphone” in the left-hand menu.
- Toggle off the button to disable microphone access for all applications.
2. Manage App Permissions
- Go to “Settings” on your device.
- Find and click on “Privacy.”
- Select “Microphone” in the left-hand menu.
- Review the list of applications that have access to your microphone.
- To disable microphone access for specific apps, toggle off the button next to the app’s name.
3. Use Physical Microphone Controls
Some devices have physical switches or buttons to enable or disable the microphone. Check your device’s manual or settings to see if there are any physical controls available. These controls provide a convenient way to quickly enable or disable the microphone without navigating through settings.
4. Uninstall Unnecessary or Suspicious Apps
Regularly review and uninstall unnecessary or suspicious apps from your device. Some apps may have excessive permissions and can potentially access your microphone without your knowledge. Removing these apps reduces the risk of unwanted recording.
5. Keep Your Operating System and Apps Updated
Make sure to keep your operating system and apps up to date. Software updates often include security patches and improvements, which can address any vulnerabilities that may allow unauthorized access to your microphone.
6. Be Cautious with Online Calls and Meetings
When participating in online calls or meetings, be aware of your privacy settings. Disable your microphone when not needed, and use headphones with built-in microphones to minimize the risk of any unwanted recording or eavesdropping.
By following these steps, you can prevent unwanted recording and ensure your privacy is protected. Stay vigilant and regularly check your microphone settings to maintain control over your device’s microphone access.
Troubleshooting Audio Problems
If you are experiencing audio issues on your computer, there are several troubleshooting steps you can take to identify and resolve the problem. Here are some common audio problems and their potential solutions:
- No sound: Check if your speakers or headphones are properly connected to your computer. Make sure the volume is turned up and not muted. Also, check if the audio device is selected as the default playback device in your computer’s settings.
- Poor sound quality: Try adjusting the volume settings on your computer and speakers. Check if the audio cables are securely connected and not damaged. If using headphones, try using a different pair to see if the issue persists. You can also try updating your audio drivers.
- Audio cutting out: Ensure that the audio cables are properly connected and not loose. Check for any interference from other devices, such as mobile phones or wireless routers, which can affect the audio signal. You can also try adjusting the audio buffer size in your computer’s audio settings.
- Microphone not working: Check if the microphone is properly connected to your computer. Make sure it is not muted or turned down in the volume settings. Try using a different microphone or headset to see if the issue is with the device. Additionally, check if the microphone is selected as the default recording device in your computer’s settings.
- Audio playback delay: This can happen when using wireless speakers or Bluetooth headphones. Make sure that the device is within the recommended range and not experiencing any interference. You can also try disabling any other Bluetooth devices that may be causing interference.
If the above troubleshooting steps do not resolve the audio problems, you may need to seek further assistance. Contacting the manufacturer of your audio device or seeking help from a professional technician can help diagnose and fix the issue.
Remember to always check for software and driver updates for your audio devices, as outdated versions can often cause audio problems. Keeping your system up to date can help ensure optimal audio performance.
Avoid Conflicts with Other Applications
Disabling the microphone for Host Process for Windows Services can help resolve conflicts with other applications that may use the microphone. Some applications, such as voice chat programs, video conferencing tools, or speech recognition software, may need exclusive access to the microphone. If the Host Process for Windows Services is also using the microphone, it can cause conflicts and result in issues such as audio distortion or inability to access the microphone in other applications.
To avoid conflicts with other applications, you can disable the microphone for Host Process for Windows Services by following these steps:
- Open the Sound settings by right-clicking on the speaker icon in the system tray and selecting “Sounds”.
- In the “Recording” tab, locate the microphone device used by Host Process for Windows Services.
- Right-click on the microphone device and select “Disable” from the context menu.
Disabling the microphone for Host Process for Windows Services will prevent it from using the microphone in any applications, freeing it up for other applications to use. However, keep in mind that disabling the microphone for Host Process for Windows Services may affect certain system functions or features that rely on microphone access. Make sure to test other applications and system functions after disabling the microphone to ensure everything is working as expected.
If you encounter any issues or want to re-enable the microphone for Host Process for Windows Services, you can follow the same steps above, but select “Enable” instead of “Disable” in the context menu.
By disabling the microphone for Host Process for Windows Services, you can avoid conflicts with other applications that require exclusive microphone access and ensure smooth audio functionality across different programs.
Protect Against Malware
Malware, short for malicious software, is a constant threat that can cause significant harm to your computer and personal information. To protect yourself against malware, follow these essential steps:
- Install Antivirus Software: Make sure you have a reputable antivirus program installed on your computer. Regularly update it and perform full system scans to detect and remove any malware.
- Keep Your Operating System Updated: Regularly check for and install operating system updates, as they often include security patches and fixes for vulnerabilities that malware exploits.
- Use a Firewall: Enable and configure a firewall on your computer to monitor and block unauthorized access attempts from external sources.
- Be Cautious When Downloading: Only download files, programs, or apps from trusted sources. Be particularly cautious with email attachments and files downloaded from websites you don’t recognize.
- Enable Automatic Updates: Enable automatic updates for all the software and applications installed on your computer. This ensures that you always have the latest security patches.
- Regularly Back Up Your Data: Create regular backups of your important files and data. This will help you recover your data in case of a malware attack or system failure.
- Use Strong, Unique Passwords: Use complex passwords for all your accounts, and avoid using the same password for multiple accounts. Consider using a password manager to securely store and generate strong passwords.
- Be Wary of Phishing Attacks: Be cautious when clicking on links in emails or messages, especially if they ask for personal information. Phishing attacks are often disguised as legitimate websites or emails.
- Regularly Educate Yourself: Stay informed about the latest types of malware and security threats. Keep up with cybersecurity news and follow best practices to protect yourself online.
By following these steps, you can significantly reduce the risk of malware infecting your computer and ensure the security of your personal information.
In Conclusion
Protecting against malware is essential in today’s interconnected world. Implementing these security measures will provide you with a strong defense against malicious software and help keep your computer and data safe.
FAQ:
What is Host Process for Windows Services?
Host Process for Windows Services is a generic term used for processes that run in the background in Windows operating systems.
Why would I want to disable the microphone for Host Process for Windows Services?
You may want to disable the microphone for Host Process for Windows Services if you want to ensure your privacy and prevent any unintended audio recording.
How can I disable the microphone for Host Process for Windows Services?
You can disable the microphone for Host Process for Windows Services by going to the “Sound” settings in the Control Panel, selecting the recording tab, and then disabling the microphone device associated with the service.
Is it possible to disable the microphone for only specific services?
Yes, it is possible to disable the microphone for specific services by going to the “Sound” settings in the Control Panel, selecting the recording tab, and then disabling the microphone device associated with the specific service you want to disable.
Will disabling the microphone for Host Process for Windows Services affect other applications or processes?
Disabling the microphone for Host Process for Windows Services will only affect the services associated with the microphone device. Other applications and processes that use the microphone will still function normally.
Can I enable the microphone for Host Process for Windows Services again after disabling it?
Yes, you can enable the microphone for Host Process for Windows Services again by going to the “Sound” settings in the Control Panel, selecting the recording tab, and then enabling the microphone device associated with the service.
Are there any alternative methods to disable the microphone for Host Process for Windows Services?
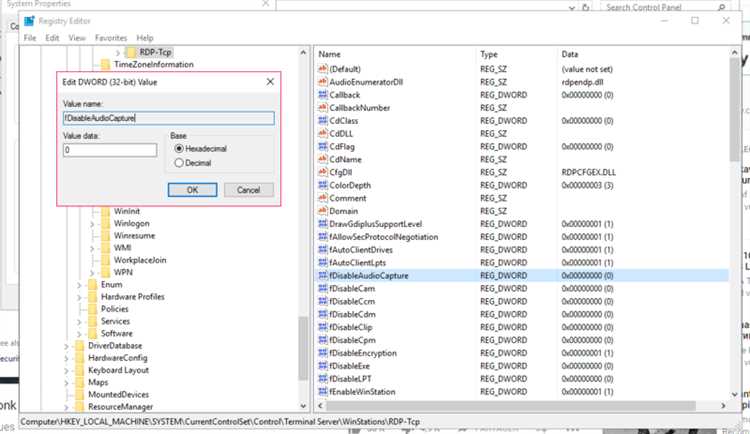
Yes, there are alternative methods to disable the microphone for Host Process for Windows Services, such as using third-party software or modifying the registry settings. However, these methods require more advanced technical knowledge and can be risky if not done correctly.