If you own an iPhone and want to create a group for texting, you’re in luck! The iPhone’s built-in messaging app, iMessage, allows you to easily create and manage groups of contacts for efficient group texting. Whether you want to plan an event with friends, coordinate a project with colleagues, or simply keep in touch with a group of people, creating a group for texting on your iPhone is a straightforward process. In this step-by-step guide, we’ll walk you through the process of creating a group, adding contacts, and sending messages to the group.
Step 1: Open the iMessage App
To create a group for texting on your iPhone, start by opening the iMessage app. Look for the green speech bubble icon labeled “Messages” on your home screen, and tap on it to open the app.
Step 2: Tap on the Compose Button
Once you have the iMessage app open, you’ll see a square button with a pencil icon in the top right corner. This is the compose button. Tap on it to start a new message.
Step 3: Add Contacts
After tapping on the compose button, you’ll see a “To” line where you can enter the recipients of your message. Start typing the name or phone number of the first contact you want to add to the group. As you type, a list of matching contacts will appear below the text field. Tap on the contact you want to add, and their name or number will appear in the “To” line.
Step 4: Continue Adding Contacts
To add more contacts to the group, simply repeat step 3. Type the name or phone number of the next contact, select them from the list of matches, and their name will be added to the “To” line. You can add as many contacts as you want to the group.
Step 5: Send a Group Message
Once you have added all the contacts you want to include in the group, you can now send a group message. Simply type your message in the text field provided and tap the send button (the arrow icon) to send the message to all the contacts in the group.
Step 6: Manage and Customize Your Group
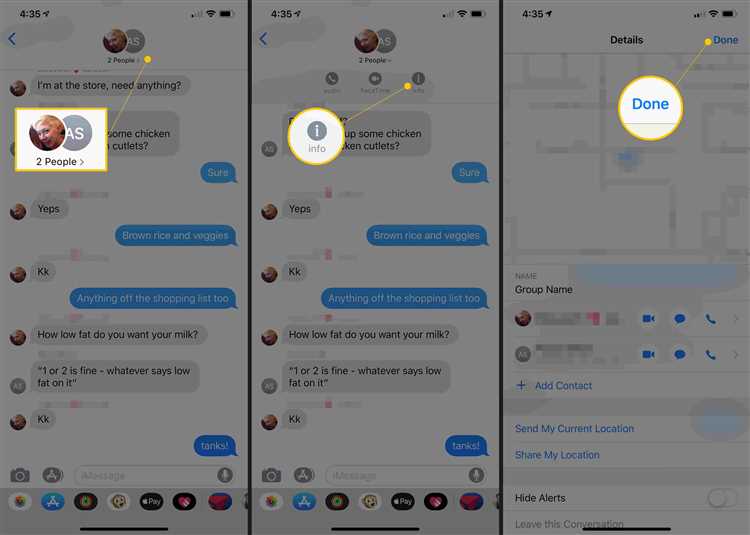
After creating a group for texting, you can manage and customize it to your liking. You can edit the group name, add or remove contacts, and even set a custom photo for the group. To do this, simply open the group message thread, tap on the group name at the top of the screen, and select “info” from the drop-down menu. From here, you can make any changes you want and personalize your group.
Creating a group for texting on your iPhone can make communication with a specific set of people much easier. Whether it’s for personal or professional purposes, following these simple steps will help you create and manage a group effortlessly. So go ahead, create that group and start sharing messages with your contacts in no time!
Why create a group for texting on iPhone?
Creating a group for texting on your iPhone can be a convenient and efficient way to communicate with multiple people at once. Whether you are planning an event, organizing a project, or simply want to stay in touch with a group of friends or family members, creating a group can help streamline your conversations and keep everyone on the same page.
Here are a few reasons why you might want to create a group for texting on iPhone:
- Simplify Communication: Instead of sending individual messages to multiple contacts, you can send a single message to the entire group. This saves you time and ensures that everyone receives the same information.
- Organize Conversations: By creating a group, all the messages exchanged within that group will be neatly organized in one place. This makes it easier to refer back to previous discussions and find important information.
- Share Media and Files: Group messaging on iPhone allows you to easily share photos, videos, documents, and other files with all group members. This can be useful for sharing event details, collaborating on projects, or simply sharing fun moments with friends and family.
- Coordinate Plans: If you are planning an outing or coordinating a group activity, having a dedicated group chat allows everyone to stay updated and provide input. This can help make the planning process smoother and ensure that everyone is on the same page.
- Stay Connected: Creating a group chat on iPhone is a great way to stay connected with a specific group of people. Whether it’s a group of close friends, family members, or colleagues, having a dedicated chat can help you stay updated on each other’s lives and maintain strong relationships.
Overall, creating a group for texting on iPhone can help you simplify communication, organize conversations, share media and files, coordinate plans, and stay connected with your desired group of contacts. It’s a powerful feature that can enhance your messaging experience and improve your efficiency in staying connected with others.
Step 1: Open the Messages app
To create a group for texting on your iPhone, you need to first open the Messages app. This app comes pre-installed on all iPhones and is the primary tool for sending and receiving text messages.
To open the Messages app, follow these steps:
- Locate the Messages app icon on your iPhone’s home screen. The icon is a green speech bubble with a white outline.
- Tap on the Messages app icon to launch it.
Once you have opened the Messages app, you will be ready to start creating your group for texting.
Step 2: Tap the Compose button
After opening the Messages app on your iPhone, you will see a list of your recent conversations. To start a new group chat, you need to tap the Compose button, which is usually located in the top-right corner of the screen. It is represented by a square icon with a pencil inside it.
By tapping the Compose button, a new chat window will appear.
If you cannot find the Compose button, you can also swipe down on the conversation list to reveal a search bar. You can then use the search bar to find a specific contact and start a new conversation with them.
Alternatively, if you have an iPhone with iOS 14 or later, you can use the App Library to find the Messages app. Swipe right on your home screen until you reach the last page, then swipe left one more time to access the App Library. From there, you can search for and open the Messages app to start a new chat.
Step 3: Type the names or numbers of the contacts
After selecting the “+” icon to create a new group, you need to start adding contacts to the group. Follow these steps:
- Tap on the empty field labeled “To:” or “Add Contact”.
- Type the names or numbers of the contacts you want to add to the group.
You can add contacts by typing their names or numbers directly into the field. As you type, the Contacts app will suggest matching contacts based on what you have entered. You can select the suggested contacts by tapping on their names or numbers.
If you don’t see the suggested contacts, make sure the Contacts app has access to your contacts and that you have entered the names or numbers correctly.
If you want to add contacts that are not in your phone’s Contacts app, you can manually type their numbers. Just enter each number separated by a comma or a semicolon.
Once you have finished adding the contacts, double-check the list to ensure all the desired contacts are included. If you need to remove a contact, tap on their name or number in the list and select “Delete” or swipe left on their name and tap “Delete”.
Adding contacts to the group is an important step to ensure that all the intended recipients receive your text messages. Take your time to accurately enter the names or numbers of your contacts to avoid any communication errors.
Step 4: Tap the “Return” or “Done” button
Once you have entered all the names or phone numbers of the contacts you want to add to the group, you need to tap the “Return” or “Done” button to proceed.
The exact location of this button may vary depending on the version of iOS you are using, but it is typically located on the keyboard or in the top-right or bottom-right corner of the screen.
Tapping the “Return” or “Done” button indicates that you have finished adding contacts and are ready to create the group.
After tapping the “Return” or “Done” button, you will be taken back to the main messaging screen with the list of contacts you have added to the group displayed. At this point, you can proceed to the next step to name and save the group.
Step 5: Enter a name for the group
Once you have selected all the contacts you want to add to the group, it’s time to give the group a name. This will help you identify the group easily in your messaging app.
To enter a name for the group, follow these steps:
- Tap on the field that says “Enter Group Name”.
- Type in a name for your group using the on-screen keyboard. You can choose any name you like, such as “Friends”, “Family”, or “Work Colleagues”.
- You can also use emojis to make the group name more fun and visually appealing. To add an emoji, tap on the smiley face icon on the keyboard and select the emoji you want to use.
- After entering the name, tap on the “Create” button or the checkmark icon to save the group name.
Once you have entered a name for the group, it will be displayed in your messaging app. You can now easily find and access the group conversation whenever you want to send a message to the entire group.
Step 6: Customize the group settings
After you have created the group for texting on your iPhone, you have the option to customize the group settings. Here’s how you can do it:
- Open the Messages app on your iPhone and navigate to the group conversation you want to customize.
- Tap on the group name or the “i” icon located at the top-right corner of the screen. This will open the group settings.
- Inside the group settings, you will see various options to customize the group.
- You can change the group name by tapping on the current name and entering a new one.
- There is an option to add a group photo or icon by tapping on the “Change Name and Photo” option.
- You can also enable or disable the option to hide alerts for the group. When this option is enabled, you won’t receive notifications for messages sent to the group.
- If you want to remove someone from the group, you can do it by scrolling down to the “Participants” section and tapping on the “-” button next to their name.
- In the group settings, you can also choose to leave the group by tapping on the “Leave This Conversation” option.
Customizing the group settings allows you to personalize your group and control the notifications and participants. Make sure to customize the group according to your preferences to enhance your texting experience on your iPhone.
Step 7: Start texting with the group
Now that you have created a group for texting on your iPhone, you can start sending messages to everyone in the group. Here’s how:
- Open the Messages app on your iPhone.
- Tap on the group conversation that you created in the previous steps. The conversation will be labeled with the group name.
- Type your message in the text field at the bottom of the screen.
- Tap the send button to send the message to everyone in the group.
- You can also add photos, videos, or other attachments to your message by tapping on the camera icon or the app icon next to the text field.
- If you want to address a specific person in the group, you can mention their name by typing the “@” symbol followed by their name. This will notify them directly.
- Continue the conversation by sending more messages and interacting with other members of the group.
Remember to be respectful and considerate when texting with the group. Avoid sending spam messages or unnecessary notifications to the group. It’s best to use the group for meaningful and relevant conversations.
If you no longer want to be part of the group or want to remove someone from the group, you can manage the group settings by going to the group conversation, tapping on the group name at the top, and selecting “Info”. From there, you can add or remove members, change the group name, or leave the group.
Now that you know how to create and start texting with a group on your iPhone, you can easily stay connected with multiple people at once and have organized conversations. Enjoy your group texting experience!
FAQ:
Is there a limit to the number of people I can add to a group for texting on my iPhone?
Yes, there is a limit to the number of people you can add to a group for texting on your iPhone. The maximum number of participants in a group chat is 32. If you try to add more than 32 people, you will receive a notification stating that the group has too many participants and some people will not be added.


