
Unwanted messages cluttering your inbox can be a nuisance and a distraction. Whether it’s spam, promotional emails, or messages from people you’d rather not hear from, it’s important to have control over your inbox. Thankfully, most email clients offer a blocking feature that allows you to filter out unwanted senders and keep your inbox clean and organized.
In this step-by-step guide, we will walk you through the process of blocking unwanted senders’ messages in popular email clients such as Gmail, Outlook, and Apple Mail. By following these easy steps, you can regain control over your inbox and eliminate the annoyance of unwanted messages.
First, we will start with Gmail. If you’re using Gmail as your primary email client, you’ll be glad to know that Google provides a simple and effective way to block unwanted senders. By following a few easy steps, you can prevent their messages from ever reaching your inbox again. Outlook users will also find instructions on how to block unwanted senders in their email client, ensuring a clutter-free mailbox. Lastly, Apple Mail users will learn how to filter out unwanted messages and keep their inbox organized.
Blocking unwanted senders’ messages is a crucial step in managing your email and maintaining a clutter-free inbox. By taking a few minutes to block unwanted senders, you can save time, reduce distractions, and improve the overall efficiency of your email experience. So, let’s get started and regain control over your inbox!
Creating a Filter
To block unwanted senders’ messages, you can create a filter in your email account. A filter allows you to automatically perform certain actions on incoming messages based on specified criteria. Follow these steps to create a filter:
- Open your email account and go to the settings or preferences page.
- Navigate to the “Filters” or “Rules” section.
- Click on the “Create a new filter” or “Add a filter” button.
- Specify the criteria for identifying unwanted senders. This can be based on the sender’s email address, the subject line, or any other relevant information.
- Choose the action you want to take on the filtered messages. Options may include deleting the messages, marking them as spam, or moving them to a separate folder.
- Review the filter settings and make any necessary adjustments.
- Save the filter to activate it.
Once the filter is set up, the email system will automatically apply it to incoming messages that meet the specified criteria. This will help you keep your inbox clean from unwanted senders’ messages.
Accessing Email Settings
In order to block unwanted senders’ messages, you will need to access your email settings. The process of accessing email settings will vary depending on the email service provider you are using. However, the general steps are similar across different platforms.
Here is a step-by-step guide to accessing email settings:
- Login to your email account by entering your username and password.
- Once you are logged in, locate the settings option. This can usually be found in the top right corner of the email interface.
- Click on the settings option to open the settings menu.
- In the settings menu, you may find a section specifically for managing blocked senders or spam filters. Click on this section to access the relevant options.
If you are unable to find the settings menu or blocked senders section, you can also try searching for specific keywords like “filters” or “spam” within the settings interface.
Alternatively, you can refer to the help or support section of your email service provider’s website. They often provide detailed instructions on how to access email settings and manage blocked senders.
Once you have accessed the email settings, you will be able to add unwanted senders to your block list or configure spam filters to automatically divert their messages to the spam folder.
Example:
| Email Service Provider | Accessing Settings | Blocked Senders Section |
|---|---|---|
| Gmail |
|
|
| Outlook |
|
|
Remember to save the changes you make to the email settings in order for the blocked senders’ messages to be effectively filtered or blocked.
Following these steps will allow you to access and configure the email settings necessary to block unwanted senders’ messages and improve your email experience.
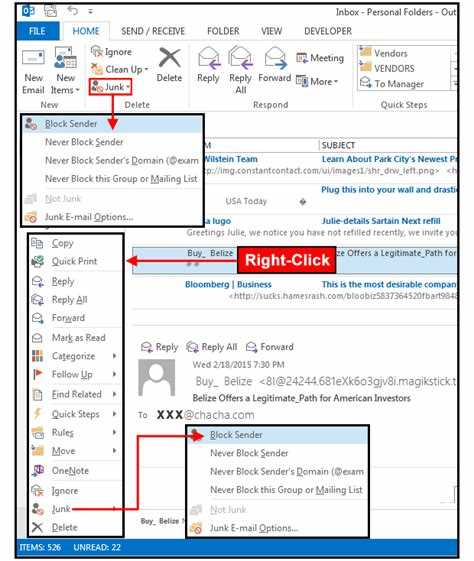
Locating the “Block Senders” Option
In order to block unwanted senders’ messages, you need to locate the “Block Senders” option in your email client. The specific process may vary depending on the email service or software you are using, but the general steps are outlined below:
- Open your email client and log in to your account using your username and password.
- Navigate to the settings or options menu. This is typically found in the upper or lower right corner, represented by a gear or three vertical dots.
- Click on the settings or options menu to open a drop-down or pop-up menu.
- Look for the “Block Senders” or “Blocked Addresses” option in the menu. This option may also be located under a “Security” or “Privacy” section.
- Click on the “Block Senders” or “Blocked Addresses” option to open the blocking settings.
If you are having trouble finding the “Block Senders” option, consider searching for it in the email client’s help documentation or support website. Alternatively, you can search for the specific steps for your email client online, as there may be user forums or guides available.
Once you have located the “Block Senders” option, you can proceed to block unwanted senders’ messages by adding their email addresses or domains to the blocked list.
Adding Unwanted Senders to the Block List
If you find yourself constantly receiving emails from unwanted senders, it can be very annoying. Fortunately, many email providers offer a block list feature that allows you to prevent these unwanted senders from reaching your inbox. Follow these steps to add unwanted senders to the block list:
- Login to your email account and open your inbox.
- Find an email from the sender you want to block.
- Select the email by clicking on it.
- Look for the options or settings button, usually represented by a gear icon or three dots.
- Click on the options or settings button and a dropdown menu should appear.
- Scroll through the menu and look for an option related to blocking or filtering.
- Click on the blocking or filtering option.
- A new window or page should open with options for managing blocked senders.
- Look for a button or link that allows you to add a sender or email address to the block list.
- Click on the appropriate button or link to add the unwanted sender to the block list.
- Some email providers may also offer the option to automatically delete or move emails from blocked senders to a separate folder. If this option is available, consider enabling it for extra protection.
- Save your changes and exit the settings or options window.
By following these steps, you can easily add unwanted senders to the block list and prevent their emails from cluttering your inbox. Be sure to regularly review and update your block list to ensure maximum effectiveness.
Configuring Filter Criteria
Configuring filter criteria is an essential step to block unwanted senders’ messages effectively. By setting up specific rules, you can ensure that only the messages that meet certain criteria are allowed through to your inbox.
To configure the filter criteria, follow these steps:
- Access your email account settings.
- Navigate to the “Filters” or “Blocked Senders” section.
- Click on the option to create a new filter or add a new blocked sender.
- Specify the criteria for the filter. This can include keywords, email addresses, domains, or specific email headers.
- Choose the action to be taken when a message matches the specified criteria. This can be to move the message to a specific folder, delete it, mark it as spam, or block the sender entirely.
- Save the filter criteria to activate it and start blocking unwanted senders’ messages.
When setting up the filter criteria, it’s important to choose relevant keywords or email addresses that are commonly used by the senders you want to block. Additionally, you can use wildcards, such as an asterisk (*) or a question mark (?), to capture variations or unknown parts of the sender’s email address or domain.
It’s recommended to regularly review and update your filter criteria to ensure that new unwanted senders are correctly blocked. Additionally, you can create multiple filters to handle different types of unwanted messages or senders.
| Criteria | Action |
|---|---|
| All emails from *@example.com | Delete |
| Subject contains “sale” or “discount” | Move to “Promotions” folder |
| Email address equals [email protected] | Block sender |
By following the steps outlined above and carefully configuring your filter criteria, you can effectively block unwanted senders’ messages and ensure that your inbox remains clear of spam and unwanted emails.
Applying the Filter
To block unwanted senders’ messages, you need to apply a filter to your email account. This filter will automatically detect and block emails from specific email addresses or domains. Here’s how to do it:
- Open your email account’s settings.
- Locate the “Filters” or “Blocked Senders” option.
- Click on “Add Filter” or a similar button to create a new filter.
- In the filter settings, specify the criteria for blocking unwanted senders. You can choose different criteria such as sender’s email address, subject line keywords, or specific words in the email body.
- Specify the action to be taken when the filter matches the criteria. Typically, you’ll want to select the option to “Delete” or “Move to Junk” the filtered emails.
- Save the filter settings.
Once the filter is enabled, any emails that match the specified criteria will be automatically blocked or moved to the junk folder. It’s important to periodically review the blocked emails or junk folder to ensure no legitimate emails are being filtered out.
Keep in mind that the steps to apply a filter may vary slightly depending on your email provider. However, most email services offer some form of filtering or blocking options in their settings.
Checking Blocked Messages
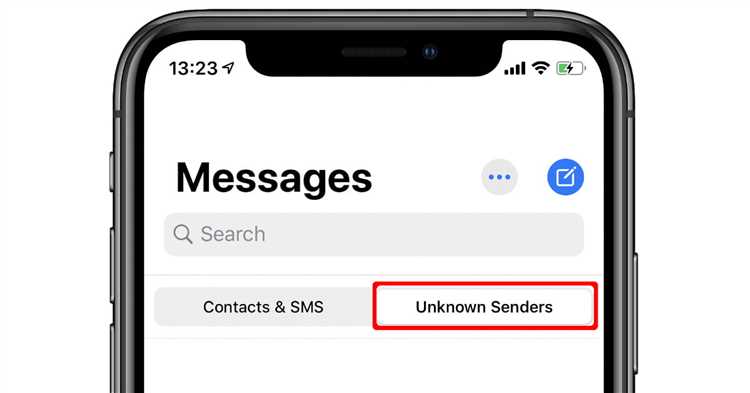
After you have successfully blocked unwanted senders’ messages, it is important to regularly check for any messages that might have been mistakenly blocked. Here is a step-by-step guide on how to check blocked messages:
- Login to your email account.
- Navigate to your email settings or preferences section. This can usually be found under the “Settings” or “Options” menu.
- Look for the “Blocked Senders” or “Blocked Contacts” tab.
- Click on the “Blocked Senders” or “Blocked Contacts” tab to view the list of blocked senders or contacts.
- Scan through the list of blocked senders or contacts to check for any messages that might have been mistakenly blocked.
- If you find any messages from blocked senders or contacts that you want to receive, select the checkbox next to their name or email address.
- Click on the “Unblock” or “Remove from Blocked List” button to remove the selected sender or contact from the blocked list.
- Close the settings or preferences window and return to your inbox.
By regularly checking for blocked messages, you can ensure that you do not miss any important emails that might have been blocked by mistake. It is also a good practice to review your blocked senders or contacts list periodically to update it based on your changing preferences.
Modifying or Removing the Filter
If you ever need to modify the filter you have set up to block unwanted senders’ messages, or if you simply want to remove it, you can easily do so by following these steps:
- Open your email client and navigate to the settings or options page.
- Locate the “Filters” or “Junk Mail” section. This section might be under a different name depending on the email client you use.
- Look for the filter you have set up to block unwanted senders’ messages. It may be listed by the sender’s email address or by a specific keyword you have used in the filter.
- If you want to modify the filter, click on it to open the options. You can then edit the conditions or actions of the filter.
- If you want to remove the filter completely, select the filter and click on the “Delete” or “Remove” button.
- Confirm the deletion when prompted, if applicable.
- Save the changes to the settings or options page and exit.
By modifying or removing the filter, you can easily adjust your email client’s behavior and ensure that you are only blocking the senders that you intend to block. It’s important to regularly review and update your filters to account for any changes in your email communication.
FAQ:
Is it possible to block unwanted senders’ messages?
Yes, it is possible to block unwanted senders’ messages. There are several steps you can take to block them.
Can I block multiple unwanted senders’ messages at once?
No, you cannot block multiple unwanted senders’ messages at once. You will need to individually add each email address or domain to your blocked list.
Is it possible to unblock a sender later?
Yes, it is possible to unblock a sender later. To do this, you will need to go back to your email settings, navigate to the options for blocking senders, and remove the email address or domain from the blocked list.
Will blocked senders know that their messages are being blocked?
No, blocked senders will not know that their messages are being blocked. The messages will simply be redirected to your spam or trash folder, depending on your email provider’s settings.
What should I do if a blocked sender continues to send me messages?
If a blocked sender continues to send you messages, you can try adding their email address or domain to your email provider’s “blacklist” or “report spam” list. This will help your email provider recognize the messages as spam and prevent them from reaching your inbox.
Are there any other methods to block unwanted senders’ messages?
Yes, there are other methods to block unwanted senders’ messages. Some email providers offer advanced filtering options that allow you to create custom rules for blocking specific senders or types of messages. Additionally, you can use third-party email filtering software or services to block unwanted senders.