
Are you an Apple device user who wants to take advantage of the convenient messaging features of iMessage? This step-by-step guide will walk you through the process of activating iMessage on your device, whether it’s an iPhone, iPad, or iPod Touch. With iMessage, you can send text messages, photos, videos, and more to other Apple users without using your cellular data or SMS plan. Follow these instructions to get started and start enjoying the benefits of iMessage.
Step 1: Open Settings on your device
To activate iMessage, start by opening the Settings app on your device. Look for the gear icon usually located on your home screen or in the app drawer. Tap on it to access the device settings.
Step 2: Find and select Messages
Once you’re in the Settings app, scroll down until you see the option for “Messages”. It’s usually located in the list of apps. Tap on it when you find it to go to the Messages settings.
Step 3: Toggle on iMessage
In the Messages settings, you will see an option for “iMessage” at the top. Beside it, there will be a toggle switch. Tap on the switch to toggle iMessage on. Once the switch turns green, iMessage is activated on your device.
Now that iMessage is activated, you can start sending and receiving messages through the iMessage platform. Simply open the Messages app and start a new conversation. If the recipient also has iMessage activated, the messages will be sent through iMessage. If they don’t have iMessage, the messages will be sent as regular SMS texts.
Tip: iMessage can be used over Wi-Fi or cellular data, so make sure you have a stable internet connection to enjoy seamless messaging.
By following these simple steps, you can easily activate iMessage on your Apple device and start enjoying the benefits of this convenient messaging service. Stay connected with your friends and family with iMessage’s features like read receipts, group messaging, and other fun options. Activate iMessage today and experience a whole new level of messaging on your Apple device.
Set Up Apple ID
In order to activate iMessage on your Apple device, you need to have an Apple ID. An Apple ID is essential for accessing various Apple services and features. Here’s how you can set up your Apple ID:
- Open the App Store on your device.
- Tap on the “Sign In” or “Create New Apple ID” option.
- If you already have an Apple ID, enter your credentials and sign in. Otherwise, proceed to the next step.
- Tap on the “Create New Apple ID” option.
- Follow the on-screen instructions to enter your name, email address, password, security questions, and other required details for creating your Apple ID.
- Review the Terms and Conditions and tap on “Agree” to proceed.
- Verify your email address by following the instructions sent to the provided email address.
- Once your Apple ID is set up, go back to your device settings and tap on “Messages”.
- Toggle the switch next to “iMessage” to enable it.
- Sign in with your newly created Apple ID when prompted.
Once you have completed the steps above, iMessage should be activated on your device, and you’ll be able to start using this messaging service with your friends and family.
Update iOS Software
Before activating iMessage on your device, it is important to ensure that your iOS software is up to date. Updating your software not only provides you with the latest features but also fixes any bugs or security vulnerabilities that may exist in the older versions. Here’s how you can update your iOS software:
- Connect your device to a stable Wi-Fi network.
- Open the “Settings” app on your device.
- Scroll down and tap on “General”.
- Tap on “Software Update”.
- Your device will now check for any available updates.
- If an update is available, tap on “Download and Install”.
- Enter your passcode if prompted.
- Agree to the terms and conditions.
- The update will now begin downloading. The time taken for the download and installation will depend on the size of the update and your internet connection speed.
- Once the update is downloaded, tap on “Install Now” to begin the installation process.
- Your device will restart during the installation process.
- After the installation is complete, your device will restart once again.
- Once your device is back on, go to “Settings” and tap on “Messages”.
- Toggle on the “iMessage” option.
Now you have successfully updated your iOS software and activated iMessage on your device. You can now enjoy sending messages, photos, videos, and more with your contacts using iMessage.
Check Network Connection
Before activating iMessage on your device, it’s important to ensure that you have a stable network connection. iMessage relies on an internet connection to send and receive messages, so without a proper network connection, you won’t be able to use the service.
To check your network connection:
- Open the Settings app on your device.
- Scroll down and tap on “Wi-Fi” or “Cellular” depending on your connection type.
- If Wi-Fi is enabled, make sure you’re connected to a stable Wi-Fi network. If not, tap on the network you want to connect to and enter the password if required.
- If you’re using cellular data, ensure that you have an active data plan and that your cellular signal strength is strong.
- If necessary, try toggling Wi-Fi or cellular data off and on again to refresh the connection.
Once you’ve confirmed that your network connection is stable, you can proceed with activating iMessage on your device.
Open iMessage App
To activate iMessage on your device, you first need to open the iMessage app. This app allows you to send messages, photos, videos, and other media to your contacts who also have iMessage.
Here are the steps to open iMessage:
- Locate the Messages app on your device. The app icon is typically a green speech bubble with a white outline.
- Tap on the Messages app to open it. This will take you to the main screen of the app.
- If prompted, sign in with your Apple ID and password. This step is necessary if you haven’t already signed in to iMessage on your device.
After opening the iMessage app and signing in, you will be able to access all the features and functionalities of iMessage, including sending and receiving messages, creating group chats, and customizing your iMessage settings.
It’s important to note that iMessage requires an internet connection, either through Wi-Fi or cellular data. Make sure your device is connected to the internet before opening the iMessage app.
If you encounter any issues or error messages when opening iMessage, try restarting your device and then opening the app again. If the problem persists, you may need to troubleshoot or seek further assistance from Apple Support.
Sign in with Apple ID
Once you have set up iMessage on your device, you can sign in using your Apple ID to enable the messaging service. Here are the steps to sign in with your Apple ID:
- Open the “Settings” app on your device.
- Scroll down and tap on “Messages”.
- In the Messages settings, tap on “Send & Receive”.
- You will see the option to sign in with your Apple ID at the top. Tap on it.
- If you are already signed in with your Apple ID on your device, it will show your name and email address. If not, enter your Apple ID and password and tap “Sign In”.
- After signing in, you can choose how you want to be reached in the “You can be reached by iMessage at” section. You can select your phone number, email address, or both.
- If you have enabled two-factor authentication for your Apple ID, you may be prompted to enter a verification code that will be sent to your trusted devices.
- Once you have selected your contact options, you can also choose to enable or disable read receipts, where others will be able to see if you have read their messages.
- Tap on the back arrow in the top left corner to save your settings.
By signing in with your Apple ID, you can not only use iMessage on your device but also sync your messages across all your Apple devices that are signed in with the same Apple ID.
Enable iMessage
Follow these steps to enable iMessage on your device:
- Open the “Settings” app on your device.
- Scroll down and tap on “Messages”.
- Toggle the switch next to “iMessage” to turn it on. The switch will turn green when enabled.
- If prompted, sign in with your Apple ID and password.
- Once signed in, you can choose to enable “Send Read Receipts” and “Send as SMS” options.
- Under the “You Can Be Reached by iMessage At” section, make sure your Apple ID email address or phone number is selected.
- If your email address or phone number isn’t listed, tap on “Add Email” or “Add Phone Number” to add it.
- Tap on “Back” to go back to the previous screen.
- In the “Message History” section, choose to keep messages for either 30 days or 1 year.
- Close the “Settings” app.
Your iMessage is now enabled on your device. You can start sending and receiving iMessages with other Apple users.
Send and Receive iMessages
iMessage is not only a platform for sending and receiving text messages, but it also enables you to send various types of multimedia content to other Apple device users. Here’s how you can send and receive iMessages:
- Open the Messages app on your device.
- Tap on the compose button, usually represented by a pencil icon.
- Type the name or number of the contact you want to send an iMessage to in the “To” field. You can also tap on the “+” button to select a contact from your address book.
- Type your message in the message field.
- If you want to add any multimedia content, tap on the “+” button to access the media options. You can choose to attach photos, videos, GIFs, audio messages, or share your location.
- After composing your message and adding any desired multimedia content, tap on the send button (usually represented by a paper airplane icon) to send the iMessage.
To receive an iMessage, simply wait for someone to send you a message via iMessage. When a new message arrives, you will receive a notification on your device. The message will appear in the Messages app, and you can tap on it to read and respond to it.
Note that iMessages are sent over the internet instead of using your cellular network’s text messaging service. This means that you can send and receive iMessages without incurring any additional charges, as long as you have a Wi-Fi or cellular data connection.
Additionally, iMessages are identified by a blue bubble in the Messages app, while regular SMS text messages are identified by a green bubble. This helps differentiate between iMessages and regular text messages.
Troubleshooting Steps
If you encounter any issues while trying to activate iMessage on your device, try the following troubleshooting steps:
- Check your internet connection: Ensure that your device is connected to a stable internet connection, either through Wi-Fi or cellular data.
- Restart your device: Sometimes a simple restart can resolve common issues. Turn off your device, wait a few seconds, and then turn it back on.
- Update your device: Make sure that your device is running the latest version of iOS or macOS. Go to Settings, then General, and select Software Update to check for any available updates.
- Enable iMessage: Go to Settings, then Messages, and toggle the iMessage switch to ON. If it is already enabled, try disabling it and then enabling it again.
- Verify your Apple ID: Ensure that you are using the correct Apple ID associated with your device. Go to Settings, then Messages, and tap Send & Receive. Select your Apple ID and make sure it is signed in correctly.
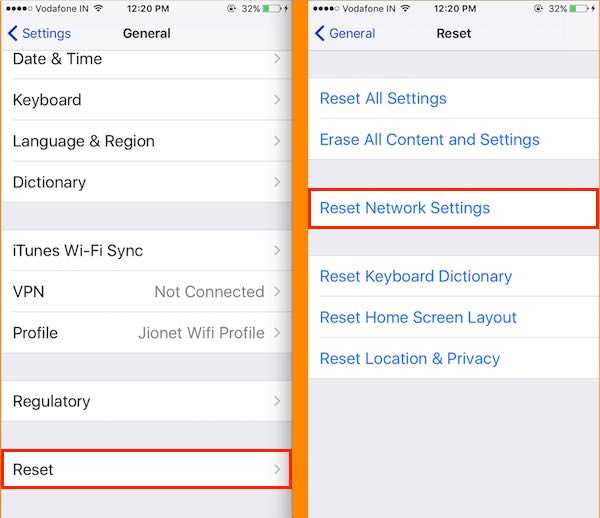
- Reset network settings: If iMessage is still not working, you can try resetting your network settings. Go to Settings, then General, then Reset, and select Reset Network Settings. Note that this will remove all saved Wi-Fi passwords.
- Contact Apple Support: If none of the above steps resolve the issue, you may need to reach out to Apple Support for further assistance. They can help troubleshoot the problem and provide additional guidance.
By following these troubleshooting steps, you should be able to activate iMessage on your device successfully. Enjoy using iMessage to securely communicate with your friends and family!
FAQ:
What is iMessage and why is it useful?
iMessage is a messaging service developed by Apple that allows users to send text messages, photos, videos, and more to other Apple device users. It is useful because it provides a seamless and convenient way to communicate with other Apple users, especially for those who have limited cellular data plans.
How do I activate iMessage on my iPhone?
To activate iMessage on your iPhone, go to the Settings app and tap on “Messages”. Then, toggle the iMessage switch to the “On” position. You will also need to ensure that your device is connected to the internet, either through Wi-Fi or cellular data. Once activated, iMessage will automatically configure and register your phone number or Apple ID for use with the service.
What if I encounter issues activating iMessage?
If you encounter issues activating iMessage, there are several troubleshooting steps you can try. First, ensure that you have a stable internet connection. If the issue persists, sign out of your Apple ID in the Messages settings and sign back in. You can also try restarting your iPhone or updating to the latest version of iOS. If none of these steps work, you may need to contact Apple Support for further assistance.
Can I use iMessage on my iPad or Mac?
Yes, you can use iMessage on your iPad and Mac as long as they are running iOS or macOS respectively. The activation process is similar to that of the iPhone. Simply go to the Settings app on your iPad or the Messages app on your Mac and toggle the iMessage switch to the “On” position. You will then be able to send and receive iMessages from your iPad or Mac using your Apple ID or phone number.