
If you’re a digital artist who’s made the switch from Photoshop to Procreate, you may be wondering how to transfer or convert your beloved Photoshop brushes into Procreate brushes. Luckily, the process is relatively simple and can be done in just a few steps. In this step-by-step guide, we’ll walk you through the process of converting your Photoshop brushes into Procreate brushes, so you can continue to create stunning artwork on your new favorite platform.
Step 1: Export Your Photoshop Brushes
The first step in converting your Photoshop brushes into Procreate brushes is to export them from Photoshop. To do this, open Photoshop and navigate to the “Brushes” panel. Once there, select the brushes you want to export by clicking and dragging over them. Then, right-click on one of the selected brushes and choose “Export Selected Brushes” from the drop-down menu. Save the brushes to a location on your computer.
Step 2: Convert the Brushes to Procreate Format
Now that you have your Photoshop brushes exported, it’s time to convert them into a format that Procreate can recognize. To do this, you’ll need to use a conversion tool such as the Procreate Brush Converter available online. Simply upload your exported Photoshop brushes to the converter tool and choose the Procreate format as the output. Once the conversion is complete, you’ll be able to download the brushes in Procreate format.
Step 3: Import the Procreate Brushes
With your converted Procreate brushes ready, it’s time to import them into Procreate. Open Procreate on your device and create a new canvas. Then, select the “Brushes” panel and tap the “+” symbol at the top right corner. Choose “Import” from the options and locate the Procreate brushes that you downloaded from the converter tool. Once you’ve selected the brushes, Procreate will automatically import them and they’ll be ready to use.
Step 4: Customize and Fine-Tune
Once your converted brushes are imported into Procreate, you may want to customize and fine-tune them to suit your artistic style. Procreate offers a wide range of brush settings that allow you to adjust things like brush size, opacity, and texture. Feel free to experiment with these settings to achieve the desired effect.
Conclusion:
Converting Photoshop brushes into Procreate brushes is a simple process that allows digital artists to seamlessly transition between the two platforms. By following these step-by-step instructions, you’ll be able to continue using your favorite Photoshop brushes in Procreate and create amazing artwork on the go.
Step 1: Exporting Photoshop Brushes
To convert Photoshop brushes into Procreate, you first need to export the brushes from Photoshop in a compatible format. Here’s how you can do it:
- Open Photoshop: Launch Adobe Photoshop on your computer.
- Select the Brush Tool: Click on the Brush Tool icon in the toolbar or press “B” on your keyboard to activate the Brush Tool.
- Choose the Brush Set: In the brush preset picker, select the brush set that you want to export.
- Open the Brush Preset Manager: Go to the top menu and navigate to “Edit” > “Preset Manager” to open the Brush Preset Manager window.
- Select the Brushes: In the Brush Preset Manager window, hold down the Shift key and click on the brushes you want to export to select multiple brushes at once.
- Save the Brushes: Once you have selected the brushes, click on the “Save Set” button to save the brushes as a .ABR file.
- Choose the Save Location: Choose a location on your computer where you want to save the .ABR file, and then click on the “Save” button.
By following these steps, you will successfully export your Photoshop brushes in a compatible format that can be imported into Procreate in the next steps.
Step 2: Organizing the Brushes
After you have successfully downloaded and imported the Photoshop brushes into Procreate, it’s time to organize them for easy access. Follow the steps below to efficiently manage your brushes:
- Create Brush Sets: Start by creating different brush sets based on the category or type of brushes. For example, you can have a set for watercolor brushes, another for texture brushes, and so on. This will help you quickly locate the brushes you need when working on different projects.
- Rename Brushes: To make it easier to identify each brush within a set, consider renaming them to more descriptive names. This can be especially helpful when you have similar brushes with different settings or variations.
- Organize Brush Sets: Arrange your brush sets in a logical order that makes sense to you. You can alphabetize them, group them by style, or any other system that works best for your workflow. The goal is to have a well-structured and easy-to-navigate library of brushes.
- Remove Unused Brushes: Over time, you may accumulate a large number of brushes that you don’t often use. It’s a good practice to periodically review your brush library and remove any brushes that you no longer need. This will help keep your brush library clutter-free and more manageable.
- Create Favorites: To quickly access your most frequently used brushes, consider creating a separate section or set for your favorites. This way, you don’t have to scroll through your entire library every time you need a specific brush.
- Backup Your Brushes: Finally, don’t forget to regularly backup your brush library. This will prevent any potential loss of brushes in case of a device failure or accidental deletion. You can easily backup your brushes by exporting them to a separate folder or cloud storage service.
By following these steps to organize your brushes in Procreate, you’ll spend less time searching for the right brush and more time creating amazing artwork!
Step 3: Importing Brushes into Procreate
To import your converted Photoshop brushes into Procreate, follow these simple steps:
- Make sure you have your converted Photoshop brush files ready in a folder on your device.
- Open the Procreate app on your iPad or iPhone.
- Create a new canvas or open an existing one where you want to import the brushes.
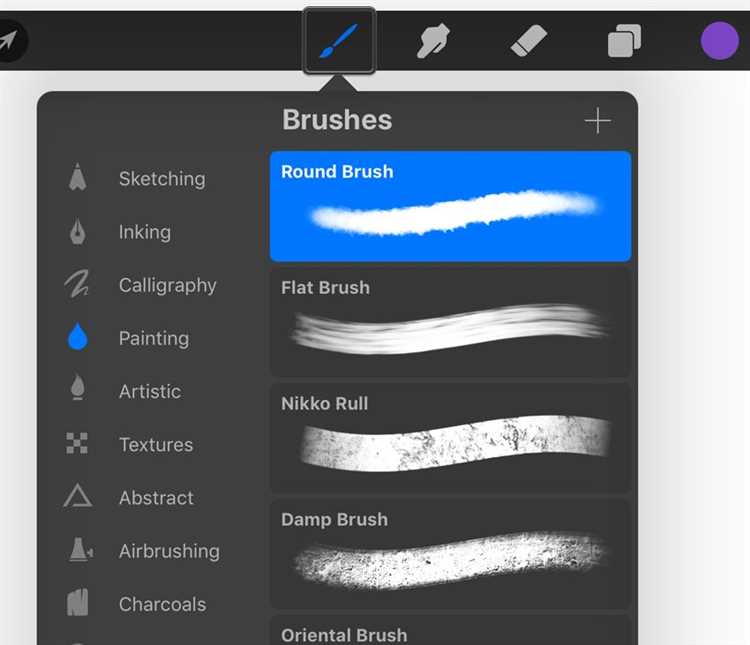
- Tap on the “+” icon in the top-right corner of the screen to open the Brush Library.
- In the Brush Library, tap on the “+” button at the top-right corner to add a new brush set.
- Name your new brush set and tap on “OK” to create it.
- Your new brush set will now appear in the Brush Library.
- Tap on the brush set to open it.
- In the brush set, tap on the “+” icon at the top-right corner to add a new brush.
- A pop-up menu will appear with brush options. Tap on “Import” at the bottom.
- Navigate to the folder where you saved your converted Photoshop brushes.
- Select the brushes you want to import by tapping on them.
- Tap on “Done” to import the selected brushes into Procreate.
Once imported, your Photoshop brushes will be available in the brush set you created. You can now use them in your Procreate artwork by selecting them from the Brush Library.
Step 4: Adjusting Brush Settings
Once you have imported your Photoshop brushes into Procreate, you may need to adjust some of the brush settings to optimize them for use in Procreate. This step will help ensure that your brushes work seamlessly with Procreate’s brush engine.
Here are the steps to adjust brush settings in Procreate:
- Select the brush: Tap on the brush icon in the top toolbar to open the brush library. Choose the brush you want to adjust.
- Access the brush settings: Once you have selected the brush, tap on the “Brush” tab at the top of the screen. This will open the brush settings panel.
- Adjust the size and opacity: In the brush settings panel, you can adjust the size and opacity of the brush by sliding the corresponding sliders. This will allow you to control the thickness and transparency of the brush strokes.
- Experiment with other settings: Procreate offers a wide range of settings that you can experiment with to achieve different effects. Some of the key settings include brush shape, spacing, scattering, and dynamics. Play around with these settings to create unique brush effects.
- Save your custom brush: If you have made changes to the brush settings and want to save it as a custom brush, tap on the “Brush” tab at the top of the screen again. Then, tap on the “+” icon in the upper right corner to create a new brush preset. Give your brush a name and tap “Done” to save it.
By adjusting the brush settings, you can tailor the brushes to your specific requirements and create custom brushes that suit your artistic style. Take some time to experiment with the settings and discover new possibilities for your artwork in Procreate.
Step 5: Testing the Brushes
Now that you have successfully converted the Photoshop brushes into Procreate format, it’s time to test them out. Follow these steps to ensure that the brushes work as intended:
- Open Procreate: Launch the Procreate app on your device.
- Create a new canvas: Tap on the “+” button to create a new canvas.
- Select the brush tool: Tap on the brush tool icon located at the top of the screen.
- Access the imported brushes: Scroll through the brush library until you find the imported brushes category. Tap on it to access the brushes you converted.
- Choose a brush: Select one of the converted brushes by tapping on it.
- Start drawing: Test out the brush by drawing on the canvas. Experiment with different brush sizes, opacities, and pressure sensitivity to see how the brush performs.
- Customize the brush settings: If desired, you can further customize the brush settings by adjusting parameters such as shape, spacing, scatter, and more. This will allow you to fine-tune the brush to your preferences.
- Repeat for other brushes: Repeat steps 4 to 7 for each brush you converted to ensure they all work correctly.
By following these steps, you can ensure that the Photoshop brushes have been successfully converted into Procreate format and are ready to use in your digital artwork. Enjoy exploring the new brushes and incorporating them into your creative process!
Step 6: Saving Custom Brush Sets
Once you have converted Photoshop brushes into Procreate and customized them to your liking, it’s important to save them as a custom brush set for easy access in the future. Here’s how:
- Open the “Brush Library” panel in Procreate by tapping the brush icon on the toolbar.
- Tap on the “+” icon in the top right corner to create a new brush set.
- Enter a name for your brush set and tap “Create”.
- Your new brush set will appear in the Brush Library panel.
- To add the converted Photoshop brushes to your custom set, tap and hold on a brush in the current set until the options menu appears.
- Select “Share” from the options menu.
- Choose “Add to Brush Set” from the sharing options.
- Select your custom brush set from the list.
- The converted brush will be added to your custom set.
- Repeat steps 5-9 for each converted brush you want to add to your custom set.
By saving your converted Photoshop brushes as a custom brush set, you can easily access them in the future without having to go through the conversion process again. This is especially useful if you frequently use these brushes in your Procreate artwork.
Tips and Tricks for Using Procreate Brushes
When it comes to using Procreate brushes, there are a few tips and tricks that can help you make the most out of your digital art creation. Whether you’re a beginner or an experienced artist, these tips will help you enhance your workflow and create stunning artwork:
- Experiment with Different Brushes: Procreate offers a wide range of brushes, each with its own unique characteristics. Take the time to explore and experiment with different brushes to find the ones that suit your style and desired effects.
- Customize Brush Settings: Procreate allows you to customize brush settings, such as size, opacity, and flow. Don’t be afraid to tweak these settings to achieve the desired look and feel for your artwork.
- Utilize Layering: Procreate supports layering, which allows you to work in a non-destructive manner. Use layers to separate different elements of your artwork and make adjustments without affecting the rest of your composition.
- Use Blending Modes: Experiment with different blending modes to create interesting and unique effects. Blending modes can help you achieve various lighting and texture effects in your artwork.
- Explore Procreate’s Brush Library: Procreate comes with a built-in brush library that offers a wide range of pre-made brushes. Take the time to explore these brushes and see how they can enhance your artwork.
- Create Custom Brushes: In addition to the pre-made brushes, Procreate allows you to create your own custom brushes. Use this feature to tailor brushes to your specific needs and style.
- Organize Your Brushes: As your brush collection grows, it’s essential to stay organized. Use Procreate’s brush sets and organization features to keep your brushes easily accessible and categorized.
- Learn from Others: Procreate has a vibrant community of artists who share their tips, techniques, and brush sets. Take advantage of this community by following tutorials and learning from other artists.
- Experiment with Brush Opacity and Flow: Varying the opacity and flow settings of your brushes can help you achieve different levels of transparency and texture in your artwork. Play around with these settings to achieve the desired effects.
- Save Favorites for Quick Access: If you have a set of brushes that you frequently use, save them as favorites for quick access. This will save you time and help streamline your workflow.
By implementing these tips and tricks, you’ll be able to take full advantage of Procreate’s powerful brush system and create stunning digital artwork. Don’t be afraid to experiment and find your own unique style!
FAQ:
Can I convert Photoshop brushes into Procreate?
Yes, you can convert Photoshop brushes into Procreate. It requires a few steps, but it is possible.
What is Procreate?
Procreate is a popular digital painting app for iPad that allows artists to create professional illustrations, paintings, and designs.
Why would I want to convert Photoshop brushes into Procreate?
Converting Photoshop brushes into Procreate allows you to use your favorite brushes in the Procreate app, expanding your range of creative options.
How do I convert Photoshop brushes into Procreate?
To convert Photoshop brushes into Procreate, you need to export the brushes from Photoshop as ABR files, convert them into PNG or JPG files using a brush converter, and then import them into Procreate.
Do I need a specific brush converter to convert Photoshop brushes into Procreate?
Yes, you will need a brush converter that supports the conversion of Photoshop brushes into Procreate-compatible files, such as the Brush Converter app or the Brush Pilot software.
Are there any limitations or differences when using converted Photoshop brushes in Procreate?
While most Photoshop brushes can be converted and used in Procreate, some brushes may not work perfectly due to differences in the brush engines between the two applications. It’s a good idea to test the converted brushes and make any necessary adjustments.
Is it possible to convert Procreate brushes into Photoshop?
No, it is not currently possible to convert Procreate brushes into Photoshop brushes. The two apps use different brush engines and file formats, so the conversion is not straightforward.